Introduction
Welcome to the Maker Space wiki!
Here you will find (hopefully) all the information you could possibly want to know about our hackspace, how it works, what facilities we have and how to use them.
In progress
This wiki is still being populated. For now you may still need to head to the old wiki for some information.
The Space
Maker Space is split into four main locations/sections:
- Ground floor corridor
- Ground floor workshop
- South/tall/big basement workshop
- North/short/small basement workshop
Prepare yourself for a Microsoft Copilot guided tour through our space.
Pretty much all of the text in the above pages was generated by asking Copilot to "in the style of an estate agent, describe [very brief description of what is in the accompanying photo] in a hackspace". The relevant, mostly correct, appropriate, amusing, (and if you are really lucky) actually helpful parts of the response were then selected and made into a mostly cohesive bit of prose.
Ground Floor Corridor
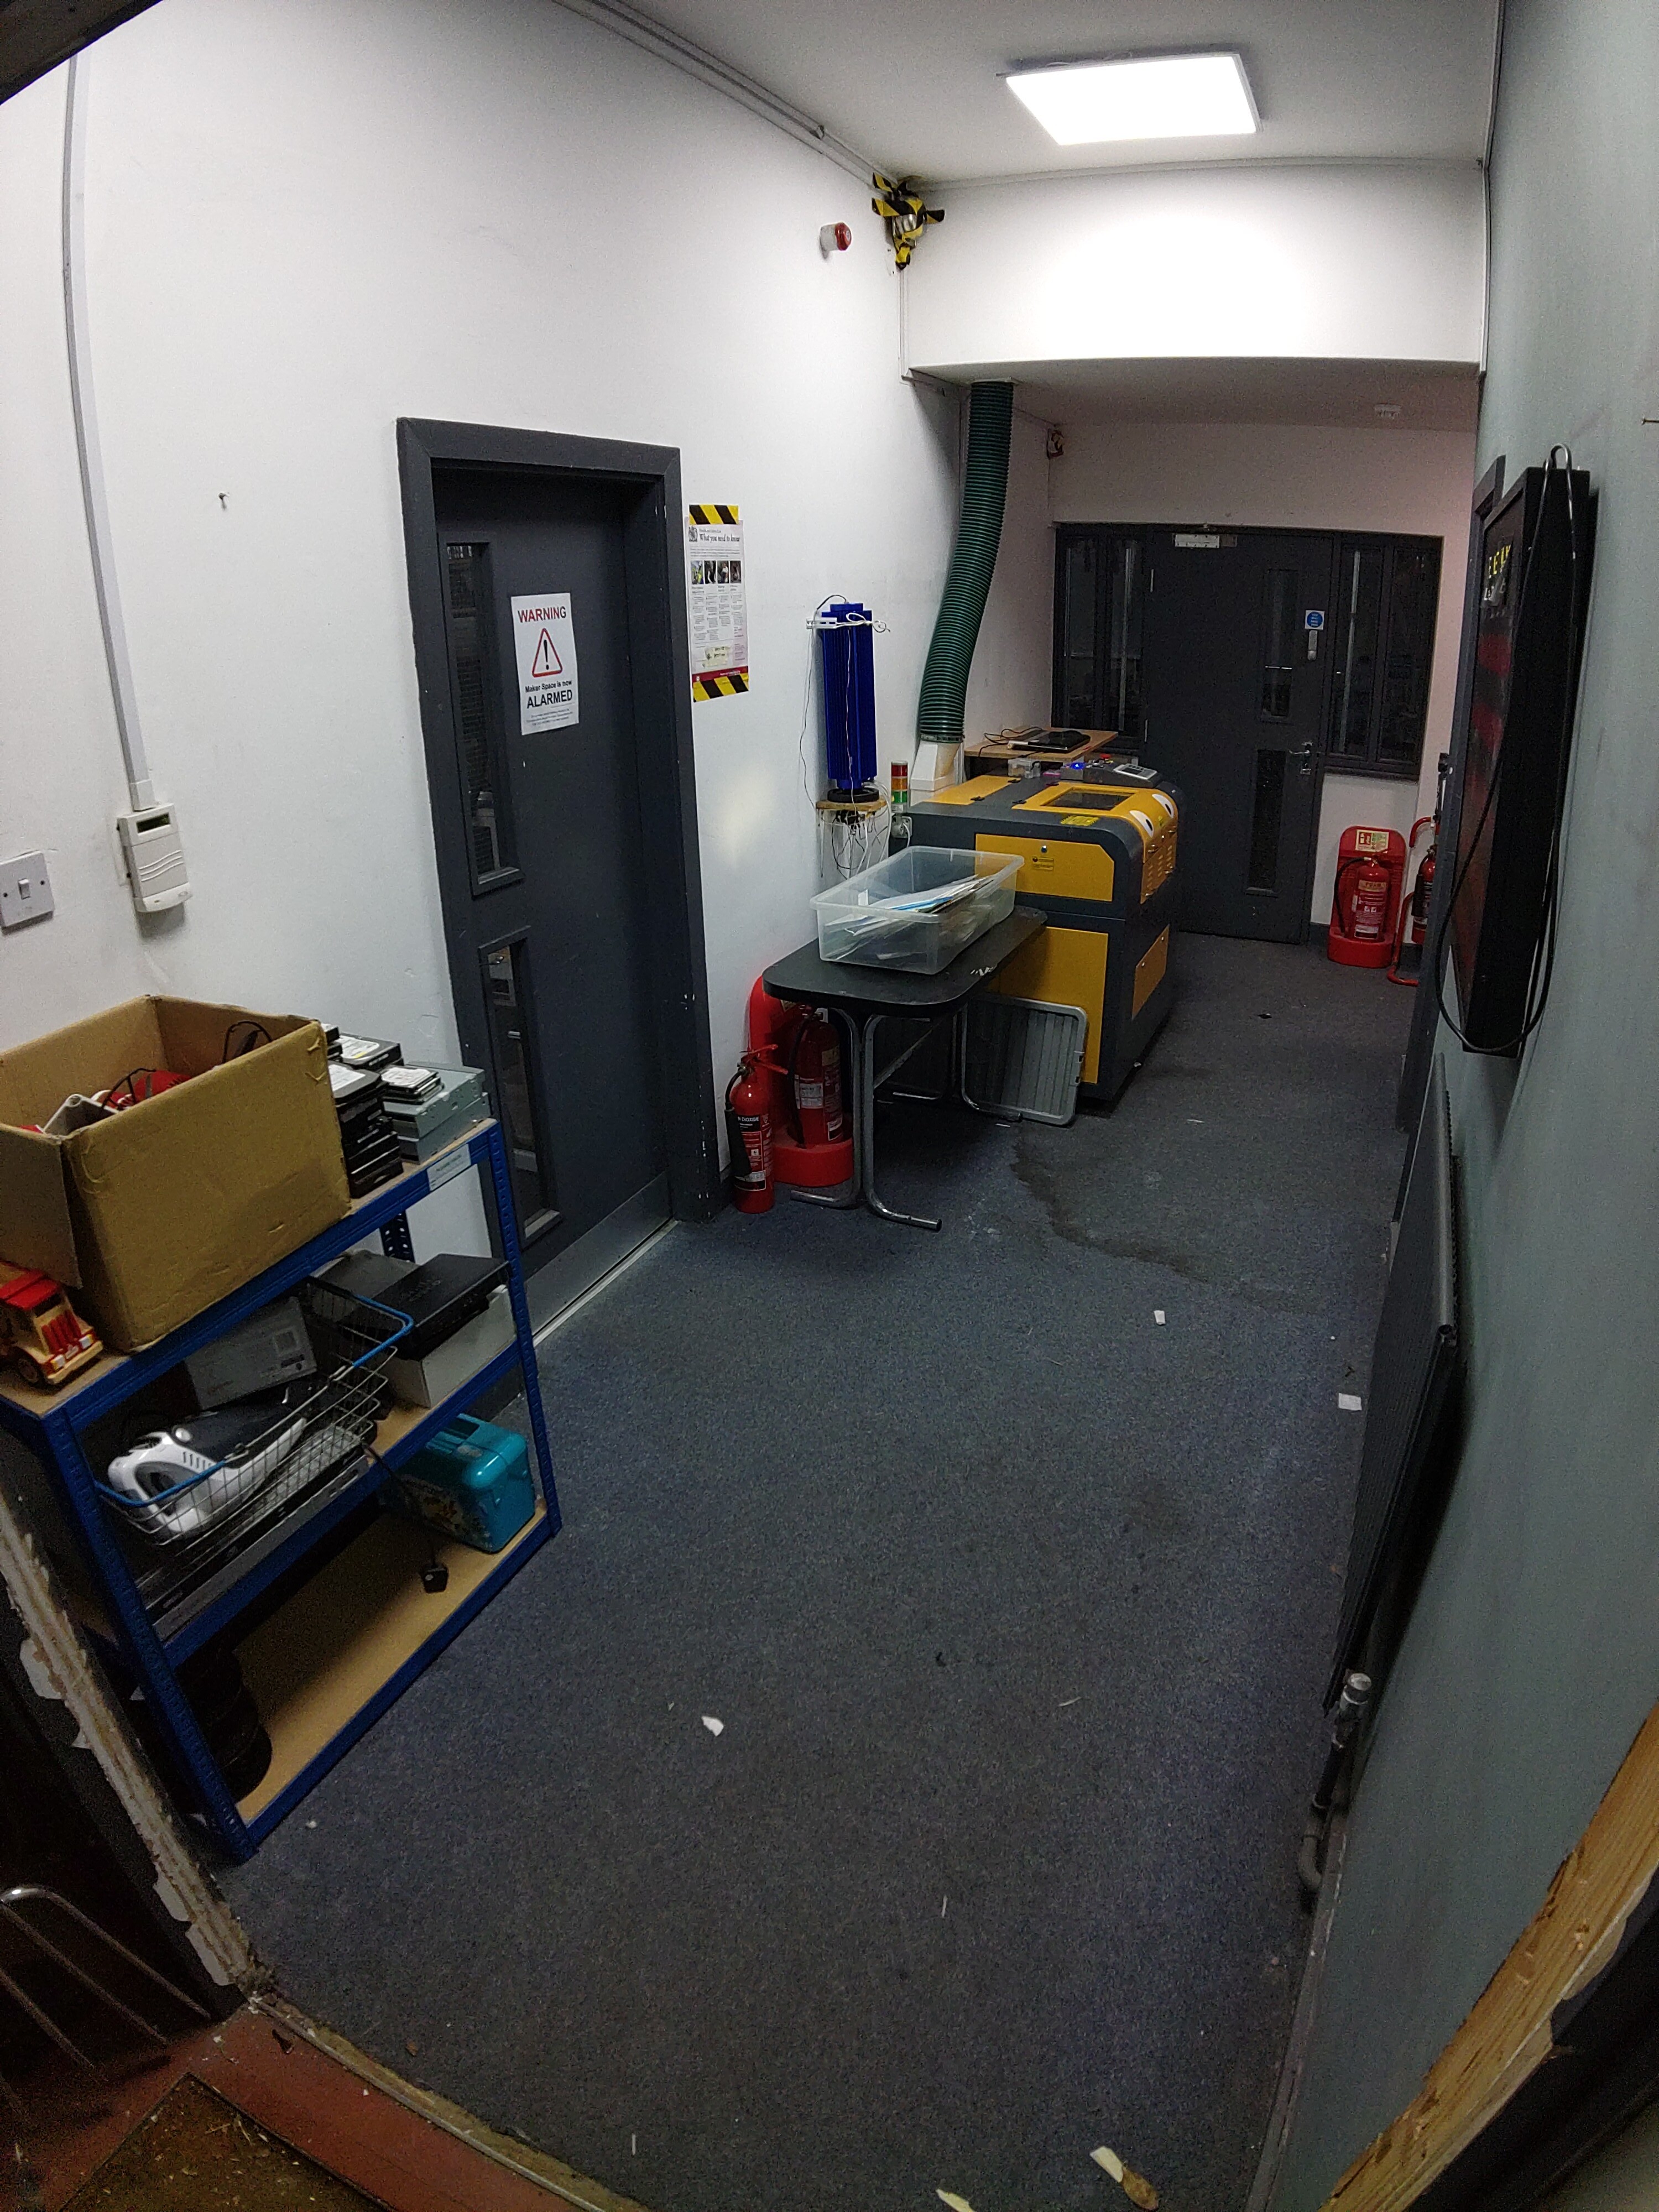
As you step into this industrial haven, the corridor unfolds before you—a seamless blend of practicality and aesthetics. The heartbeat of this workspace, the corridor stretches like a silent river, connecting different realms within the building. It’s not merely a passageway; it’s a conduit of creativity and collaboration.
At one end of the corridor, behold the pièce de résistance - the laser cutter. Its sleek metallic frame stands like a sentinel, ready to transform raw materials into precision-cut masterpieces. The hum of the extraction adds a symphonic undertone to the corridor’s rhythm.
Ground Floor Workshop
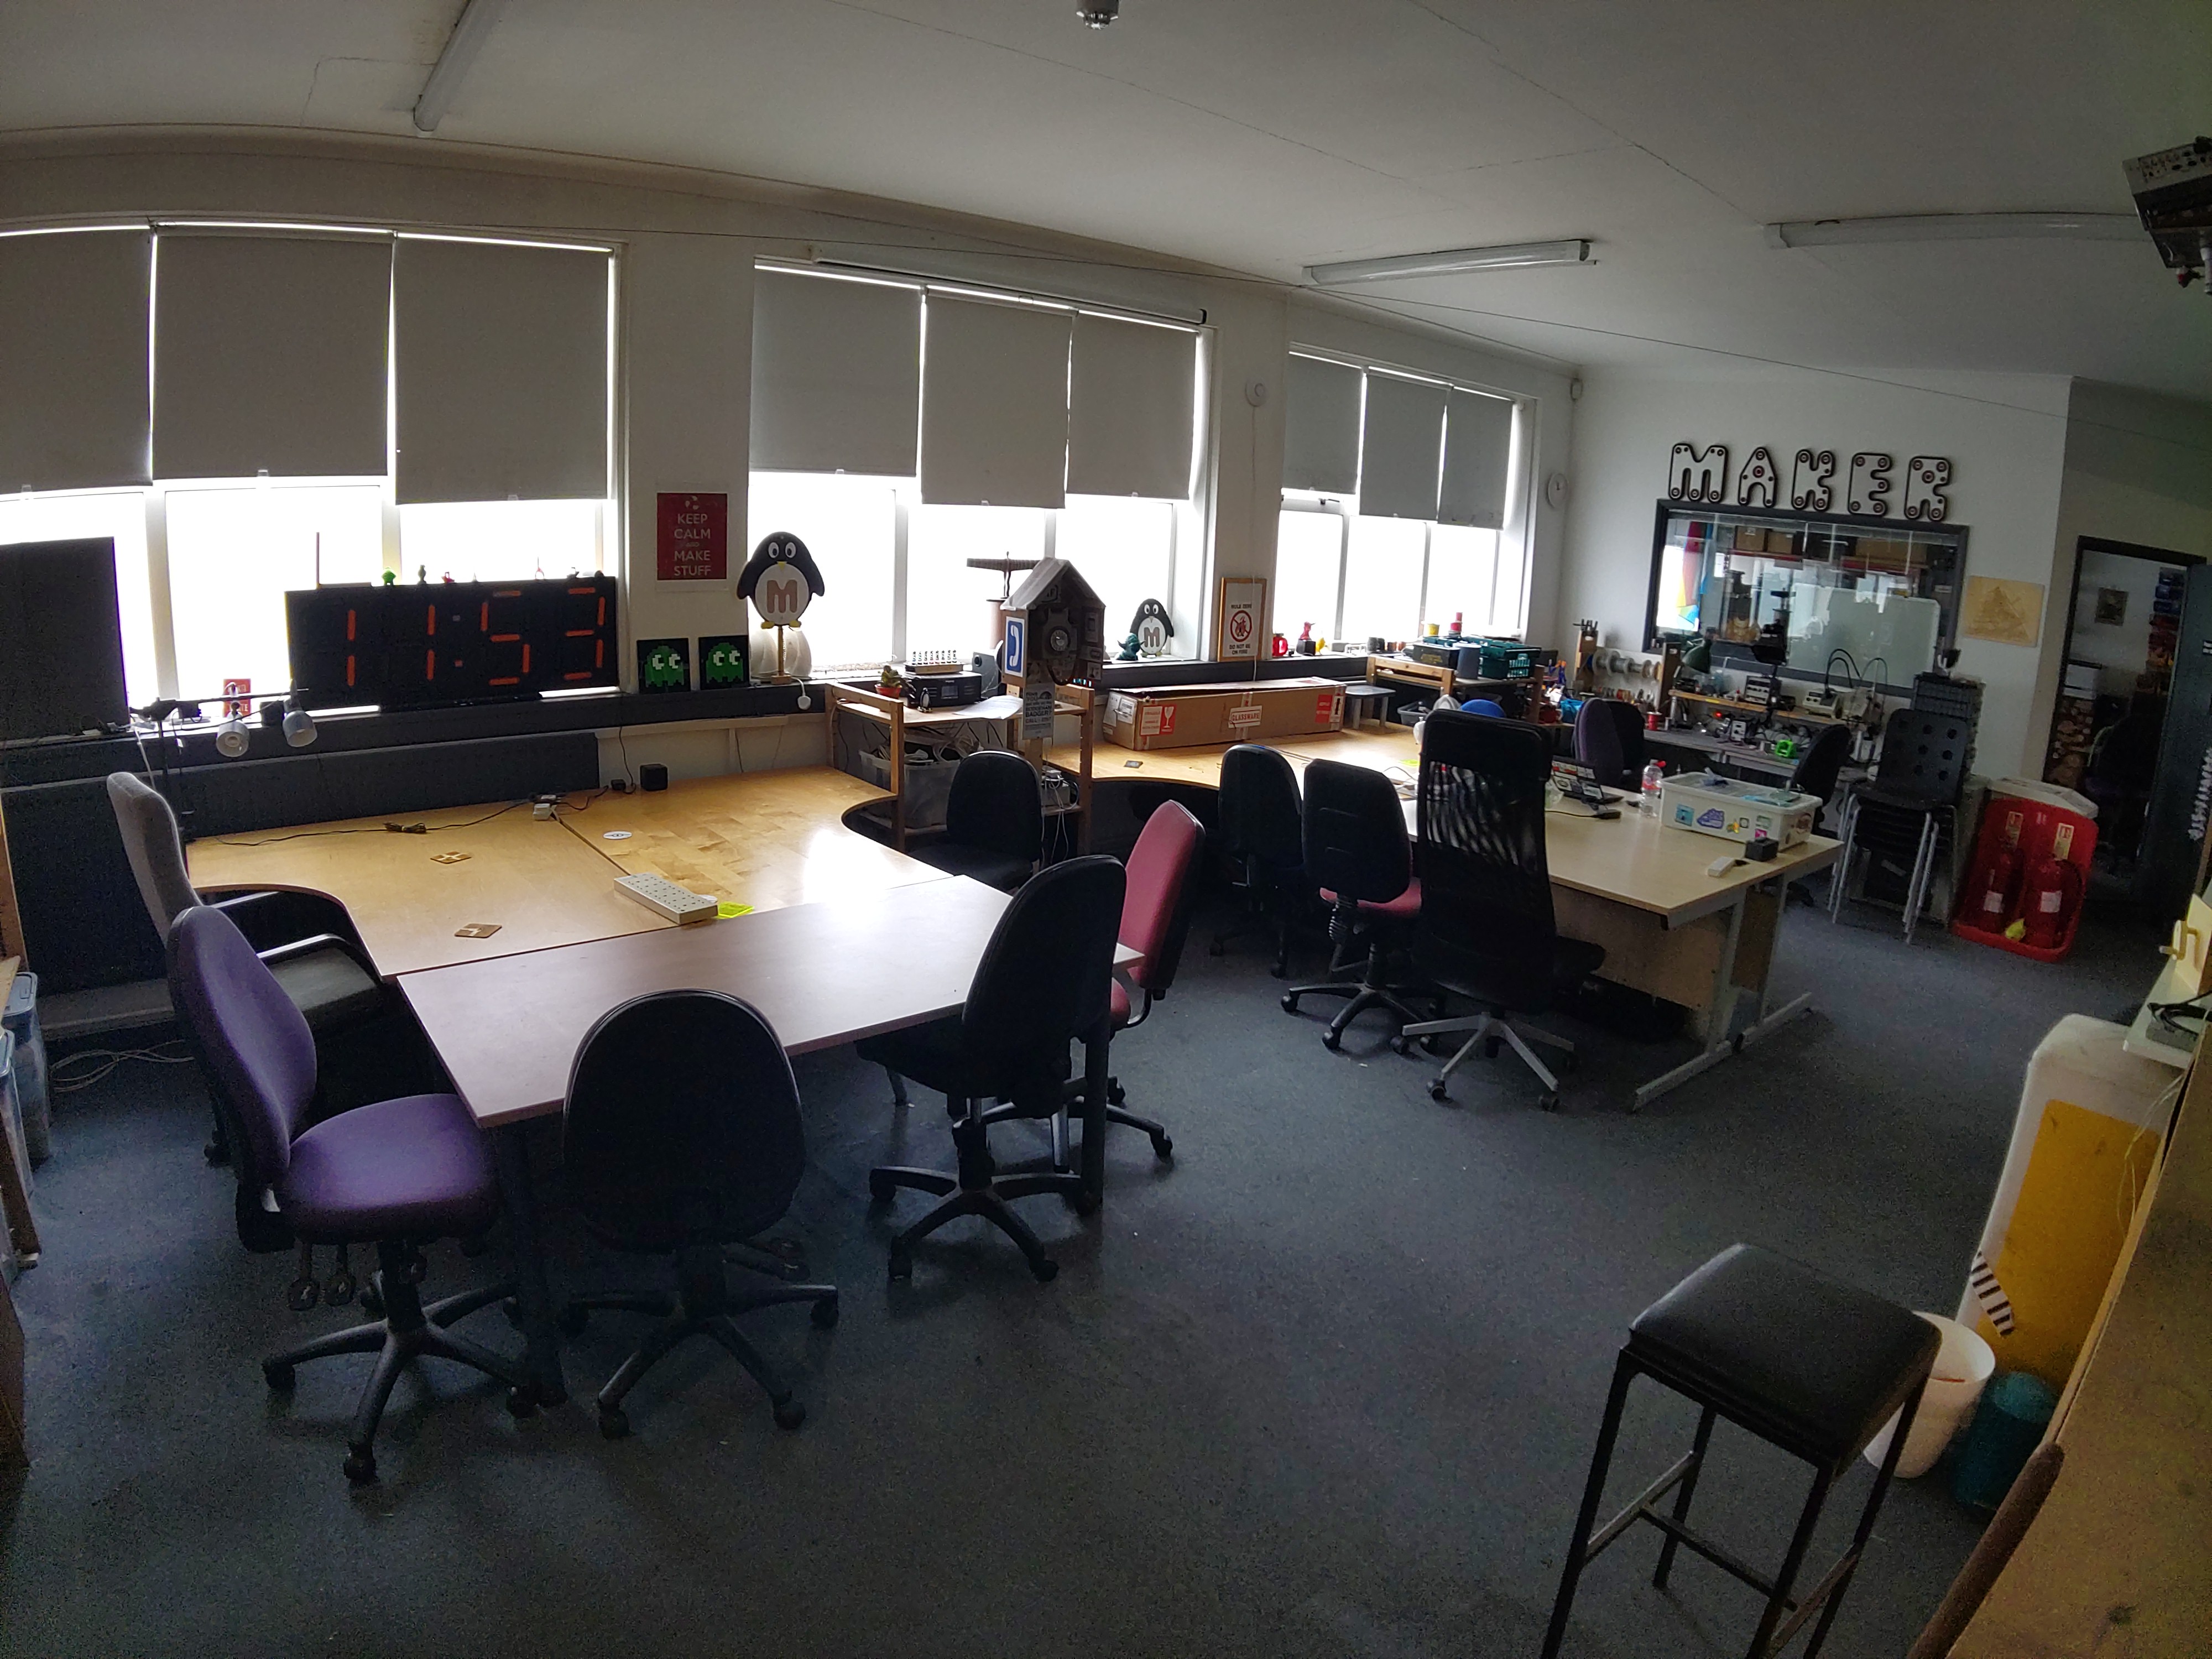
Step into this vibrant hub of innovation, where imagination takes tangible form. Our main workshop is more than just a room - it's a canvas for your wildest ideas.
Picture a symphony of activity. The main workshop sprawls across the floor, partitioned into multiple work areas. Whether you're assembling a PCB or making tote bags, there's a spot for your creative endeavors.
Our electronics workspaces, a place where wires tangle like ivy, components sprawl like fallen leaves, and soldering irons hum like caffeinated bees.
The soldering stations wear battle scars. Burn marks, flux residue, and tangled solder wicks - they tell tales of countless connections forged. The air smells of molten dreams and a hint of desperation.
Dive in, untangle wires, and let sparks fly. Who knows? Your next invention might emerge from this delightful chaos.

In our cosy goldfish bowl you will find several PC workstations - each a digital canvas awaiting your command. These machines hum with potential, their screens reflecting the glow of countless projects.
Currently we have two general purpose machines: one Ubuntu 24.04 and one Windows 10, and one dedicated CAD machine running Windows 10, where 3D models take shape, and blueprints come alive. Whether you're designing a futuristic skyscraper or a whimsical teapot, these stations empower your vision.
Each wall of the room is clad in a labyrinth of industrial shelving. Each shelf cradles a universe of components, parts and tools.
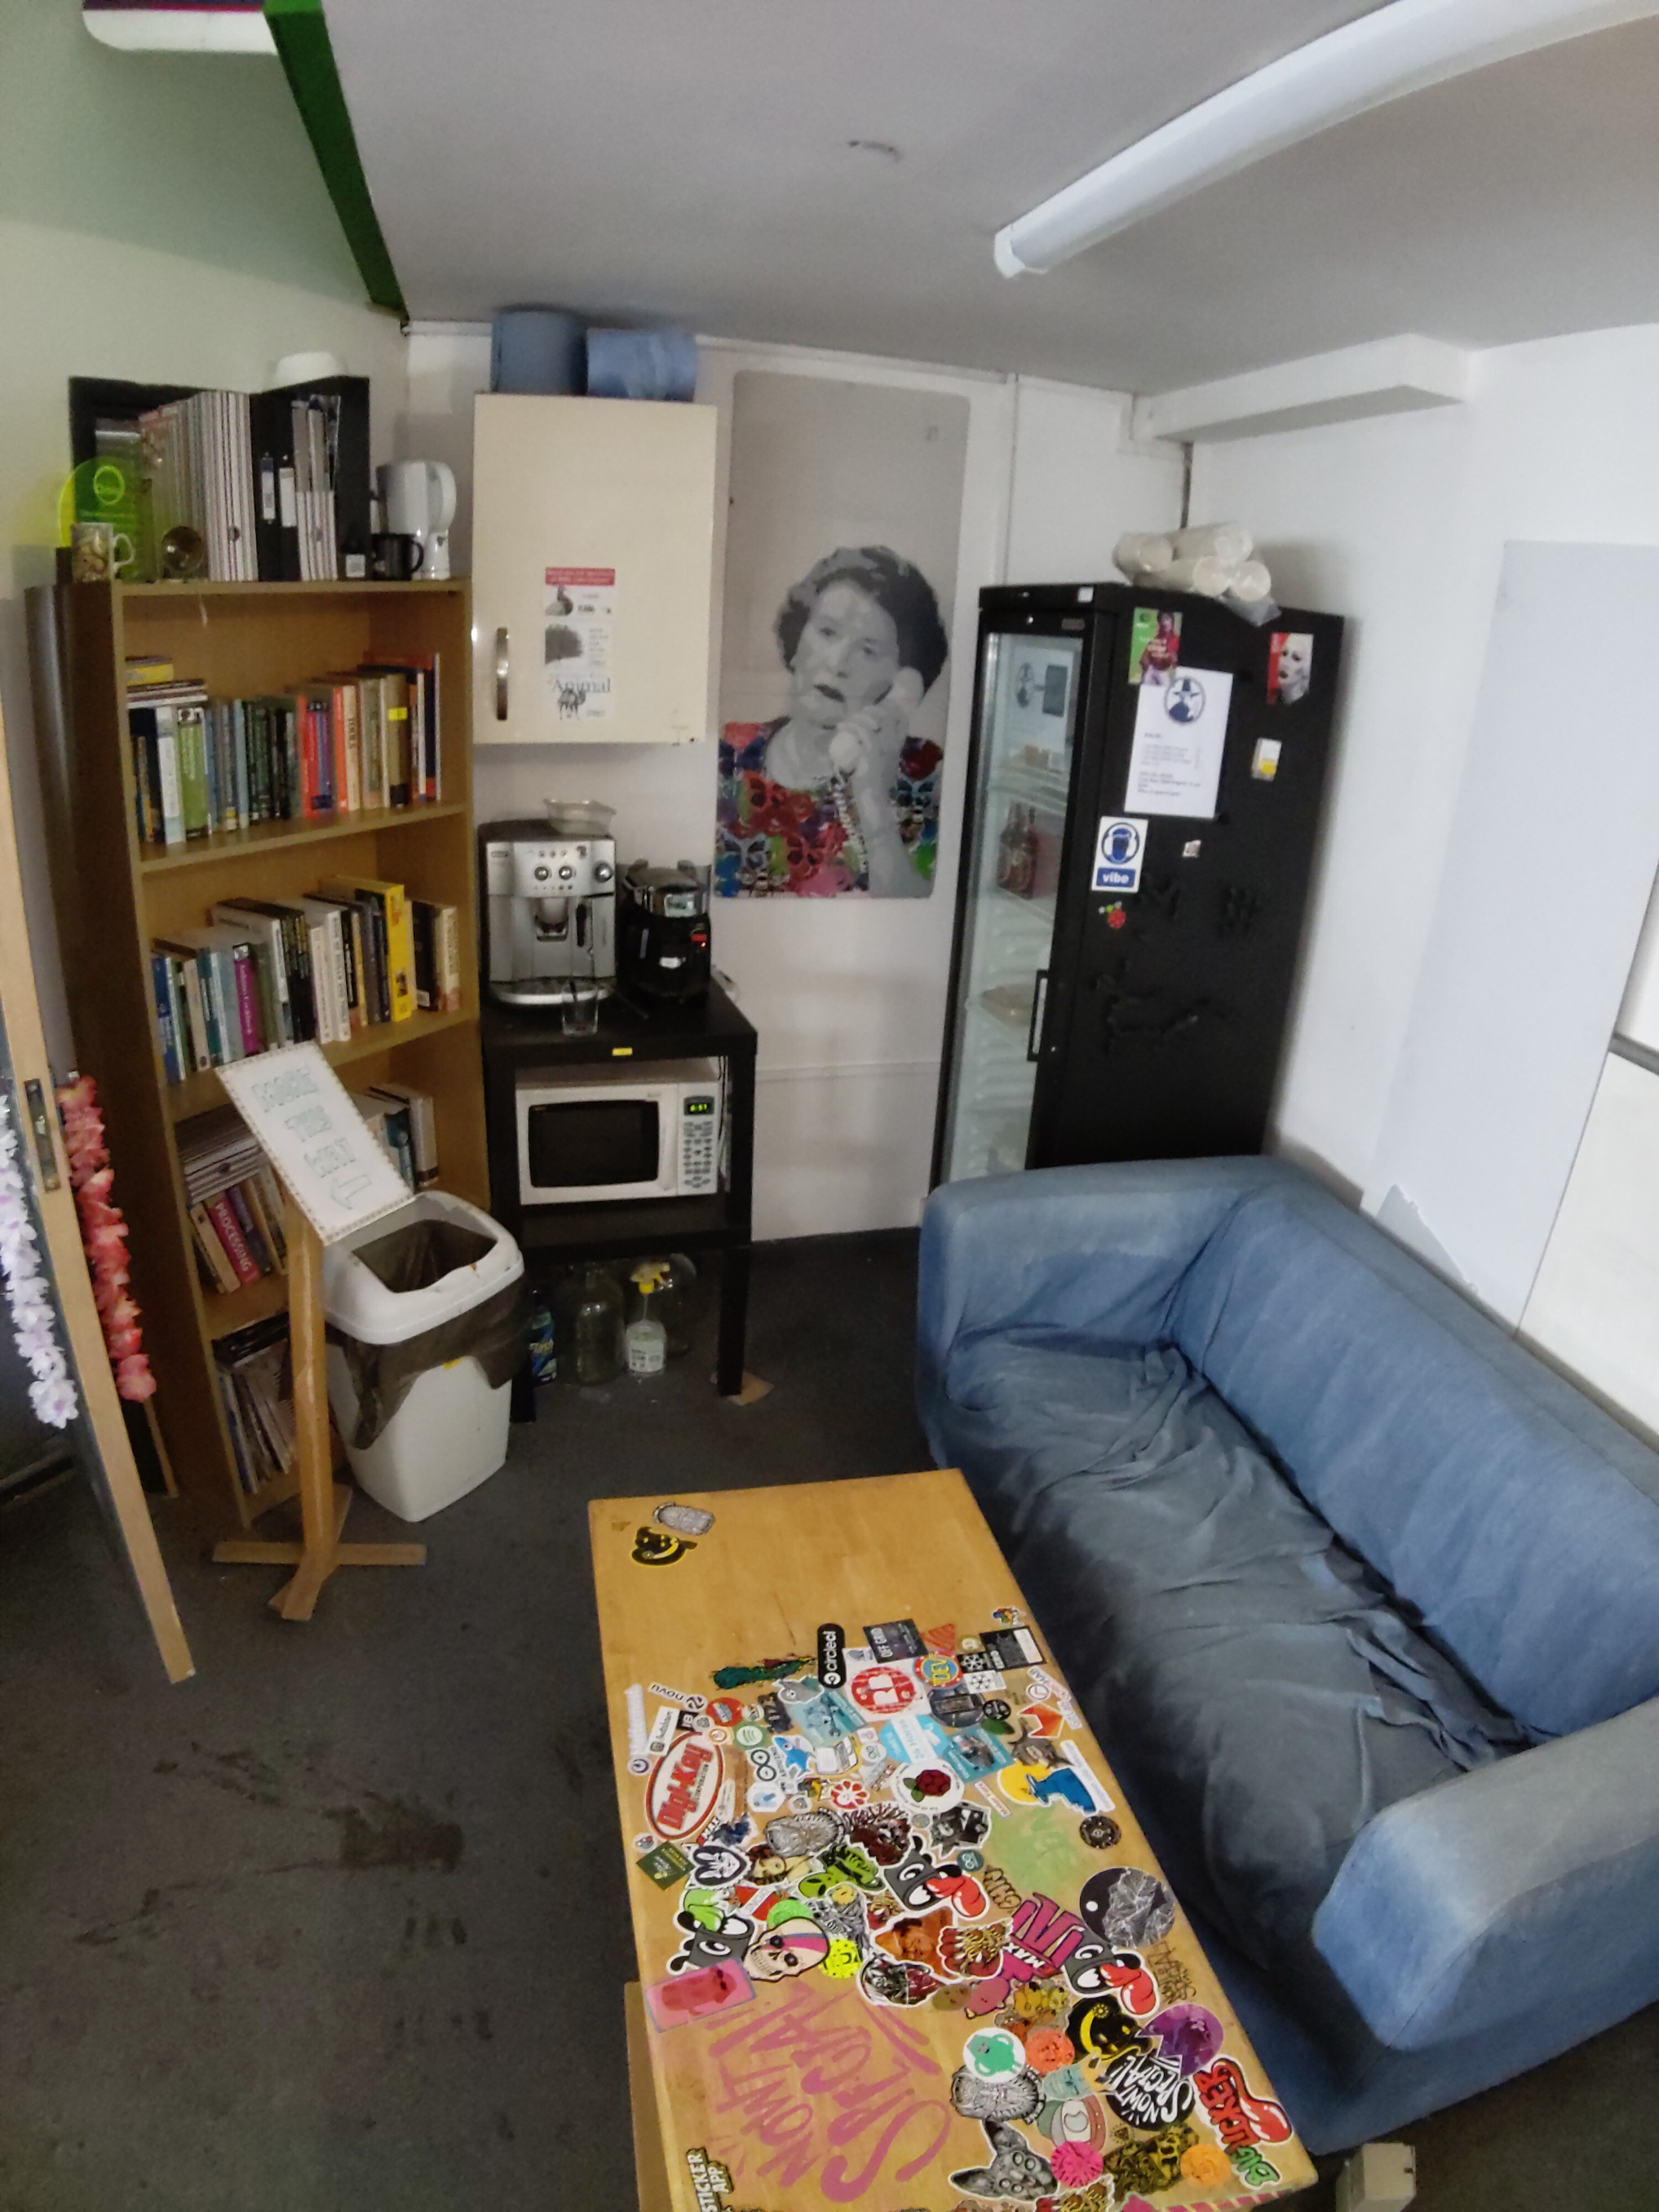
Welcome to the hackspace lounge, a tranquil corner where making takes a breather.
Behold at what some consider the most critical items in the space: our tea and coffee making facilities. The aroma of freshly brewed chai mingles with the robust scent of freshly ground beans. Choose your potion: tea or double-shot espresso? Both enjoyed from the Royal Doulton with the hand-painted periwinkles.
Nestled against the wall, our plush sofa beckons. Sink into its embrace - a refuge for tired hackers and dreamers alike. Whether you're pondering the next steps for your current project or just need a power nap, this sofa cradles your thoughts.
Open the fridge, and you'll find a treasure trove: cold brews, artisanal sodas, and perhaps a rogue slice of leftover pizza. It’s like Narnia, but with more caffeine. But please note some items belong to members or cost money if you'd like to consume them.
The bookcase stands tall, its shelves sagging under the weight of knowledge. Dusty hardcovers, dog-eared paperbacks, and a few mysterious tomes - they’re all here.
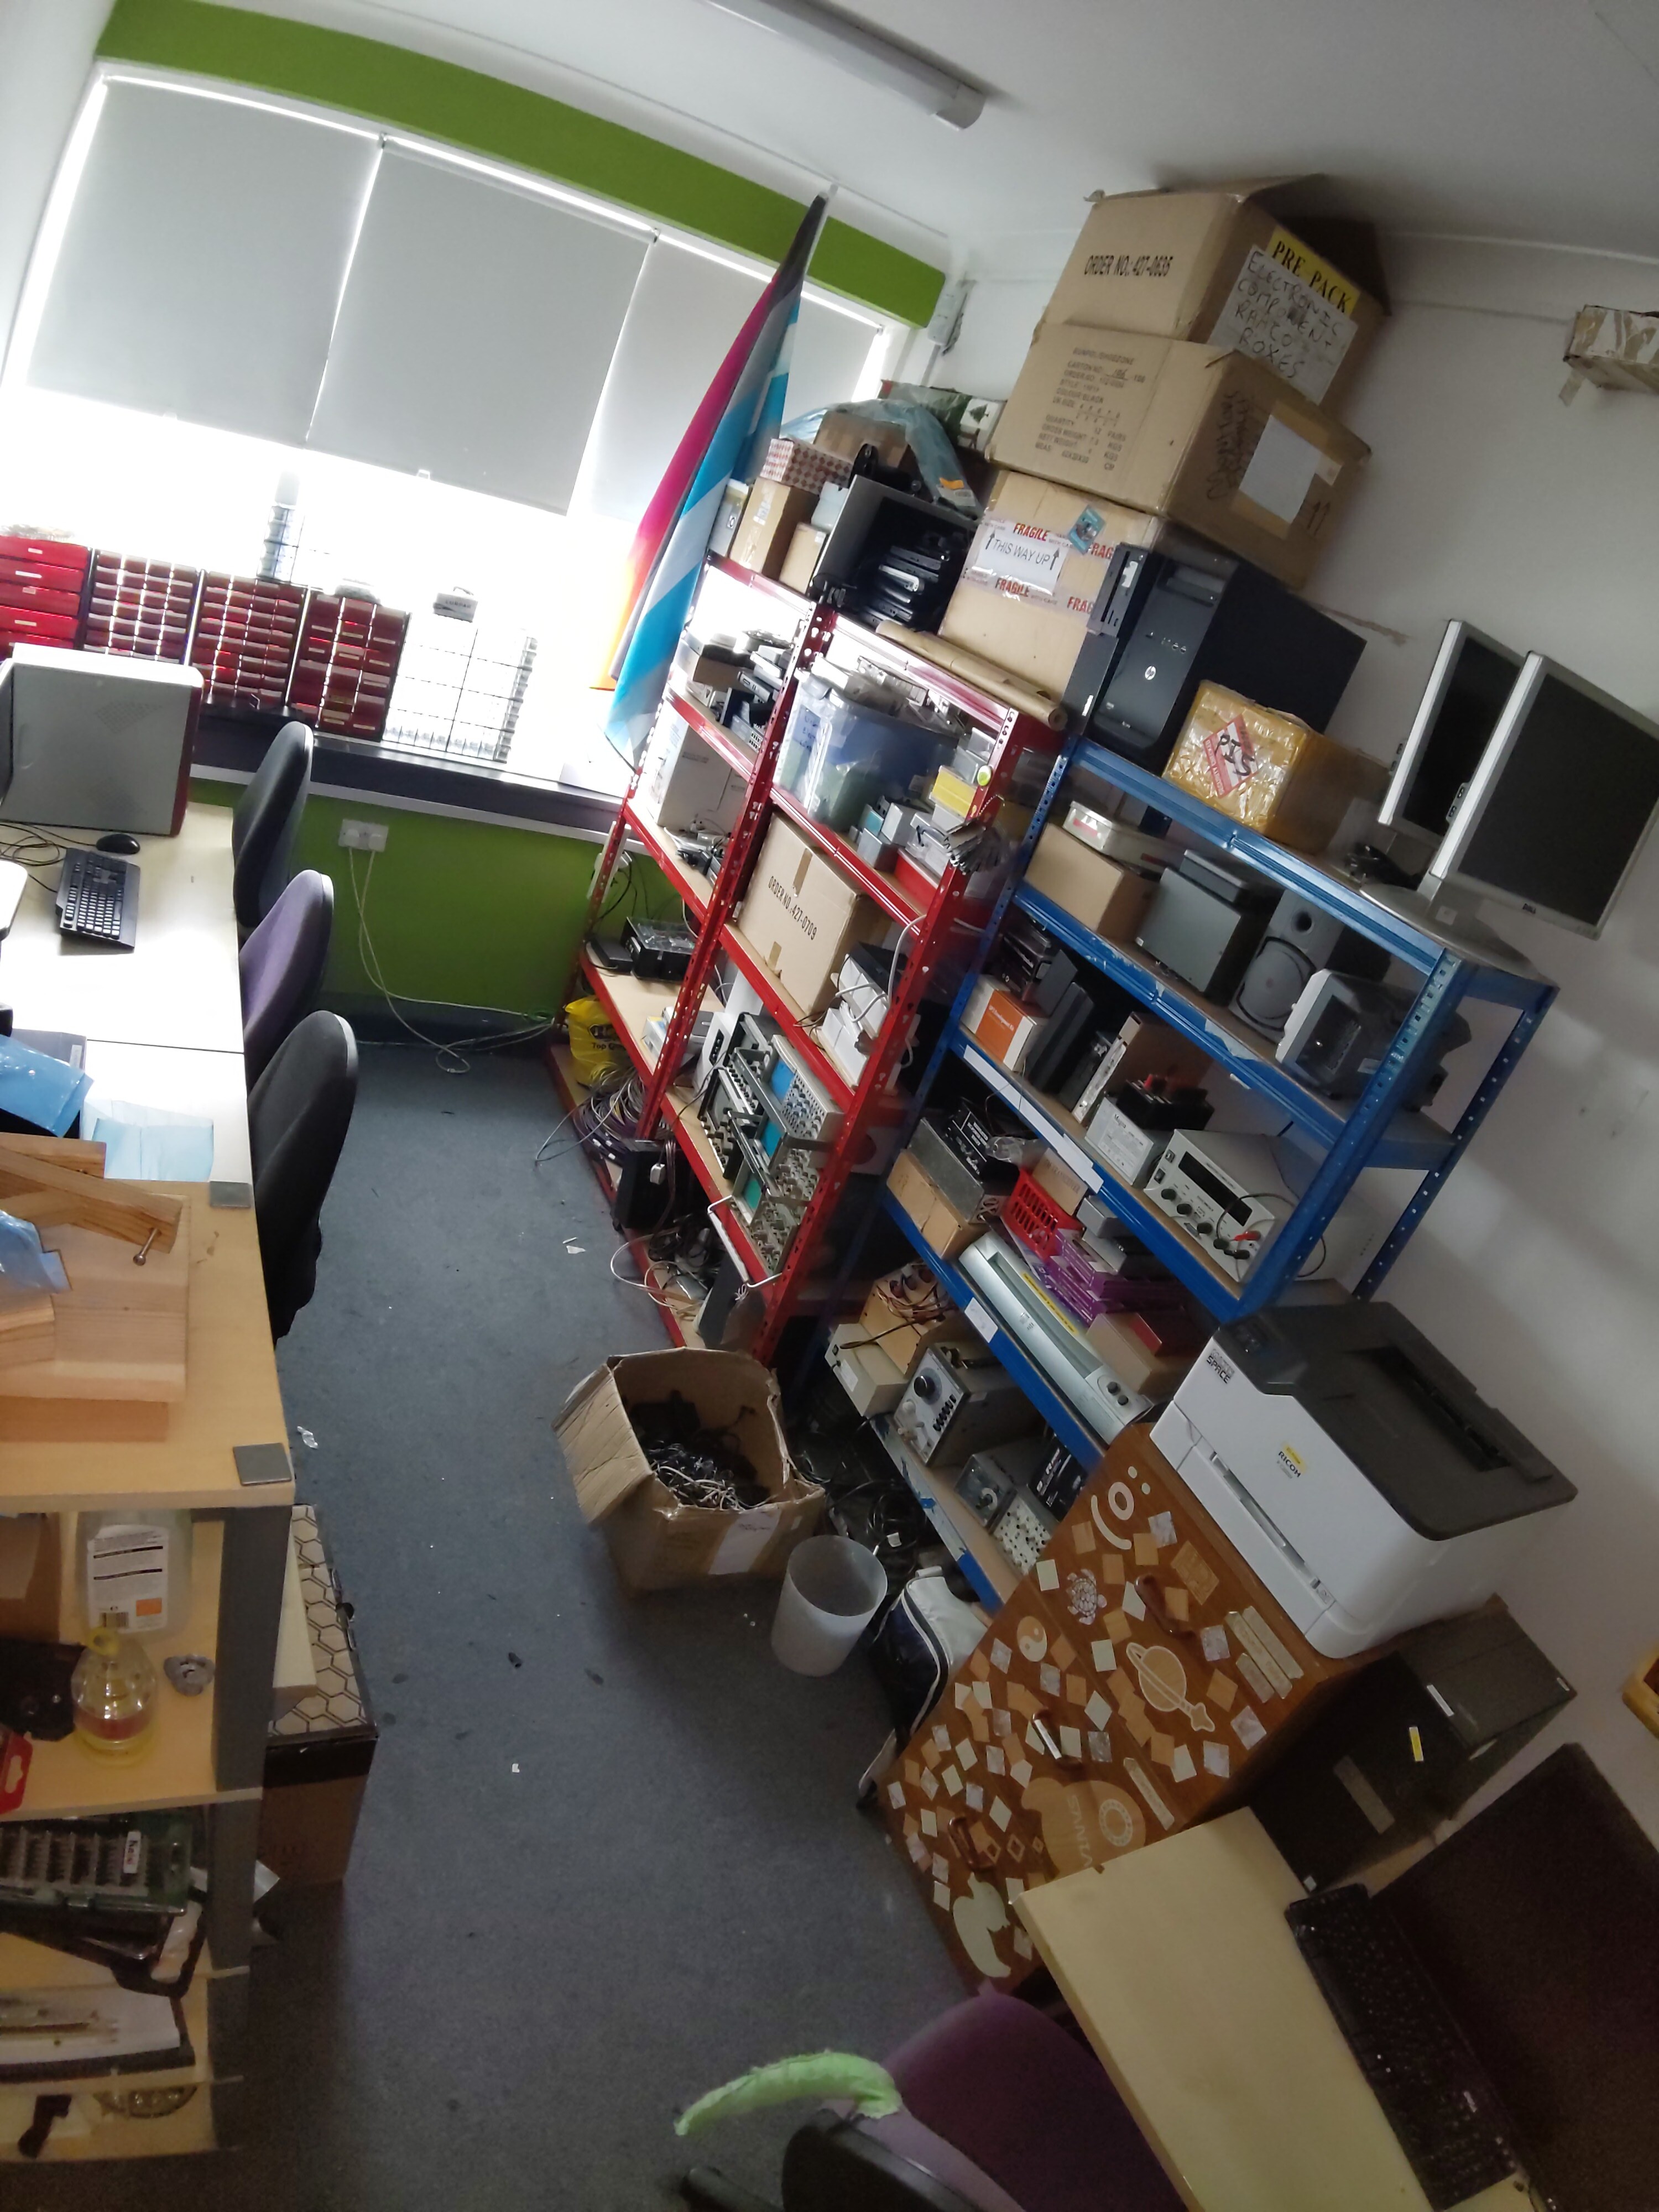
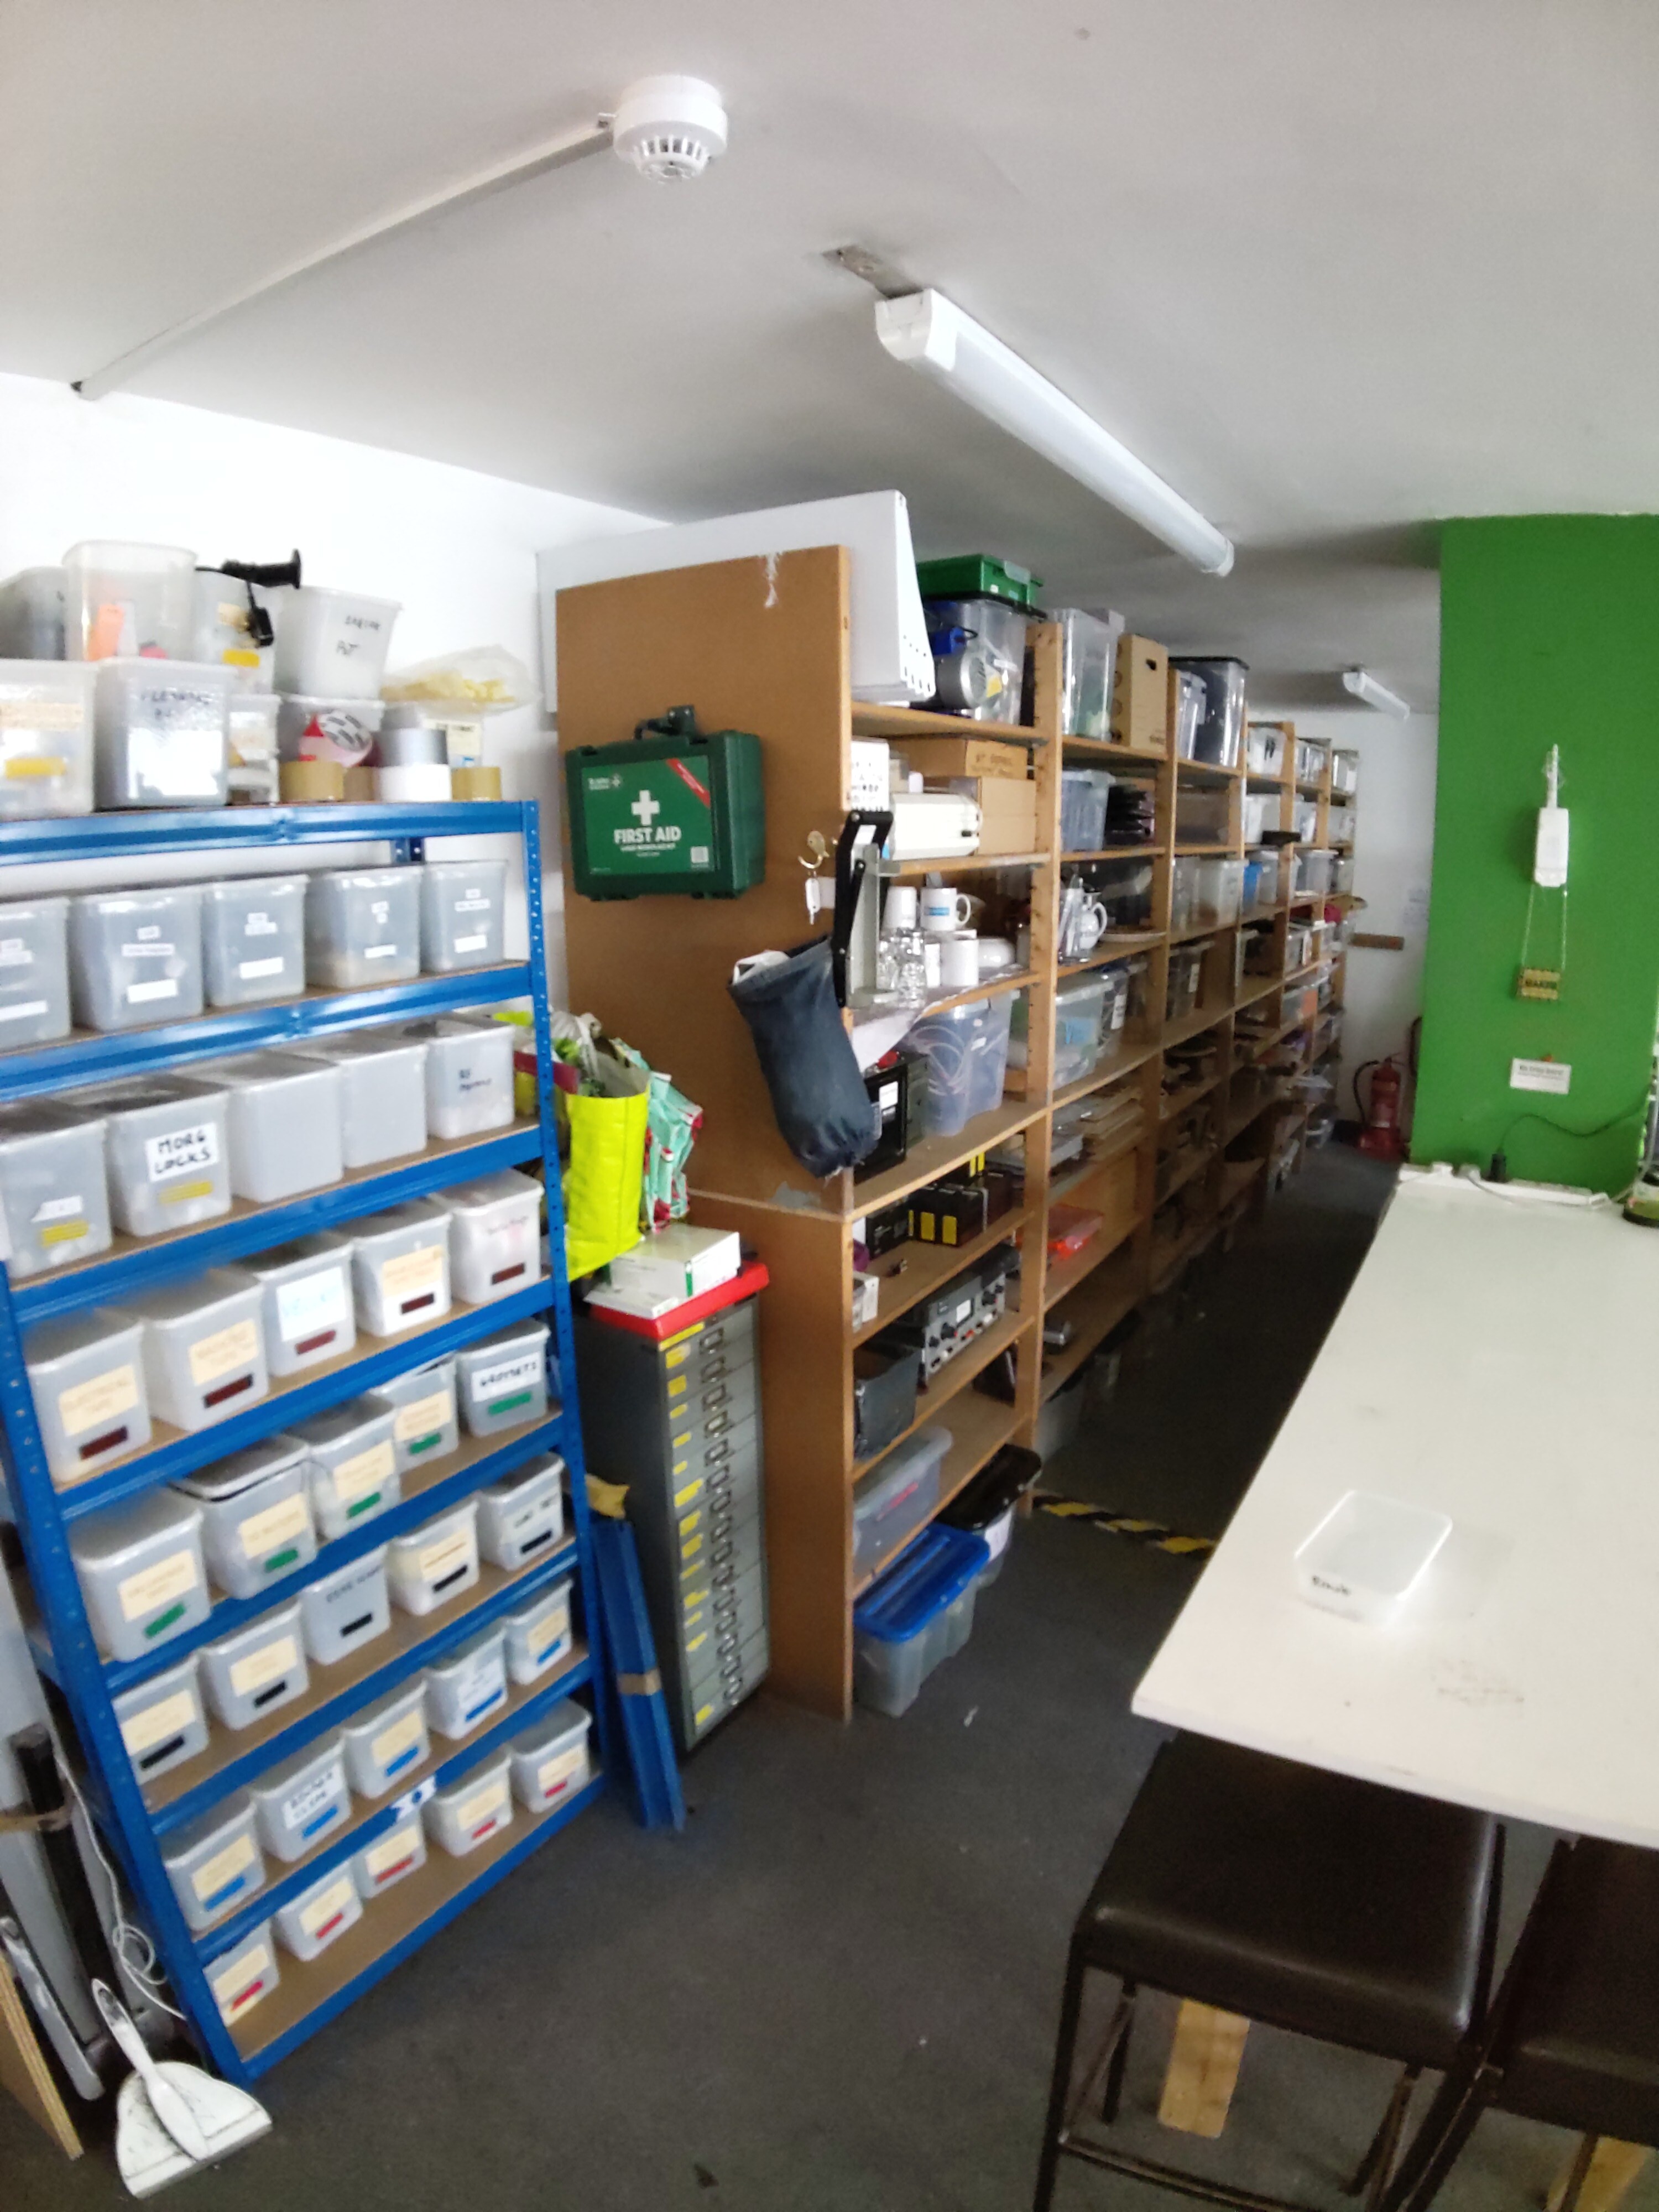
The storage wall is a vast expanse of shelving, stretching from floor to ceiling, each unit brimming with a variety of tools, components, and materials. Every inch is utilized to its fullest potential, packed full of tools, parts and materials just waiting for the right project to come along.
The south side of this shelving is dedicated to storage for member's personal items.
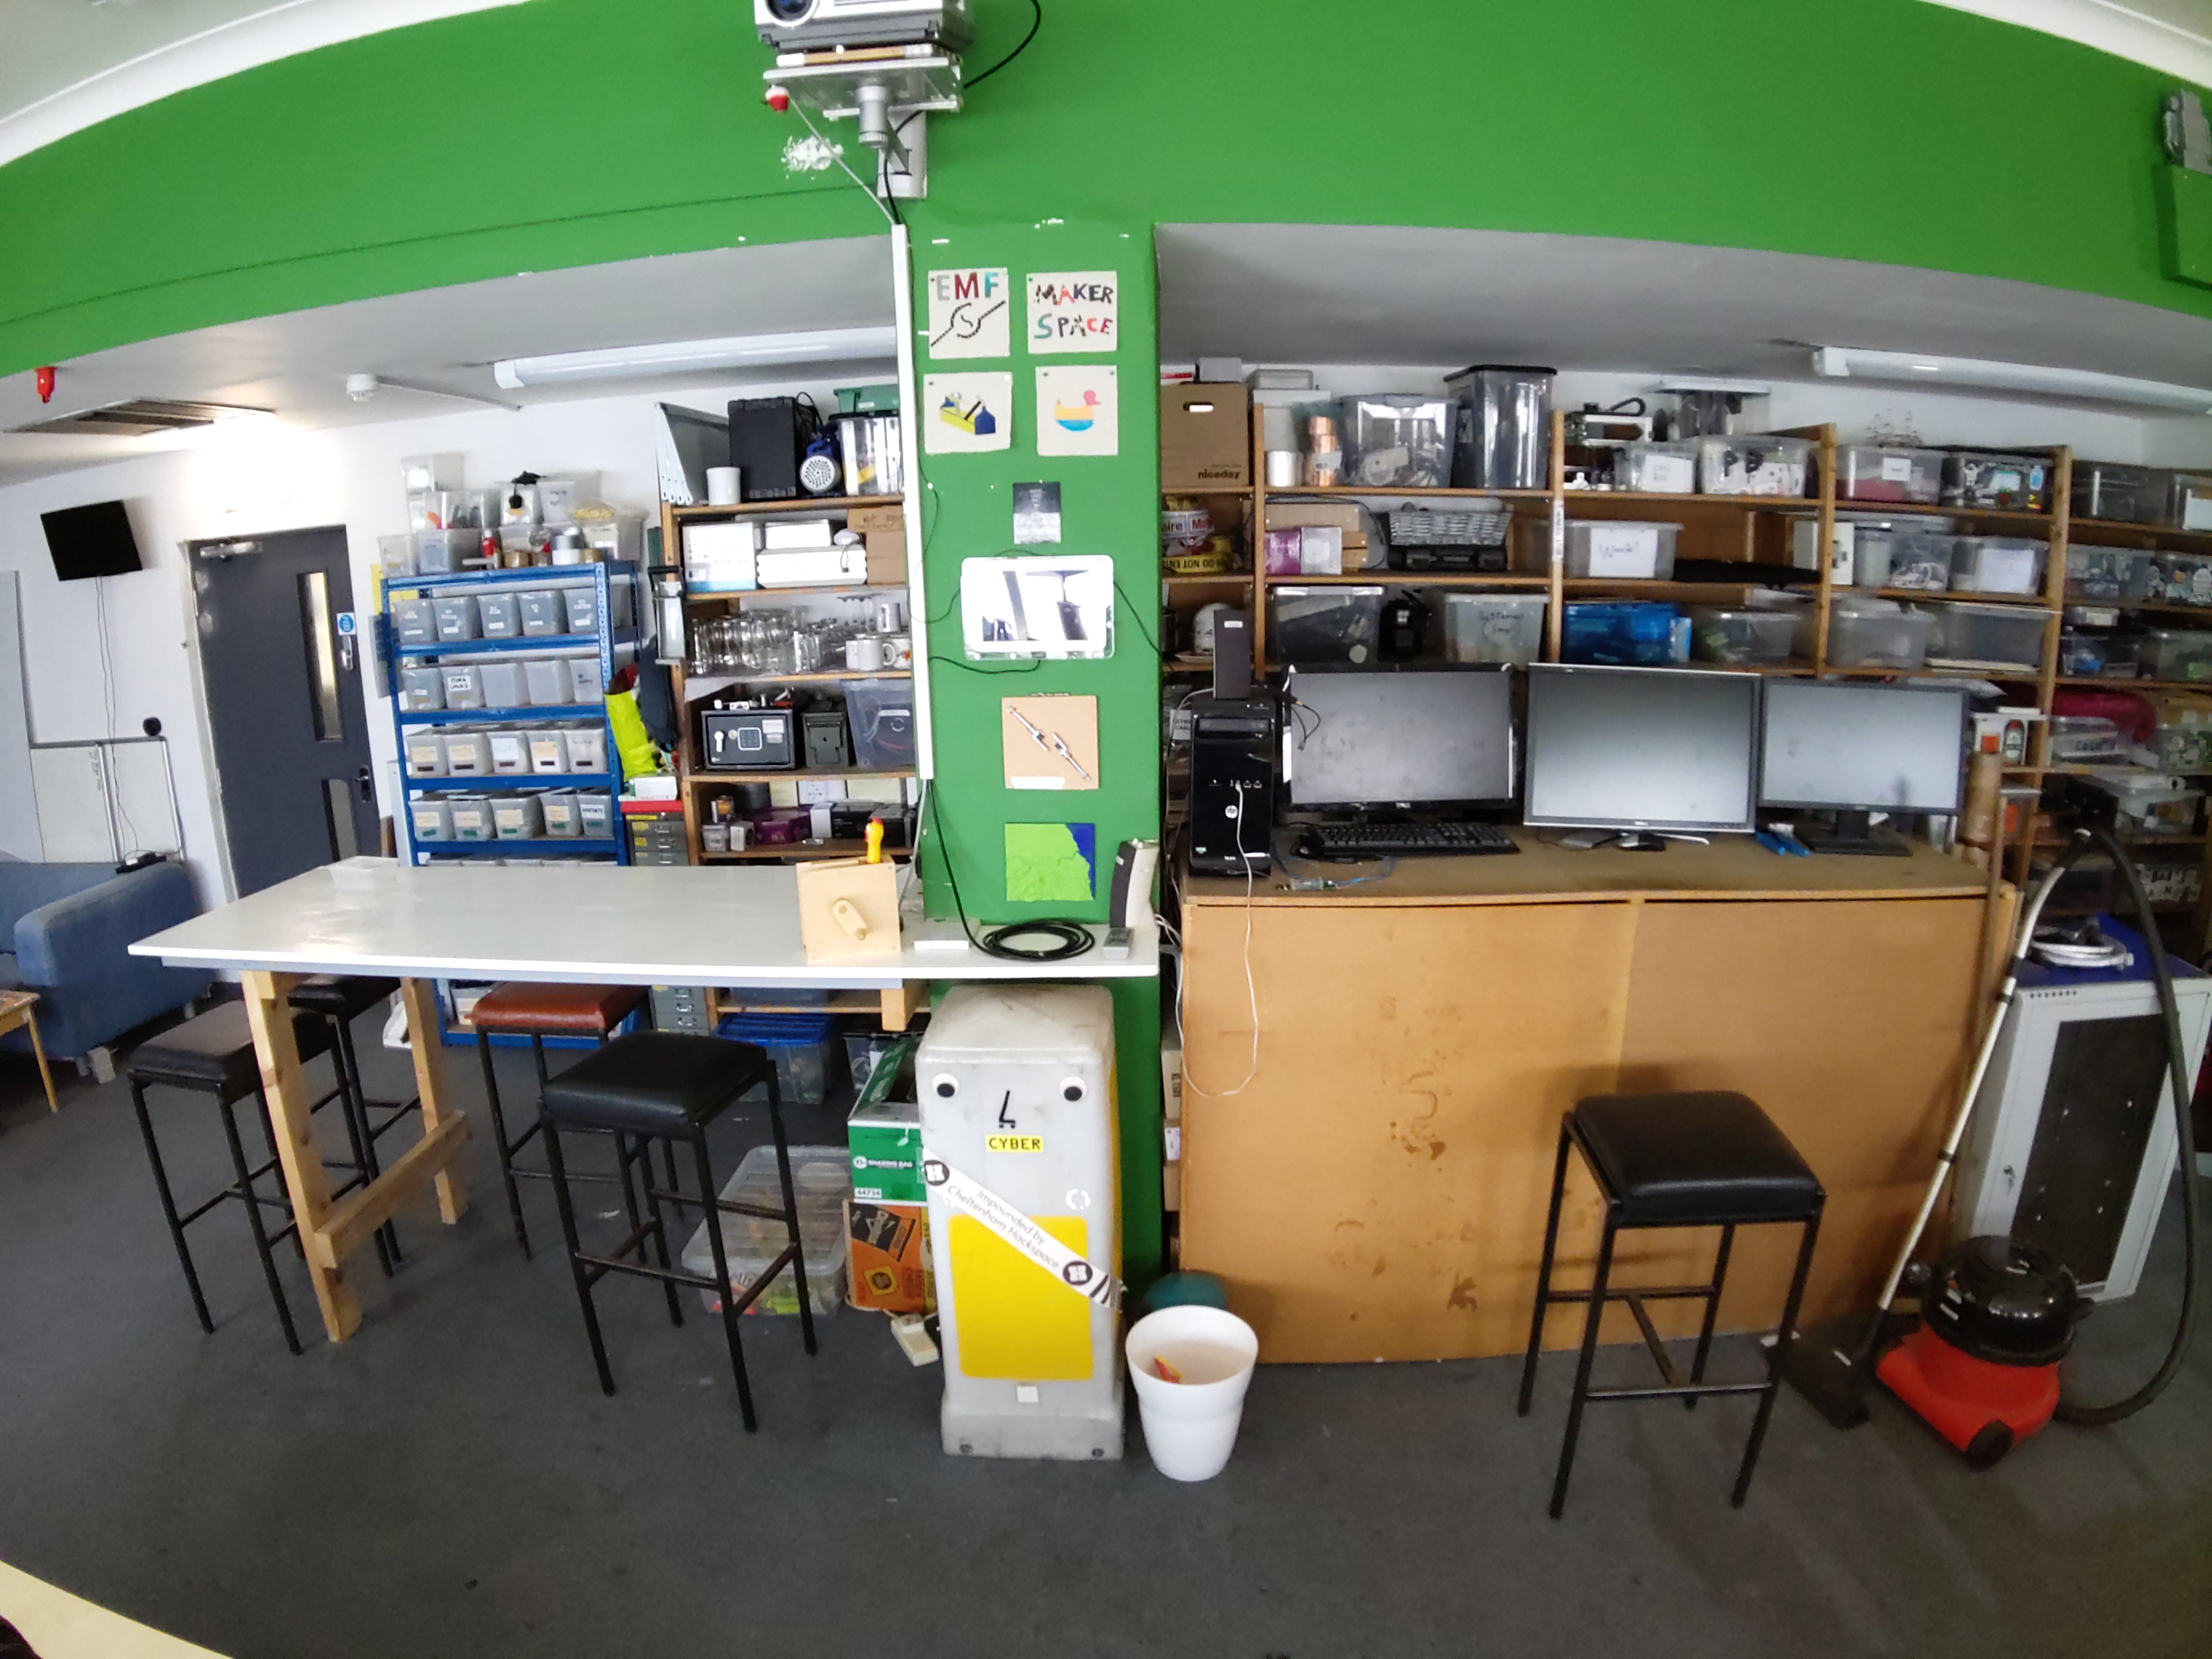
Welcome to the vibrant hub of creativity within this dynamic hackspace: the breakfast bar. This inviting space is designed to foster collaboration and provide a comfortable spot for members to create and connect.
The breakfast bar table is a sleek, modern fixture, crafted from high-quality materials that blend functionality with style. It's spacious surface offers ample room for enjoying a quick snack, tinkering on a project, or engaging in lively discussions about the latest projects and ideas. The bar stools, with their ergonomic design, ensure comfort during those longer brainstorming sessions.
Strategically located within the hackspace, this area is bathed in natural light, creating a warm and welcoming atmosphere. The surrounding decor is thoughtfully curated to inspire creativity, with vibrant artwork and innovative designs adorning the walls.
Whether you’re taking a break from a challenging project or simply looking to network with fellow makers, the breakfast bar table area is the perfect spot.
Adjacent to the breakfast bar is the cutting-edge communication hub within the hackspace: the amateur radio setup. This area is meticulously designed for enthusiasts and hobbyists who are passionate about radio technology and communication.
This amateur radio setup is more than just a collection of equipment; it's a gateway to a world of communication and exploration. Whether you're a seasoned operator or new to the hobby, this space is designed to inspire and support your passion for radio technology.
Step into this exceptional amateur radio setup and experience the thrill of global communication right from the heart of our hackspace!
Here we have our 3D printing station. This area is a dream come true for any maker, featuring top-of-the-line equipment that promises precision and reliability.
To the left, you’ll find the renowned Prusa MK3. Its user-friendly interface and reliable performance make it an indispensable tool for both beginners and seasoned professionals.
Complementing the Prusa MK3 is the cutting-edge Bambu Lab P1S. This advanced 3D printer is celebrated for its speed and versatility, capable of producing high-quality prints in a fraction of the time. With its sleek design and state-of-the-art features, the Bambu Lab P1S is perfect for those looking to push the boundaries of their creativity.
The 3D printing station is thoughtfully arranged to maximize efficiency and inspire innovation. Each printer is strategically positioned to allow for seamless workflow, with ample workspace for preparing and finishing prints. The station is well-lit and equipped with all the necessary tools and materials, ensuring that every project can be executed to perfection.

South Basement Workshop
Welcome to this unique and versatile basement workshop. This exceptional space is a haven for woodworking enthusiasts, offering a comprehensive array of tools and equipment to bring your creative visions to life. The workshop boasts a generous floor plan, providing ample room for multiple projects and collaborative work.
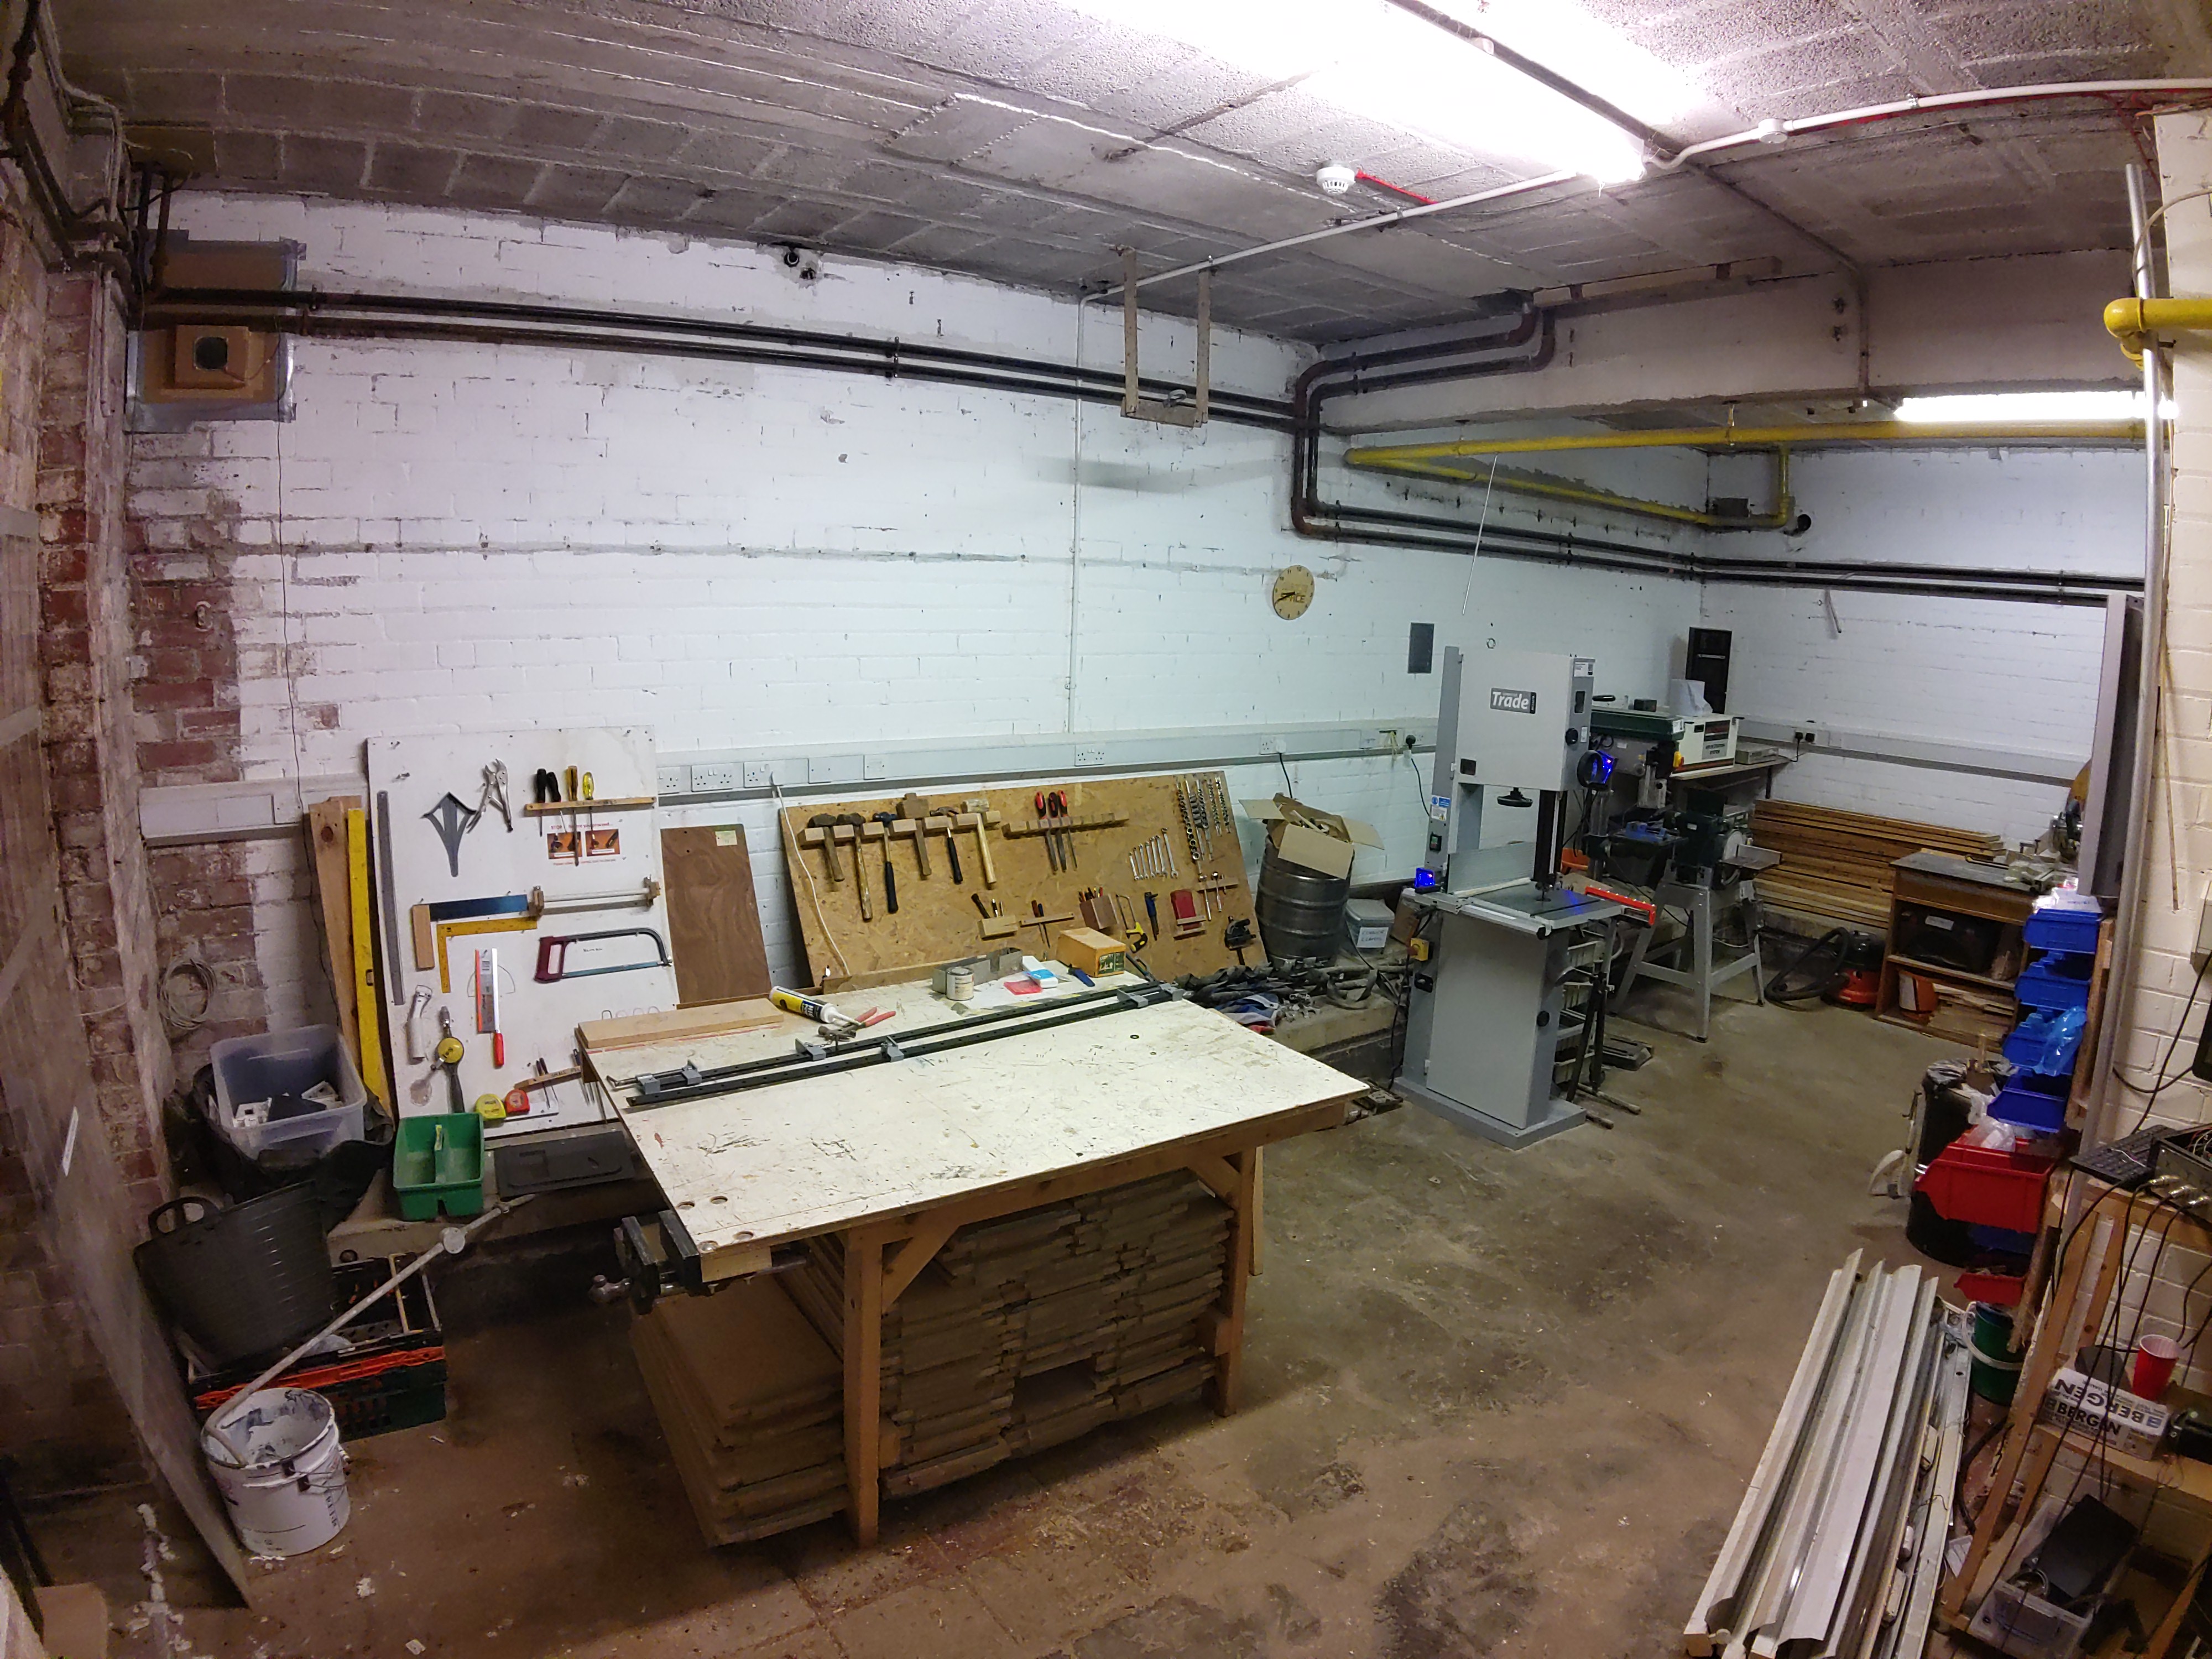
Here, we present a non-functioning CNC milling machine, awaiting the touch of a skilled hand to restore it to its former glory. The machine boasts a solid and durable construction, designed to handle heavy-duty tasks once operational.
The plastic bins harbor an orchestra of fasteners. Hex nuts, wing nuts, carriage bolts—they jostle for attention. And the washers? They’re like tiny time-traveling saucers, ready to stabilize your contraptions.
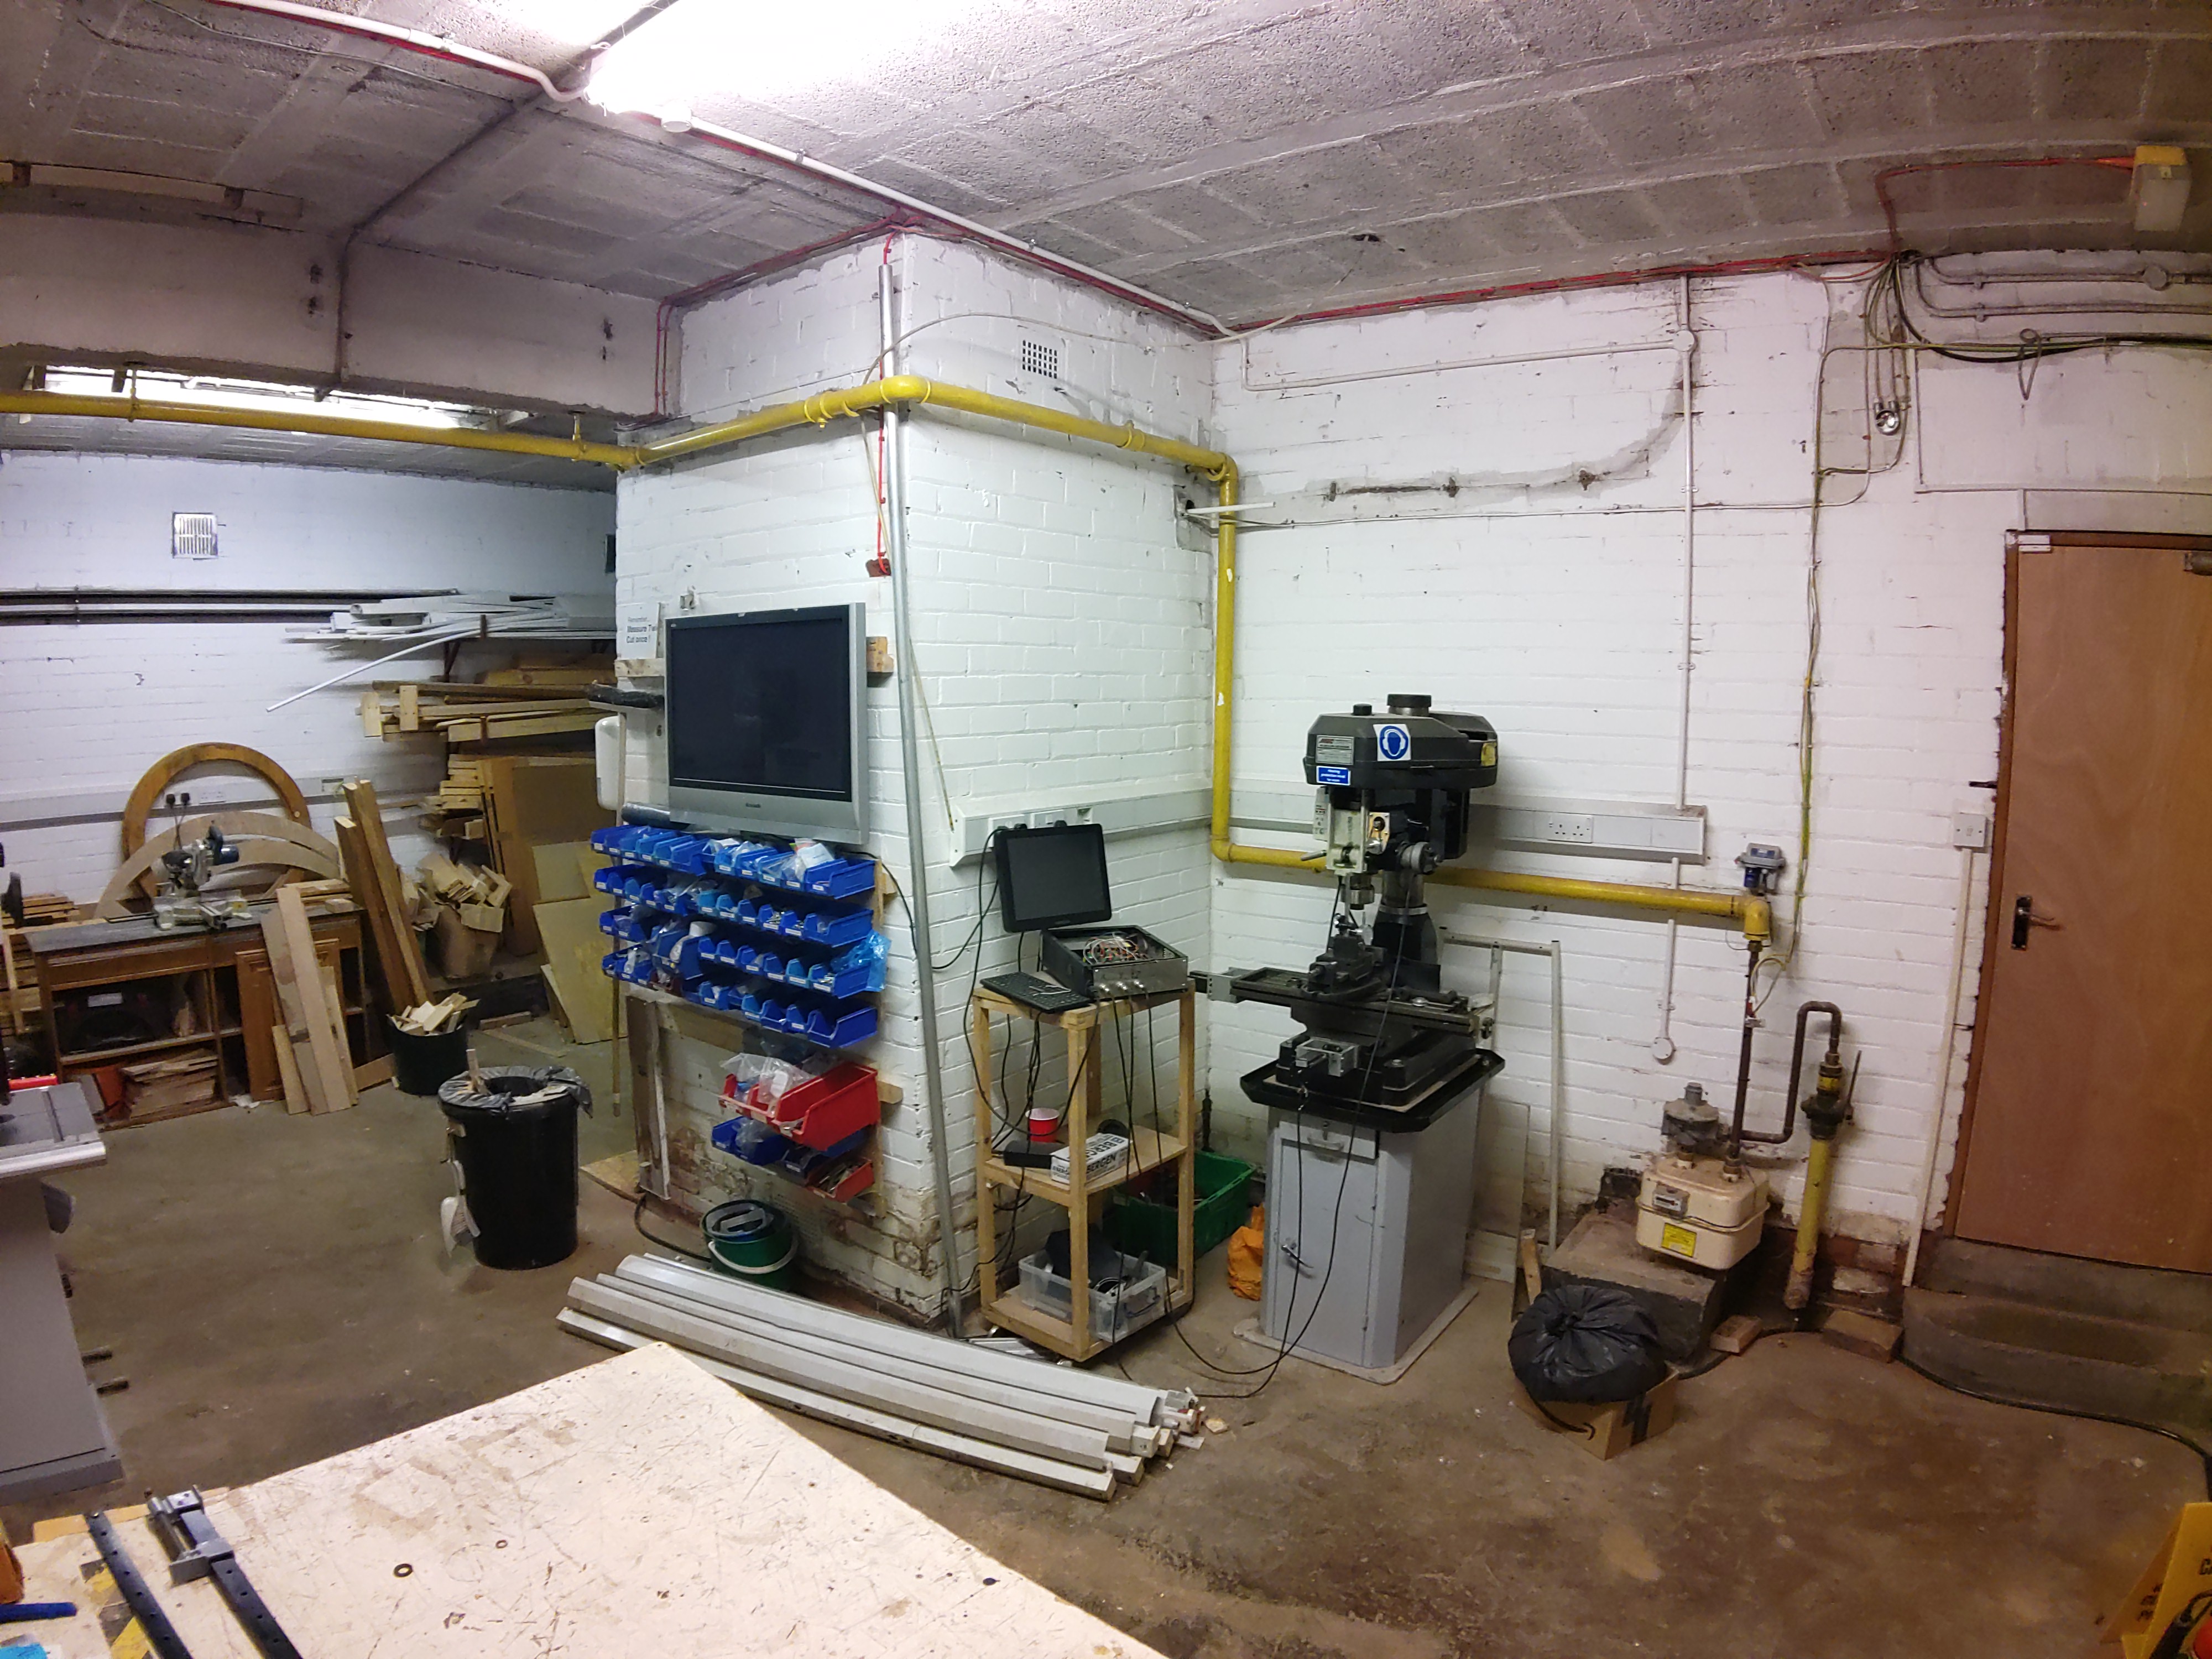
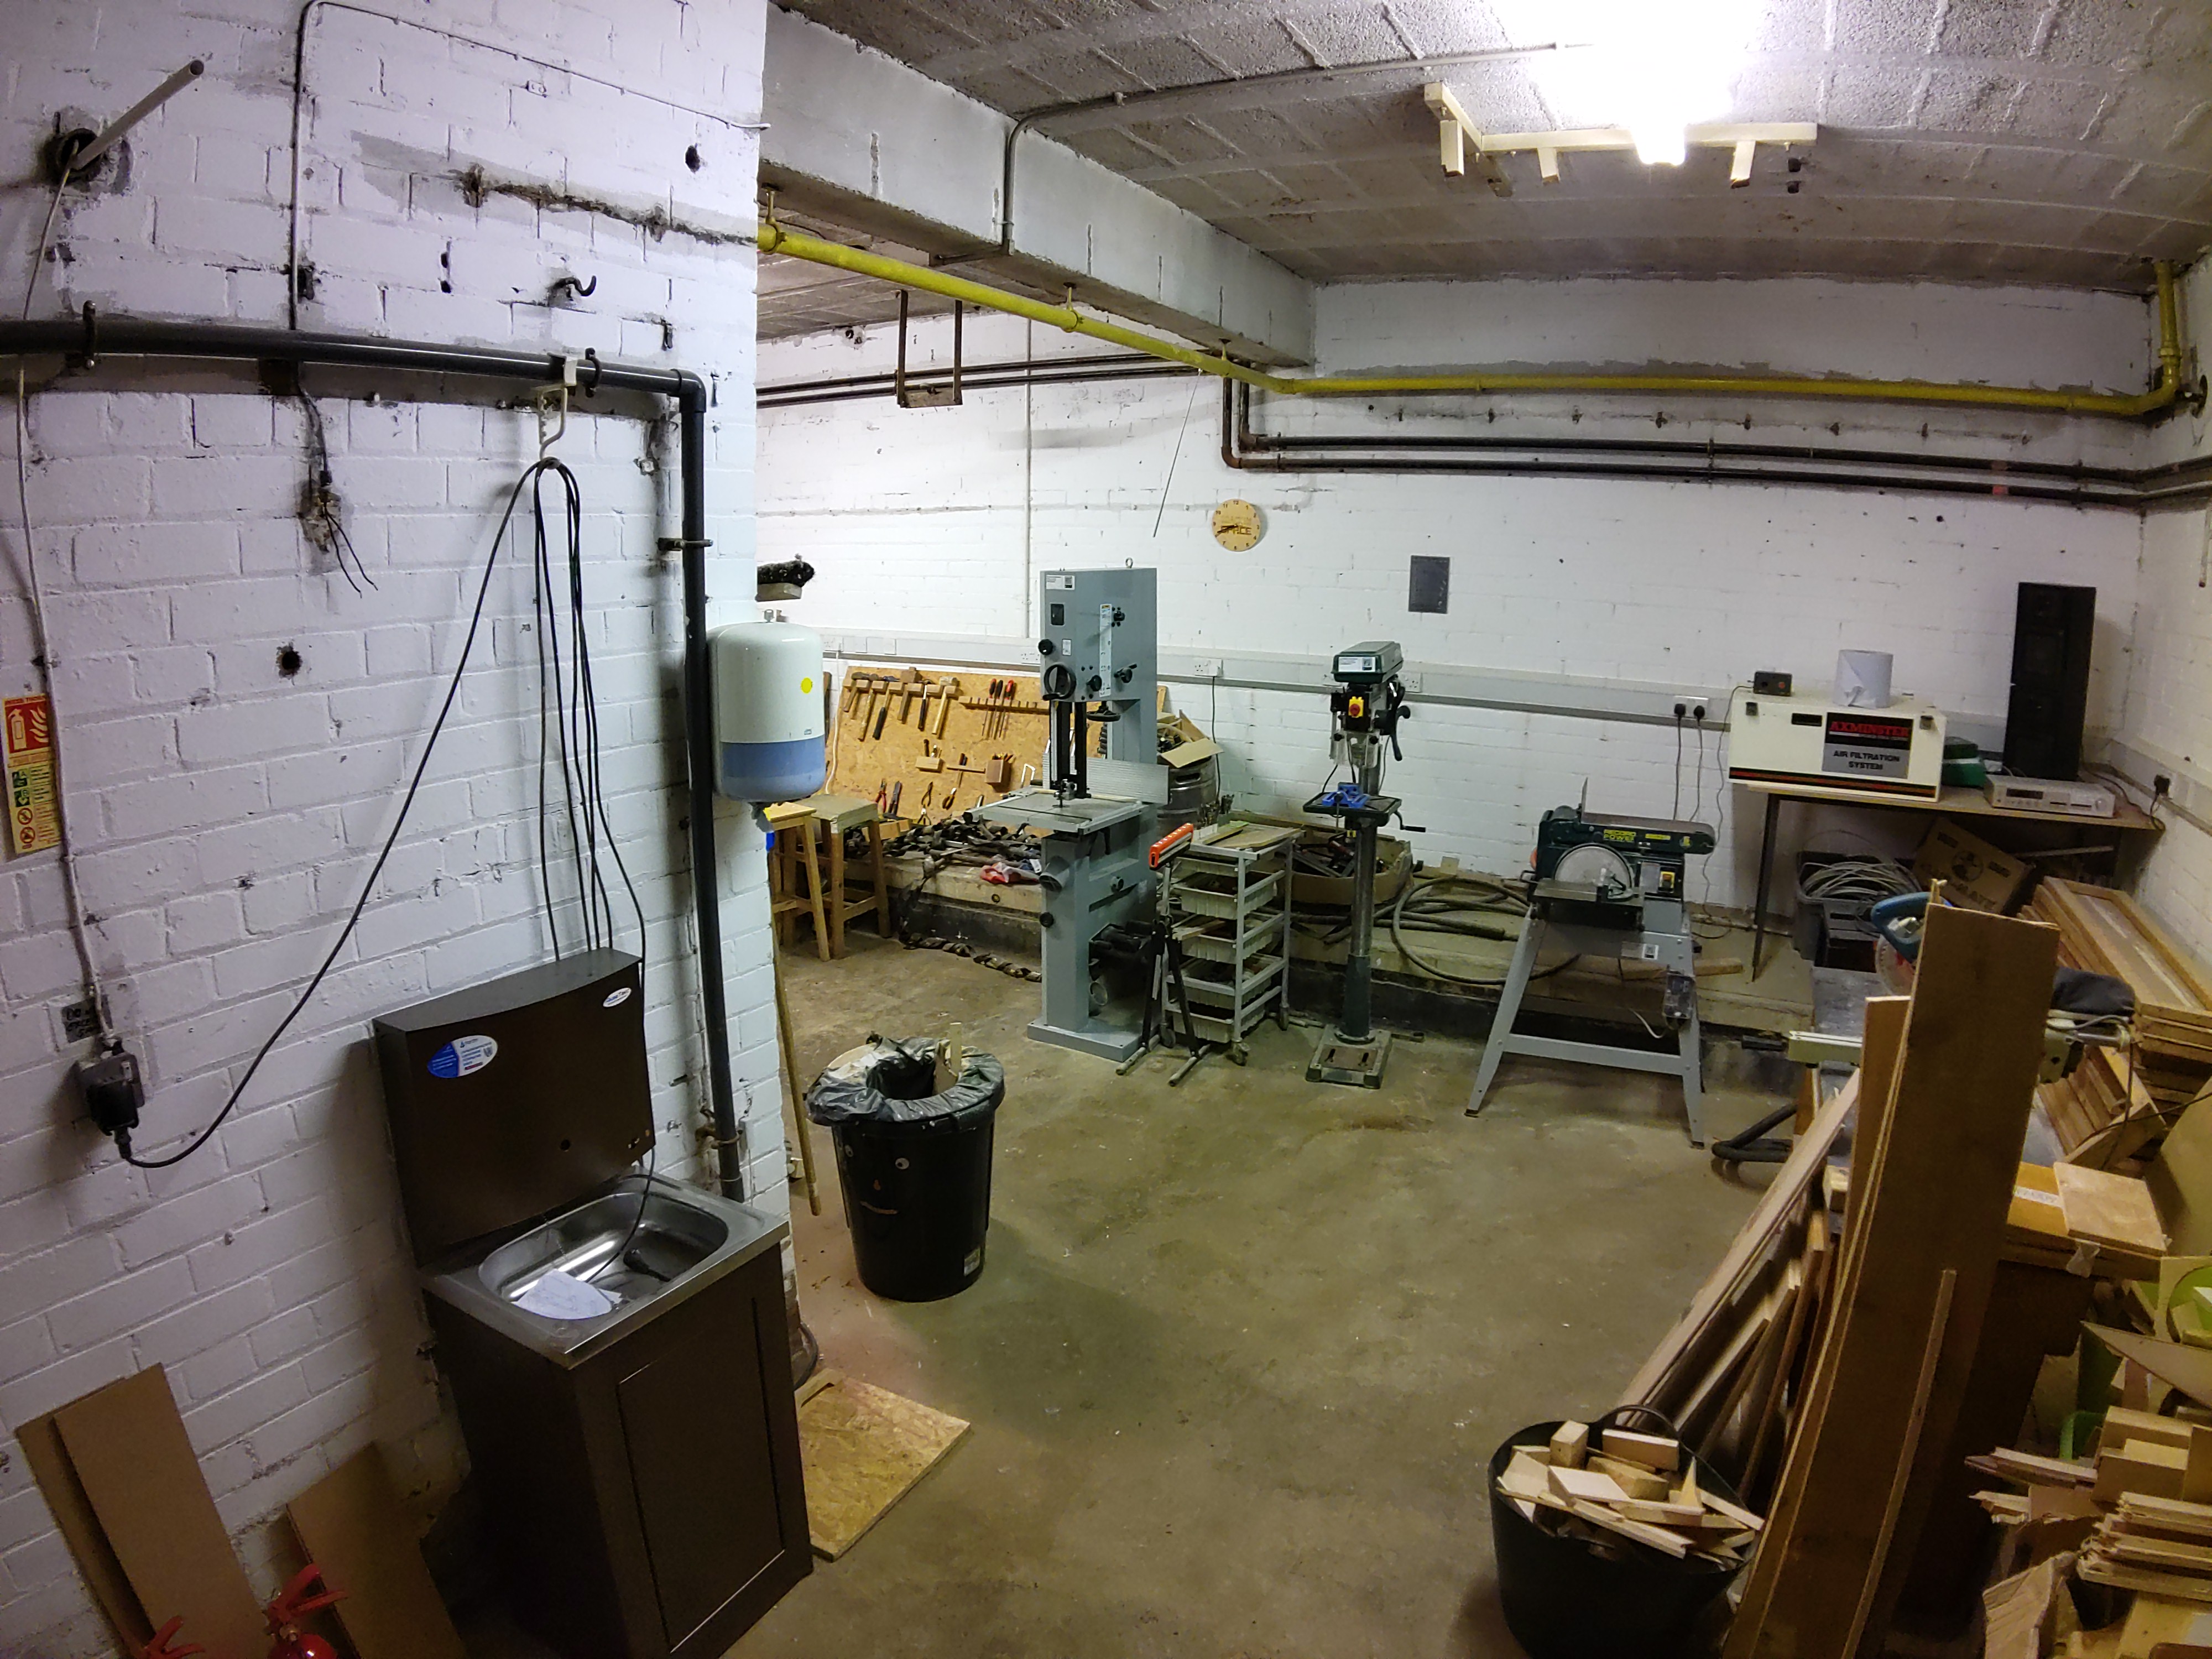
This well-equipped work area is a dream come true for any maker, featuring an impressive array of machine tools designed to bring your projects to life. All tools are maintained to the highest standards, ensuring precision and reliability for every project. The work area is thoughtfully organised, with clear pathways and designated zones for each type of machine, promoting a smooth and efficient workflow.
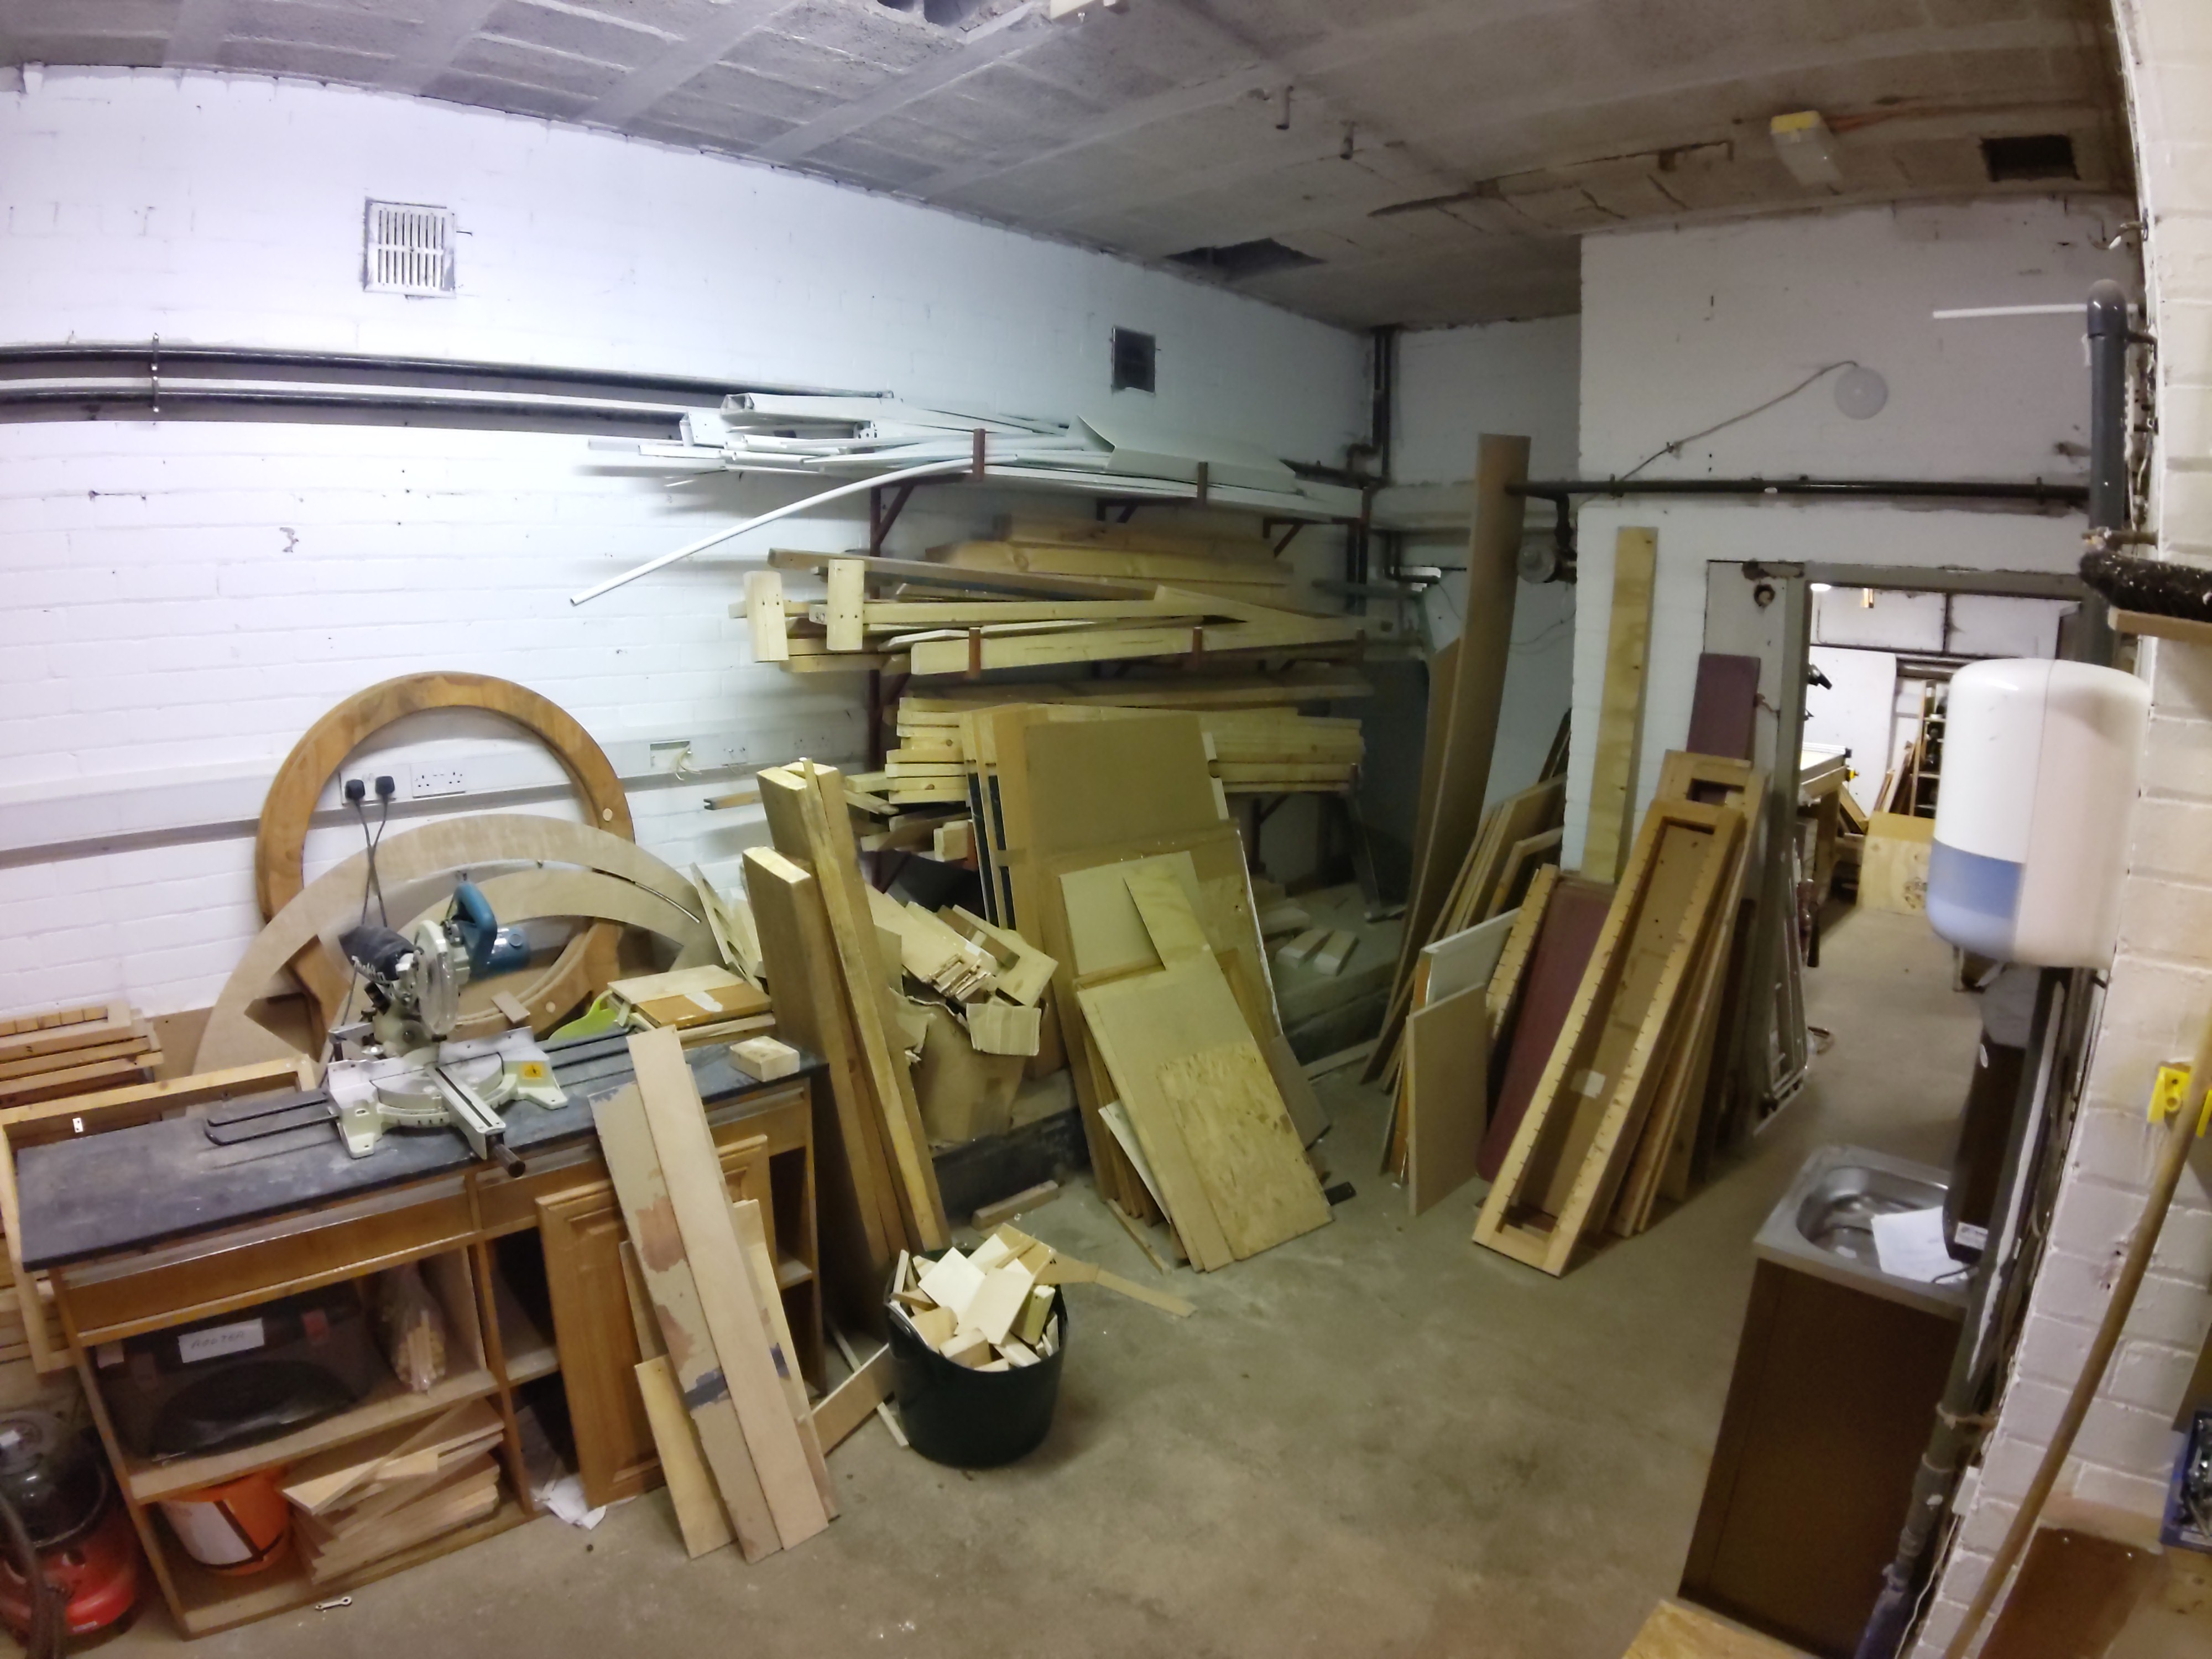
In the corner you will find our wood and pipe storage area. This dedicated space is designed to cater to the needs of woodworking enthusiasts, ensuring that all materials are stored efficiently and safely. The area boasts a variety of storage solutions, including vertical racks, horizontal shelves, and custom bins, accommodating wood of all sizes and types.
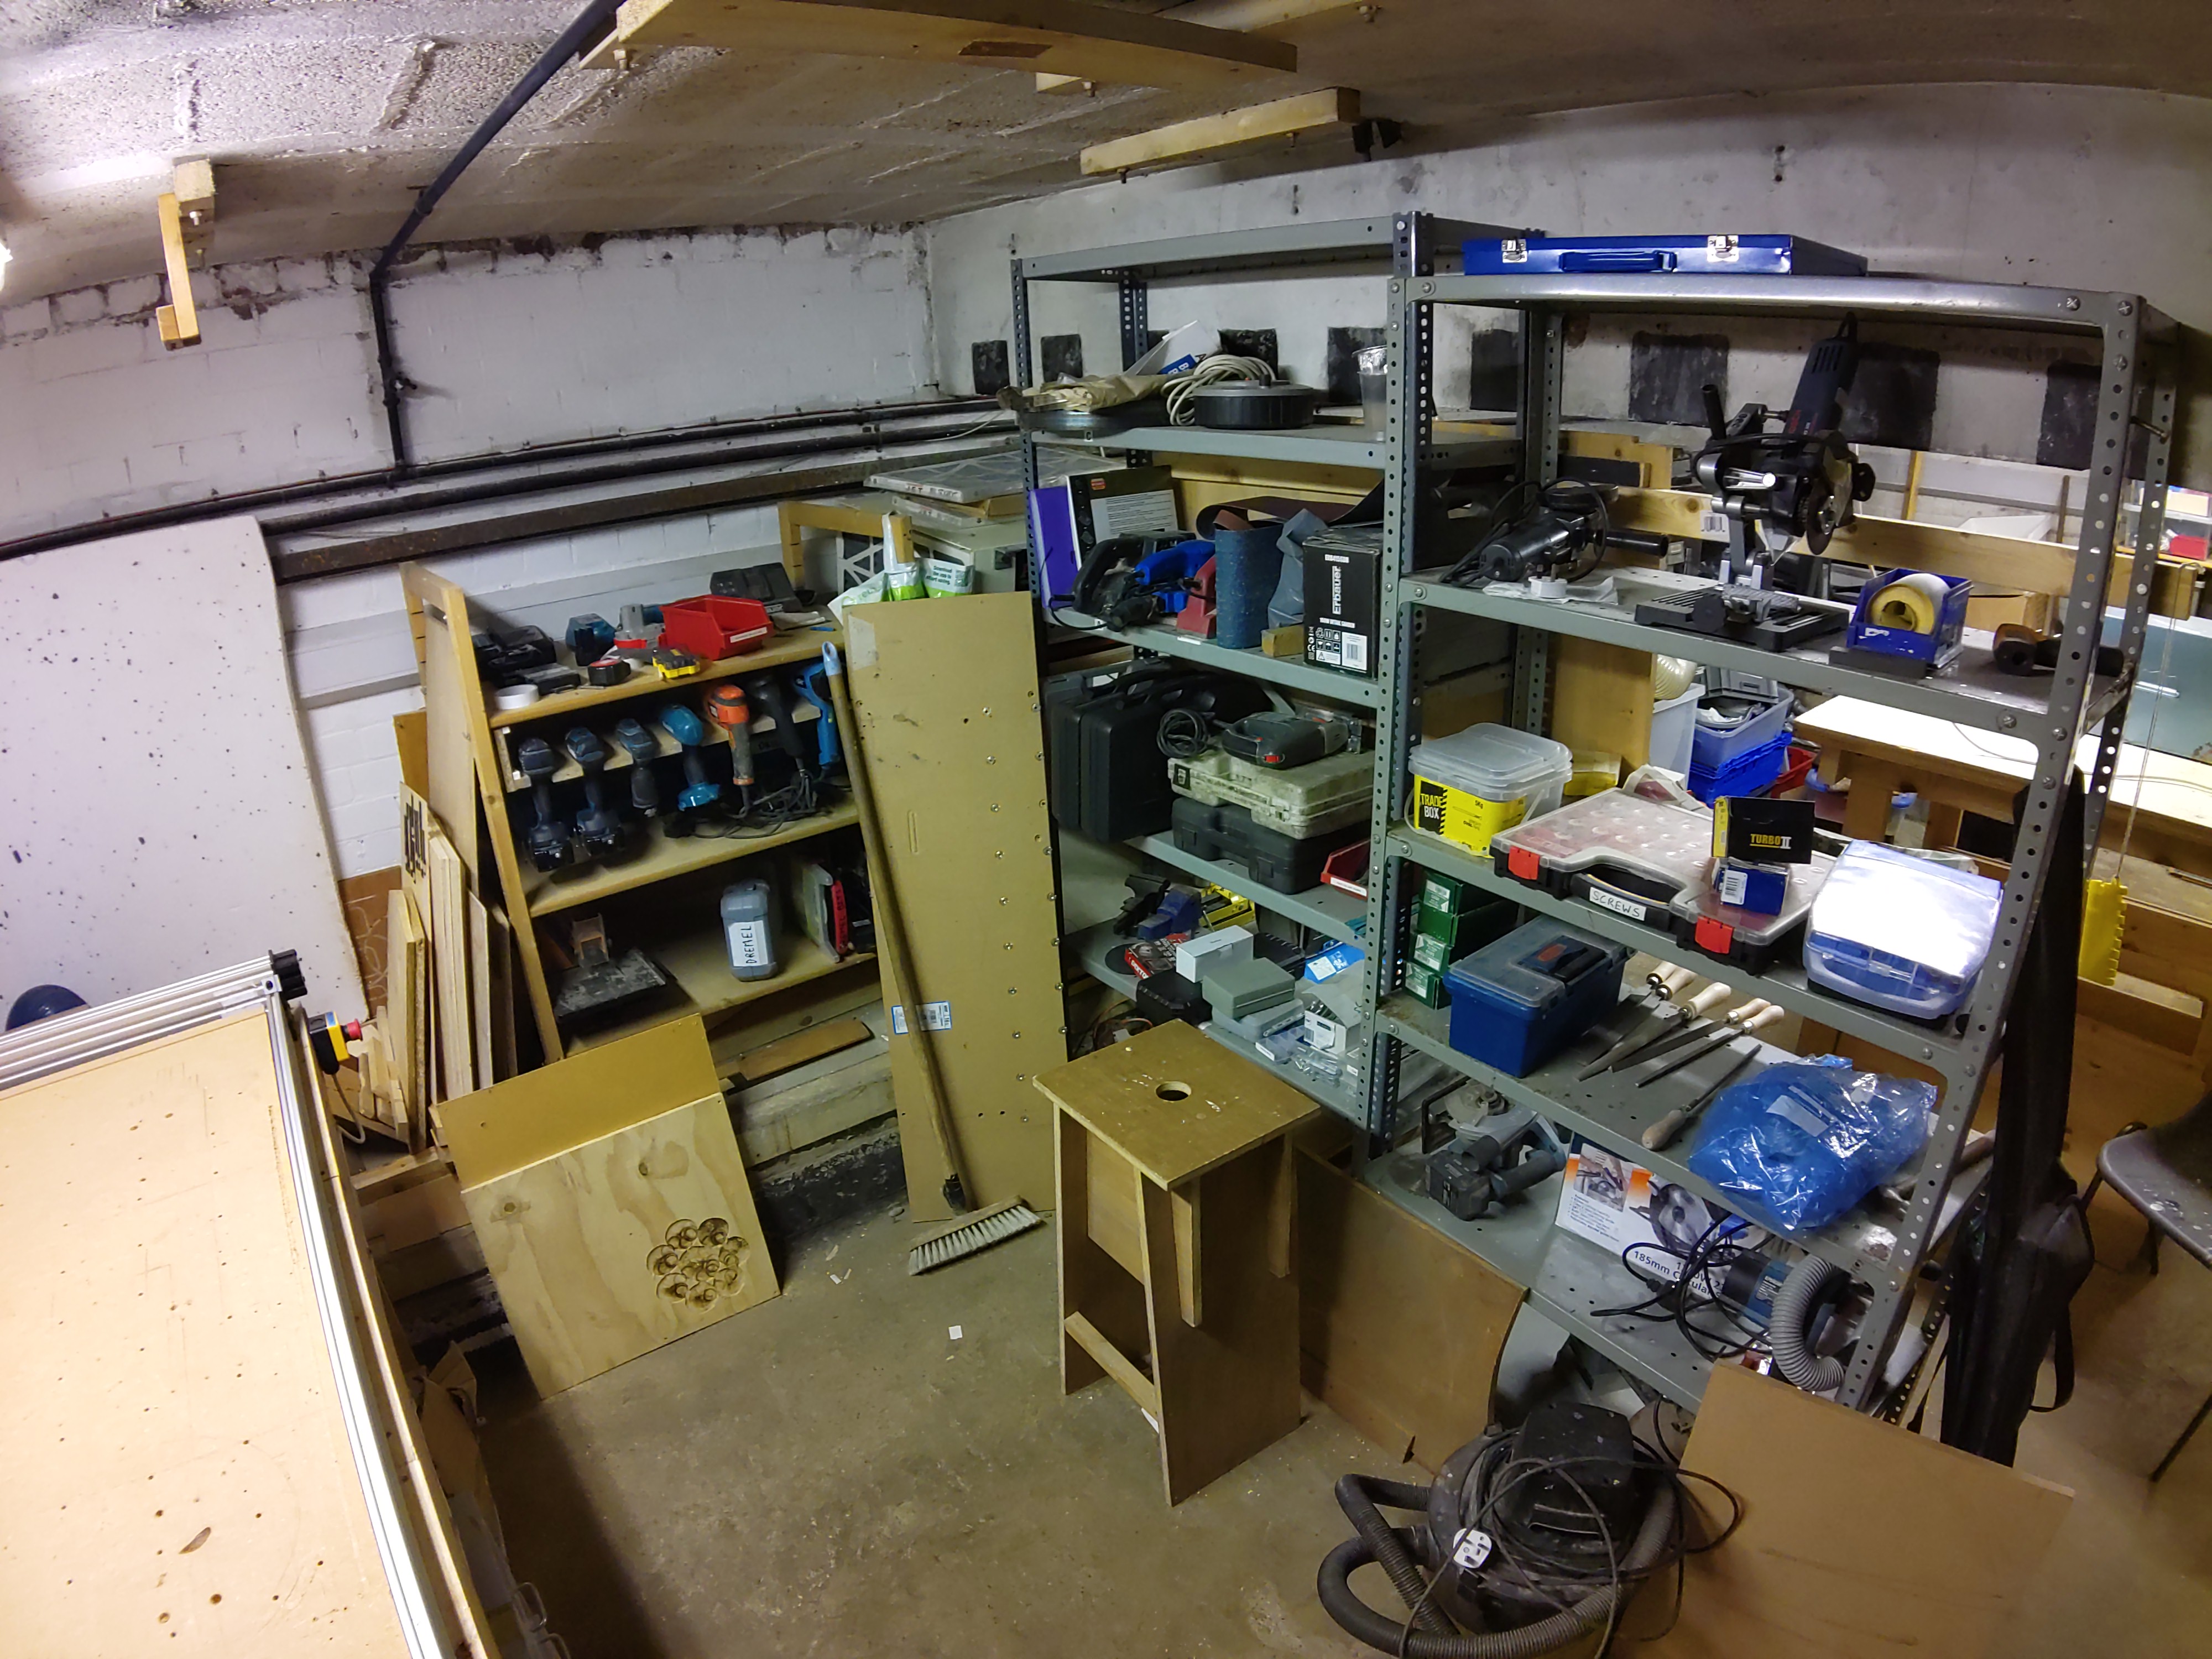
North Basement Workshop
Welcome to the cutting-edge corner of the basement workshop, where innovation meets precision. This dedicated area features the highly sought-after Workbee CNC router, a must-have for any serious maker or woodworker. The Workbee CNC router is the centerpiece of this corner, known for its accuracy and versatility. It’s perfect for intricate carvings, precise cuts, and complex designs. The intuitive control system and software make it accessible for both beginners and experienced users, allowing for seamless operation and creativity.
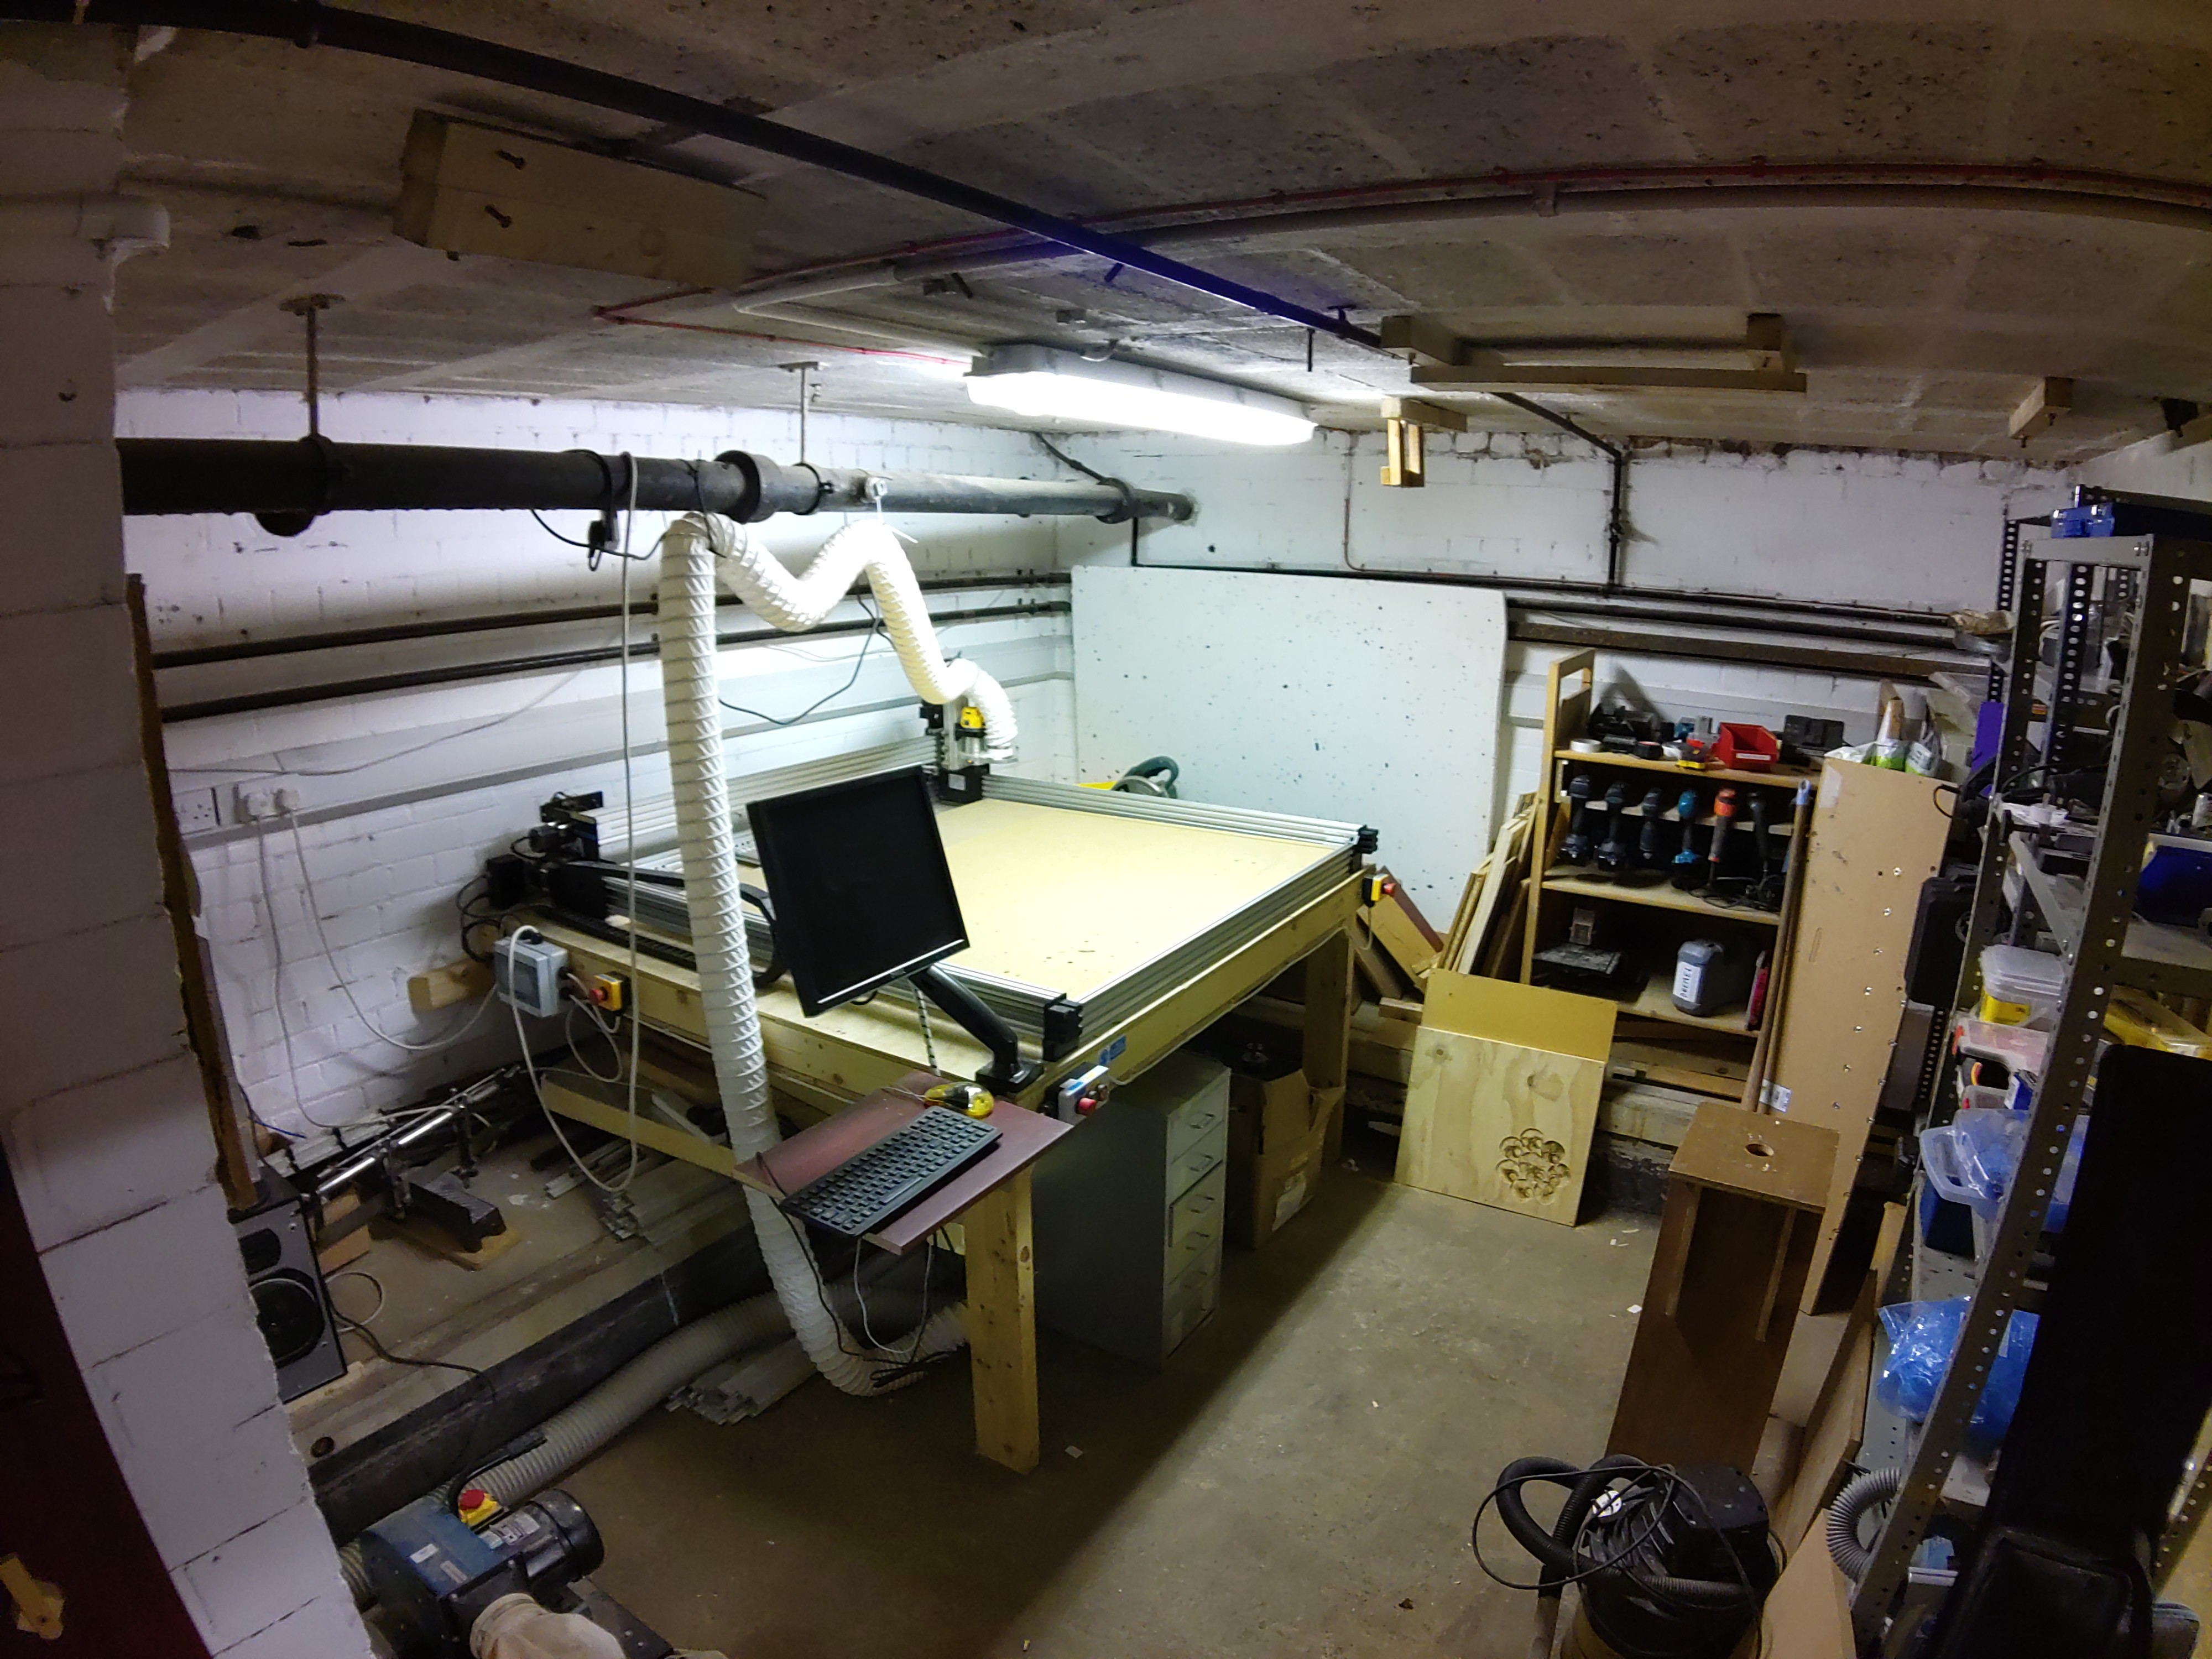
Welcome to the meticulously curated hand tool collection within our vibrant hackspace. This essential area is a treasure trove for any maker, offering a diverse range of tools that cater to all your crafting and repair needs. Tools are neatly arranged on shelves and in toolboxes, making it easy to find exactly what you need quickly and efficiently. As part of our hackspace, this collection benefits from the collective knowledge and experience of our members, who are always willing to share tips and techniques. Regular maintenance ensures that all tools are kept in optimal condition, ready for use whenever inspiration strikes.
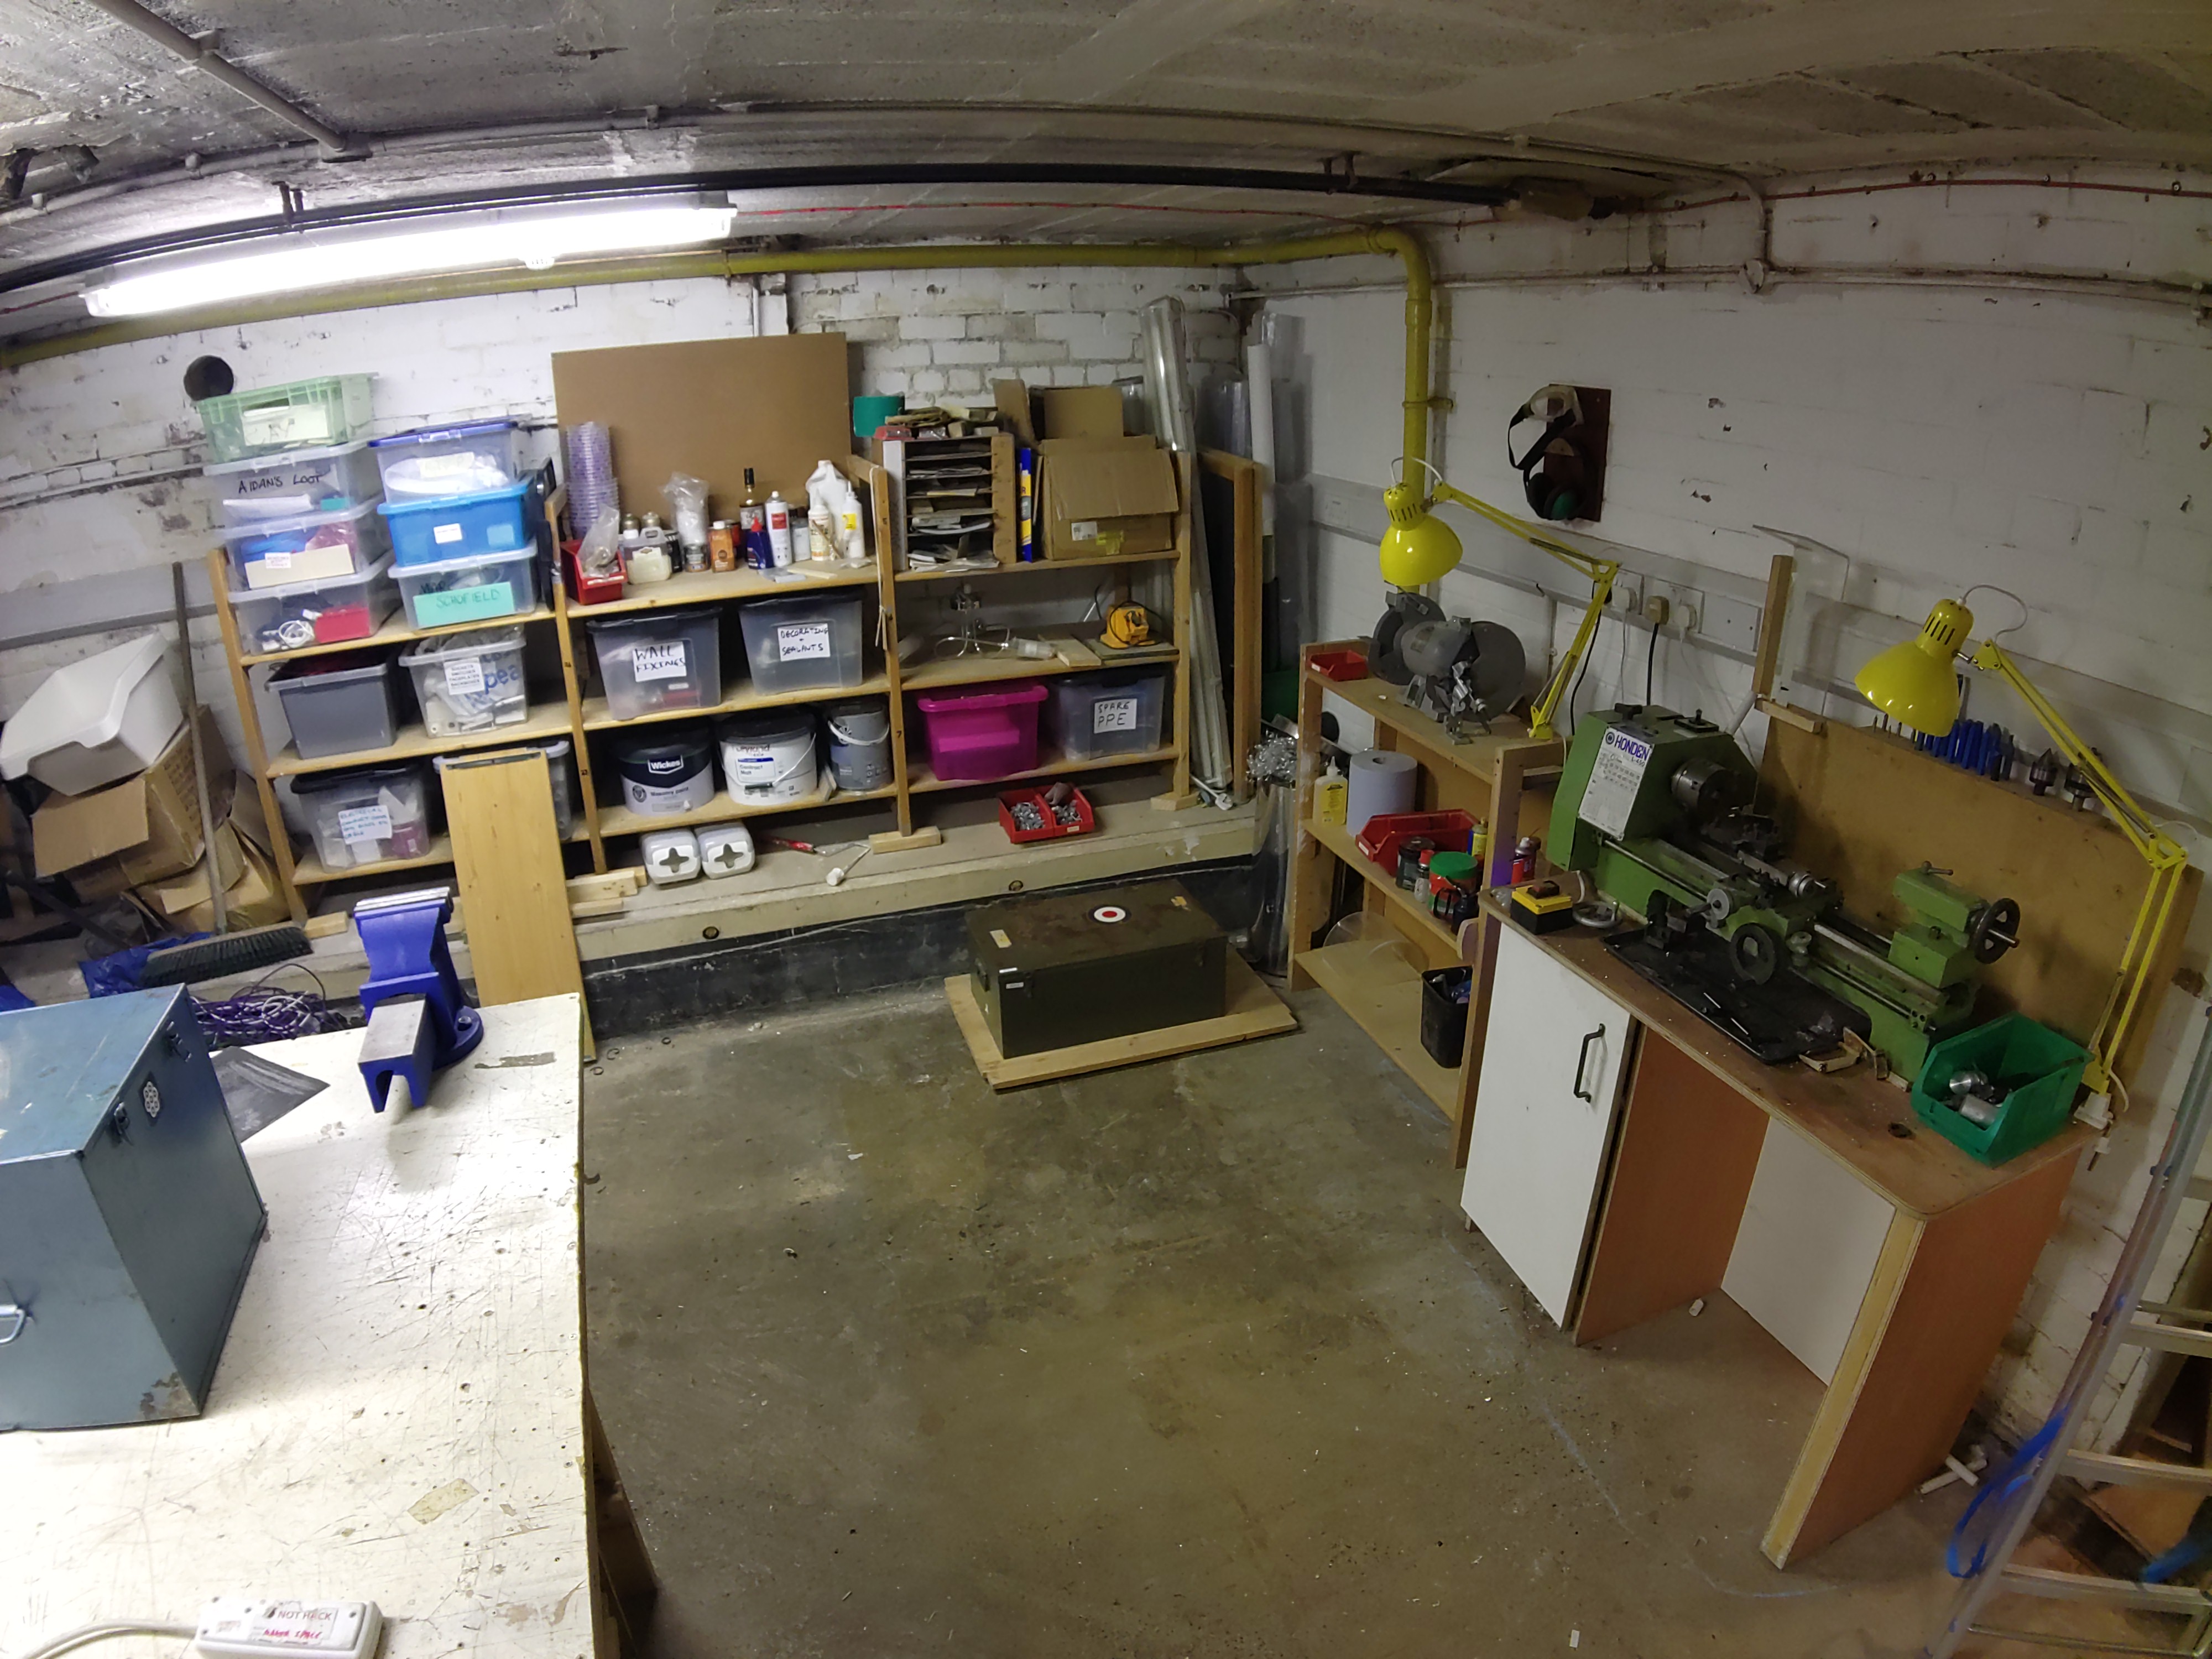
Welcome to the dedicated metalworking area within our innovative hackspace, a haven for metal enthusiasts and craftsmen alike. This well-appointed section is designed to cater to all your metalworking needs, featuring a top-of-the-line metal lathe as its centerpiece. The star of this area is a high-precision metal lathe, perfect for turning, facing, and threading a variety of metals. Its robust construction and advanced features ensure accuracy and reliability for all your projects. Alongside the lathe, you'll find an array of essential metalworking tools, including cutting tools, calipers, micrometers, and more, all meticulously maintained for optimal performance.
Against the rear wall, you will find yet another of our storage areas. These sturdy storage shelves, strategically placed against the wall, are designed to keep your tools and materials neatly arranged and easily accessible.
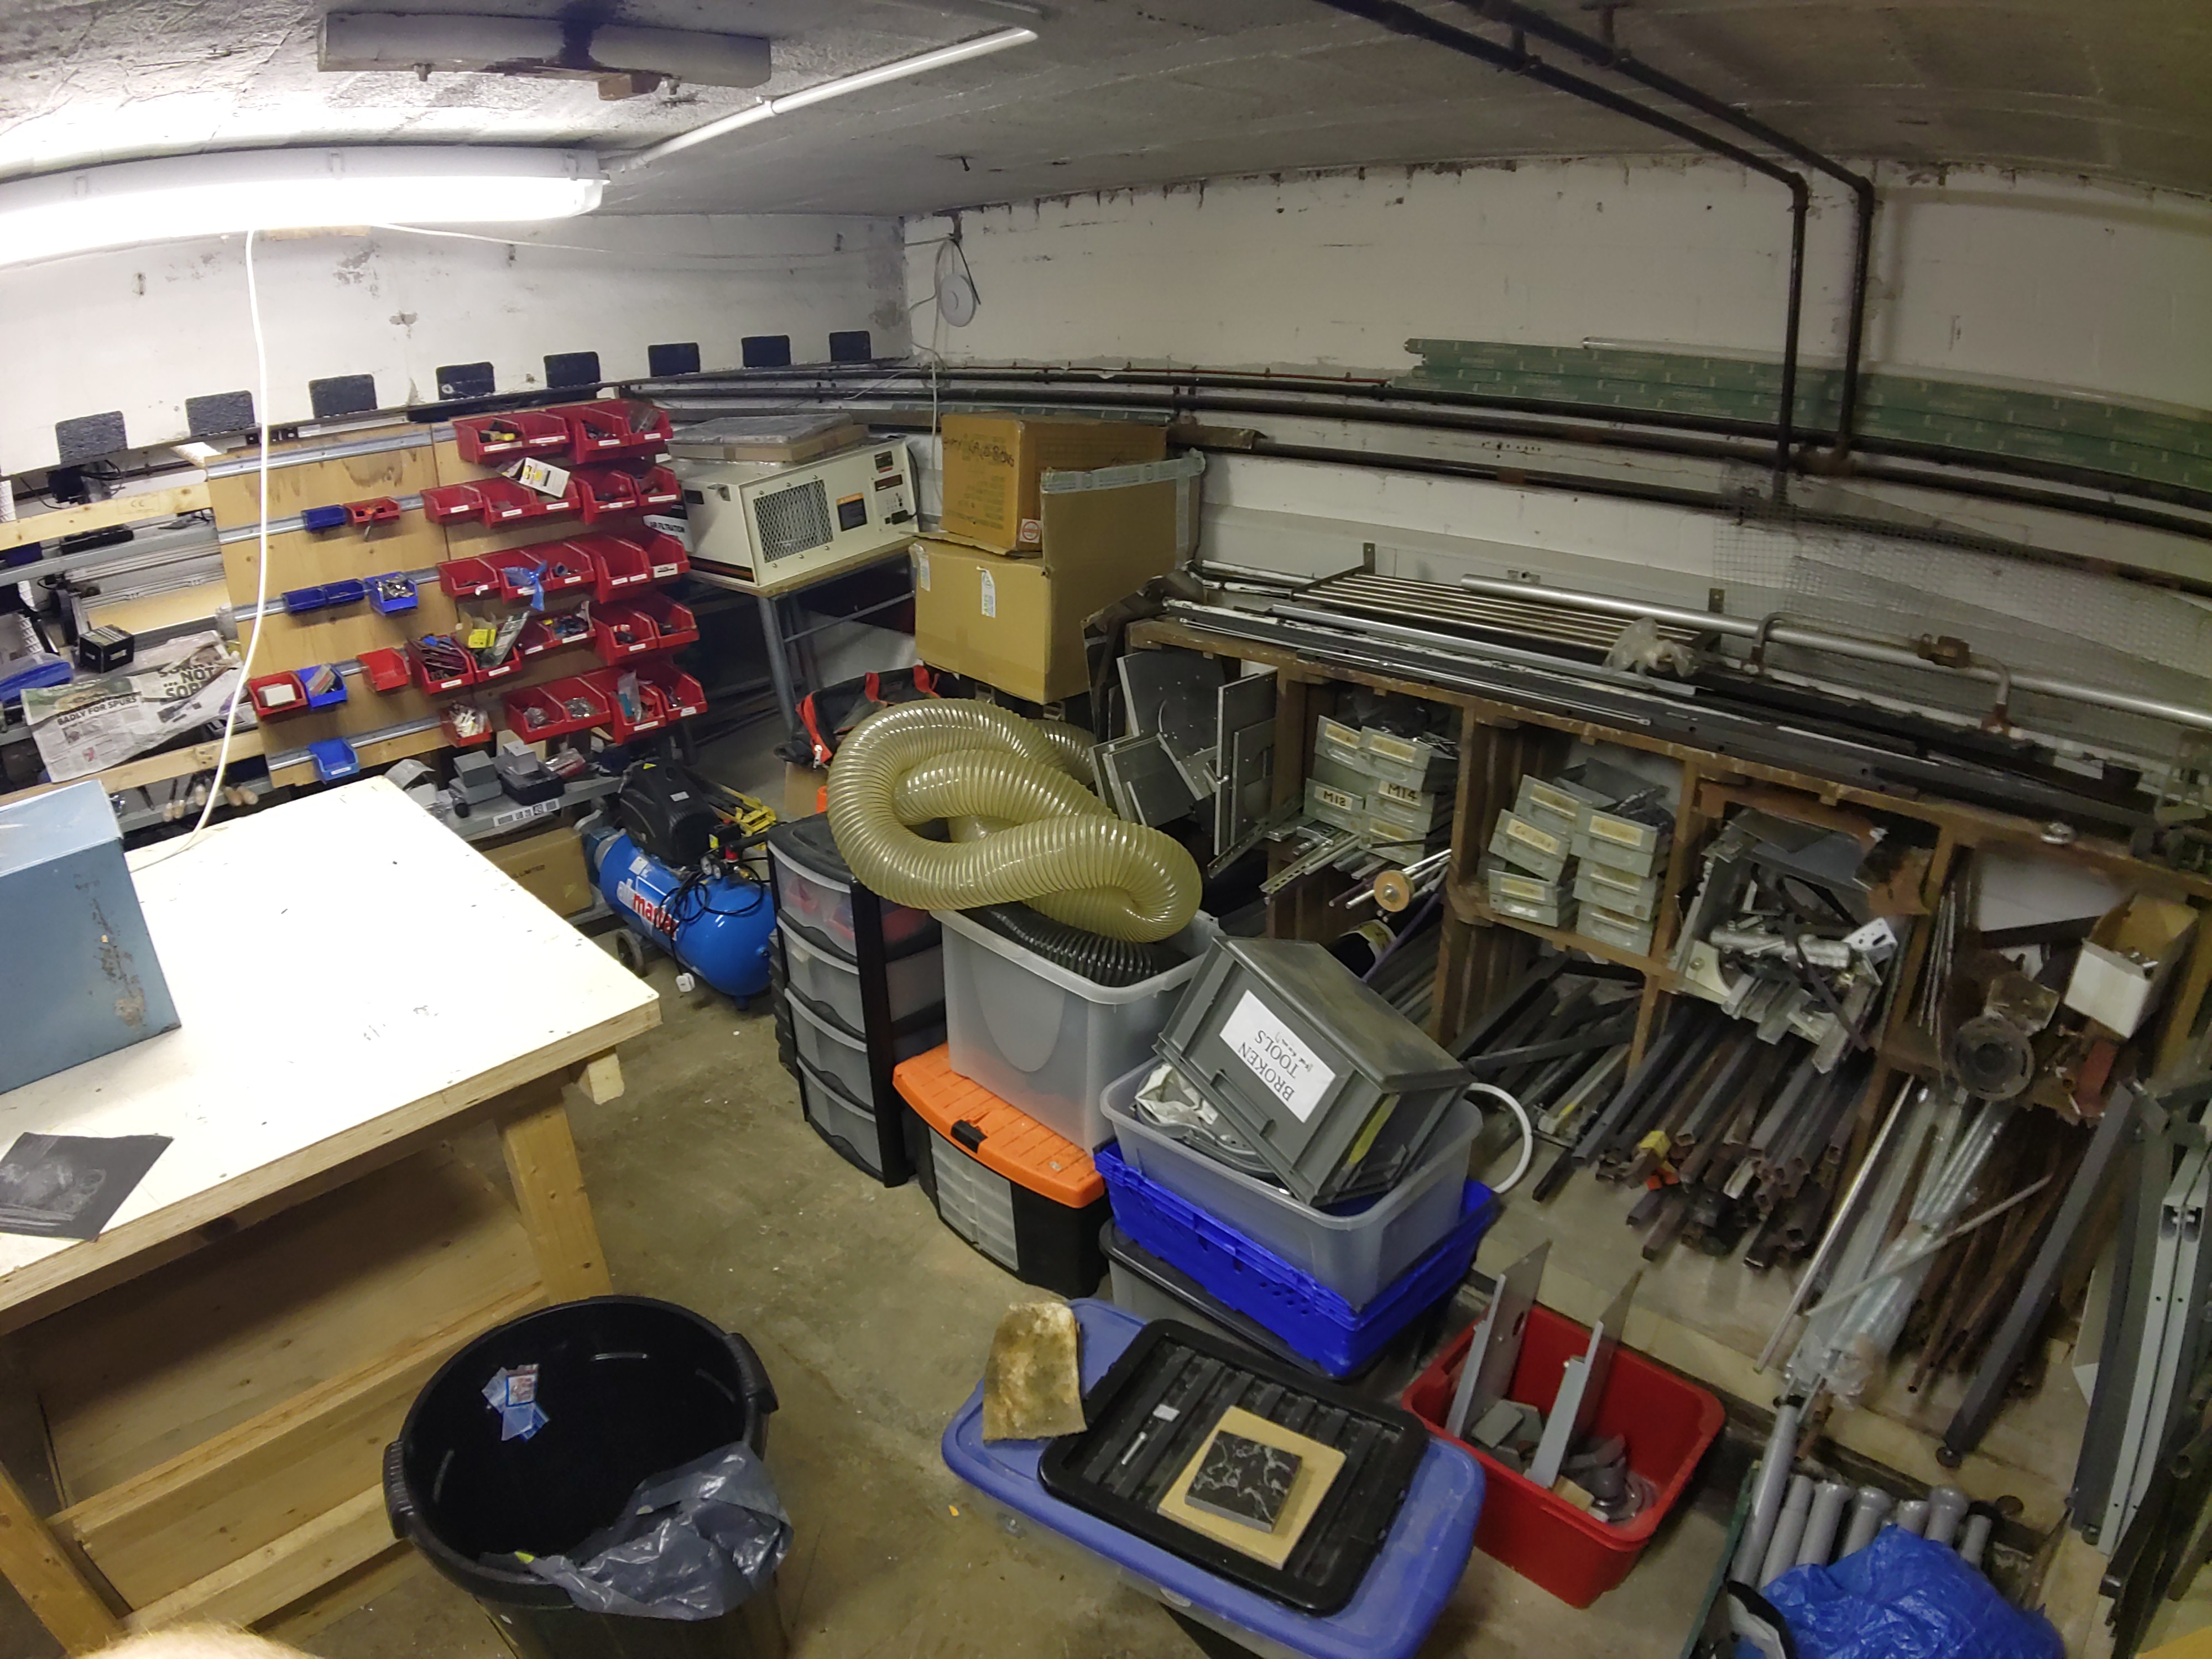
Against the adjoining wall you will discover the metal stock storage. This dedicated space is designed to cater to the needs of metalworking enthusiasts, ensuring that all materials are stored efficiently and safely. Metals are neatly categorized by type and size, making it easy to locate the exact material you need for your project. Whether you require aluminum, steel, copper, or brass, everything is clearly labeled and accessible. Conveniently located adjacent to the main metalworking area, the metal storage section allows for quick and easy access to materials, streamlining your workflow.
At the center of this dynamic space stands a robust and versatile workbench, designed to be the focal point for all your metalworking projects. This workbench is built to withstand the rigors of heavy-duty metalworking, featuring a solid frame and a thick, durable work surface. Equipped with a high-quality vice, the workbench ensures secure clamping of materials, allowing for precise and stable work.
Equipment
Here you will find an overview of the equipment available at Maker Space.
Larger, more complex or more significant items are listed, by area, below. A more complete, yet with less information, list of things we have can be found here.
Equipment is typically listed with a list of responsible person(s). These people are who you should seek advice of with regards to induction requests, reporting faults and discussing alteration/upgrades. Do not attempt to modify or repair a piece of equipment without prior discussion/approval/understanding of the people responsible for the equipment in question.
Access controlled equipment
Certain items in the space are fitted with RFID access controllers. These ensure that only members who are sure of their own competence in using a specific piece of equipment can use them.
TODO: add link to access controller docs
In order to gain access to a piece of equipment, a responsible person for that machine will have to verify that you are sure of how to operate the equipment safely. More information about the skills and knowledge you will be required to demonstrate can be found on the page for that machine.
Ground Floor Corridor
Ground Floor Workshop
South Basement Workshop
- CNC Mill
- Axminster Bandsaw
- Record Power Drill Press
- Record Power Belt & Disc Sander
- Chop Saw
North Basement Workshop
- Workbee CNC Router
- Air Compressor
- Metal Lathe
- Bench Grinder
Abridged Equipment List
This list serves as a more complete list of the things we have in Maker Space. It does, however, contain much less information than the pages for specific pieces of equiptment.
Some items on this may be deserving of a full equipment page. If you believe that to be the case for a particular item: well volunteered.
| Item | Approximate Location |
|---|---|
| Henry hoover | Ground Floor Workshop |
| EEPROM programmer | Ground Floor Workshop - goldfish bowl - right hand shelves |
| Spare monitors | Ground Floor Workshop - goldfish bowl - right hand shelves |
| Bench power supplies | Ground Floor Workshop - goldfish bowl - right hand shelves |
| More bench power supplies | Ground Floor Workshop - solder station |
| Various network switches | Ground Floor Workshop - goldfish bowl - right hand shelves |
| Rigol oscilloscope | Ground Floor Workshop - goldfish bowl - right hand shelves |
| Label printer | Ground Floor Workshop - goldfish bowl - middle drawer under 2D printer |
Laser Cutter (Hoshiguma)
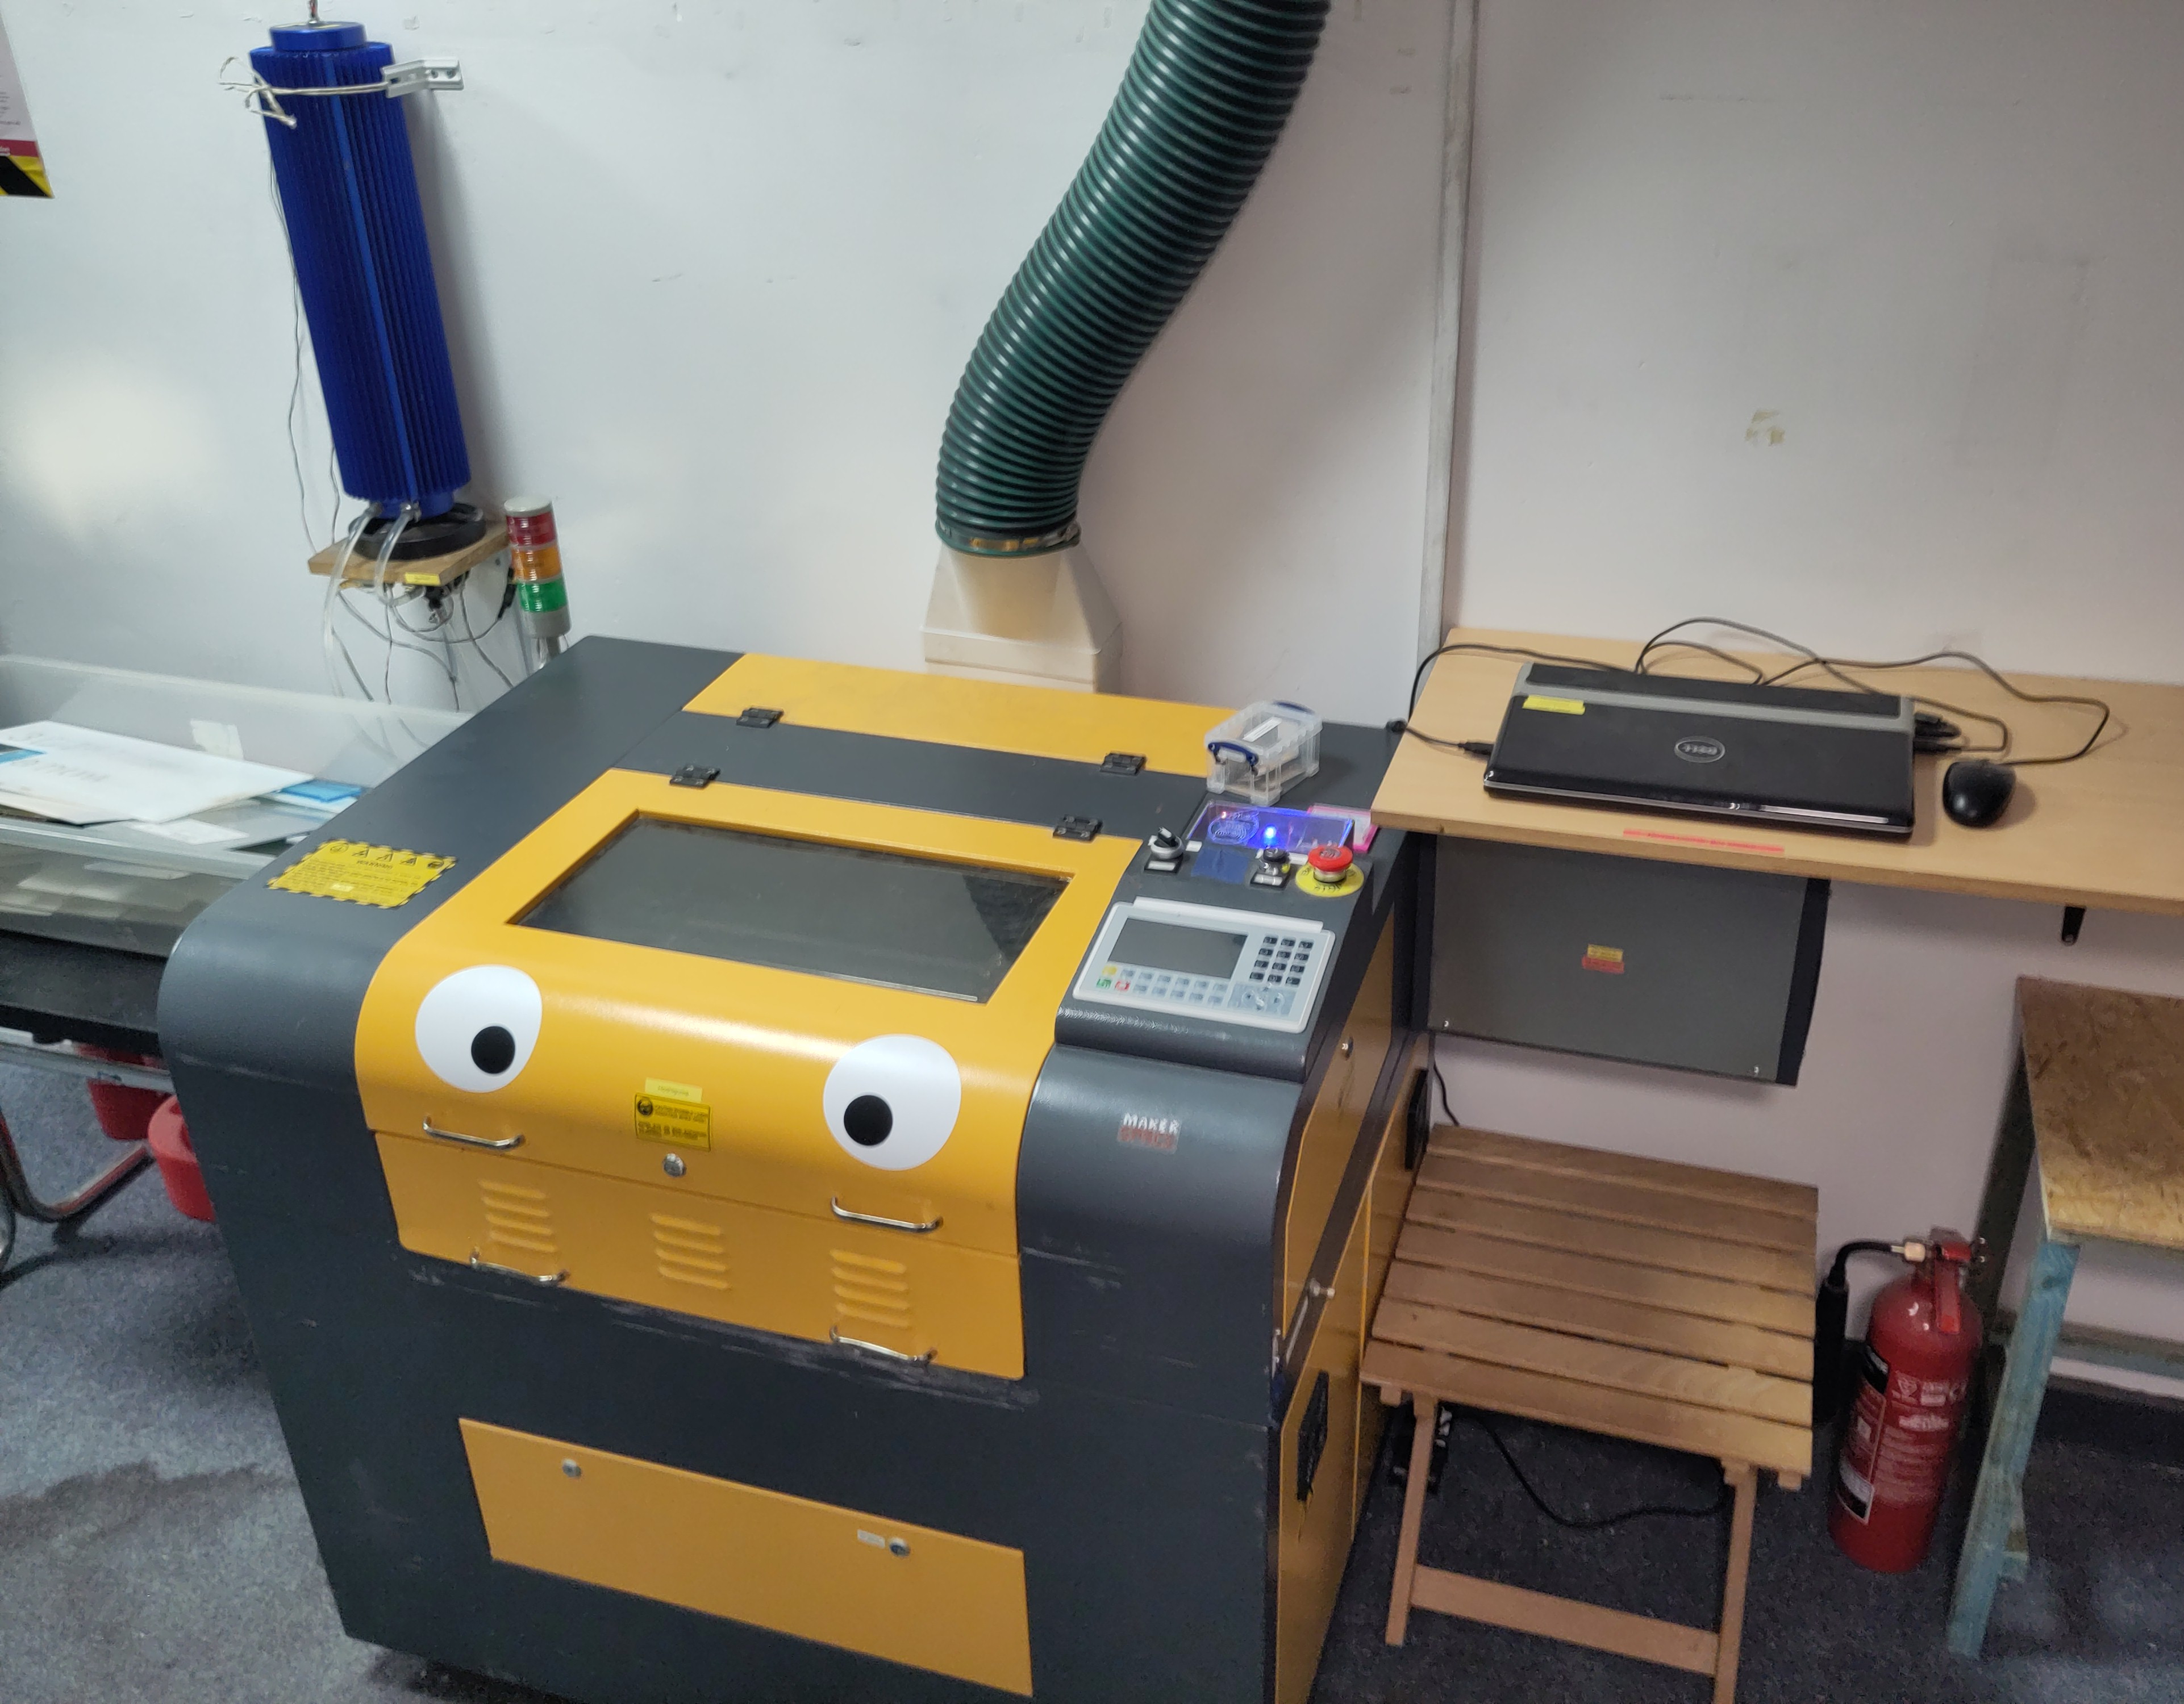
A laser cutter. It cuts stuff using a laser.
Essential Information
- Location: Ground Floor Corridor
- Responsible Person(s): Dan Nixon
- Induction Required: Yes
Usage notes
It is not permitted under any circumstances to leave this machine running unattended!
A list of compatible materials can be found here. A list of known good settings is here.
Note: both the safety/accessory control system and cooling system are currently being worked on (I know, top notch planning, right?). As such, please avoid doing very long (>20 minute) jobs without asking about how to reasonably do this first.
Laser suitable materials
Materials that can be cut/engraved (largely taken from the London Hack Space wiki).
If you want to cut a material which is not on the allowed list you must contact the maintainers through the members email list to ask permission.
Prohibited materials
- Anything that cannot, with reasonable confidence, be identified
- Cork (fire risk)
- Wood which isn't explicitly laser-grade (laser contamination, fire risk, emissions)
- Food (laser contamination, fire risk, emissions)
- Body parts
- Plastics containing PVC (laser contamination, emissions)
- Plastics containing ABS (laser contamination, fire risk, cyanide emission)
- Fibreglass (laser contamination, fire risk, emissions)
- Circuit boards (laser contamination, fire risk, emissions)
- Polycarbonate (laser contamination, fire risk)
- All metal (except engraving anodized aluminium)
- Polystyrene (laser contamination, fire risk, emissions)
- Polypropylene (laser contamination, fire risk, emissions)
- HDPE (high-density polyethylene or polyethylene) (laser contamination, fire risk, emissions)
- Carbon fibre (laser contamination, fire risk, emissions)
- Shuttering ply (laser contamination, fire risk, emissions)
- Latex (laser contamination, fire risk, emissions)
- Leather, all. (laser contamination)
- Anything not explicitly allowed (either in the lists below, or by prior permission)
Allowed
Woods:
- Laser-grade MDF (max 8mm)
- Laser-grade plywood
- Birch ply (max 9mm)
- Poplar ply (max 9mm)
- Balsa wood
- Paper (cutting only)
- Card/Cardboard (cutting only)
Plastics:
- Thin Polypropylene sheet (<1mm)
- Acrylic (max 10mm)
- Foamcore (non-PVC variety)
- Correx (Genuine non PVC)
- Depron foam (Fire risk, must be closely monitored)
- EVA Foam (if real)
- Delrin (max 8mm)
Textiles:
- Cloth/felt/hemp/cotton (Not plastic-impregnated fabric)
- Polar Fleece
Engraving only
- Stone
- Ceramic tile
- Non-resinous wood IE hardwood
- Glass
- Anodised Aluminium
Laser cutter settings
This is a list of contributed known good settings. They are probably good to just use, if nothing else they are a good starting point.
All laser users are free, and indeed encouraged, to update this list as they find new settings for specific materials.
| Material | Max. Power | Min. Power | Speed |
|---|---|---|---|
| Birch ply - 3mm | 80 | 65 | 25 |
Setting up LightBurn on your own laptop
It is possible to use your own laptop for preparing jobs and running the laser cutter. To do so, you will need LightBurn installed and licensed and the configuration for the laser cutter installed.
When operating the laser cutter, simply plug the USB cable into your laptop. Remember to plug it back into the communal laptop once you are finished (i.e. leave things how you found them).
Process
It is assumed that you have not previously installed LightBurn on the target laptop. If you have then you more than likely do not need this guide, can download the device profile file from step 2 and go on your merry way.
- Install LightBurn from here.
- Download
device_profile.lbdev. - Launch LightBurn.
- Either activate the trial or purchase your own suitable license and activate that (see note below).
- When prompted to add a machine, import the file downloaded in step 2.
- You should now have a machine named Hoshiguma available, use this when you want to prepare or machine jobs on this laser.
License requirement
Hoshiguma uses a Ruida controller, so is therefore a DSP machine in the eyes of LightBurn.
You will need either a DSP or DSP + Galvo license, or purchase the DSP addon. If you are purchasing a license with the discount code (see below), you should purchase a DSP license.
LightBurn discount
We (Maker Space) have a code for discounted Light Burn licenses for members. If you would like one, ask the person who did your laser training.
Note that the license is only to be using with the laser cutter in Maker Space. Should you need to use other machines you should pay for a full license.
Bambu Lab P1S
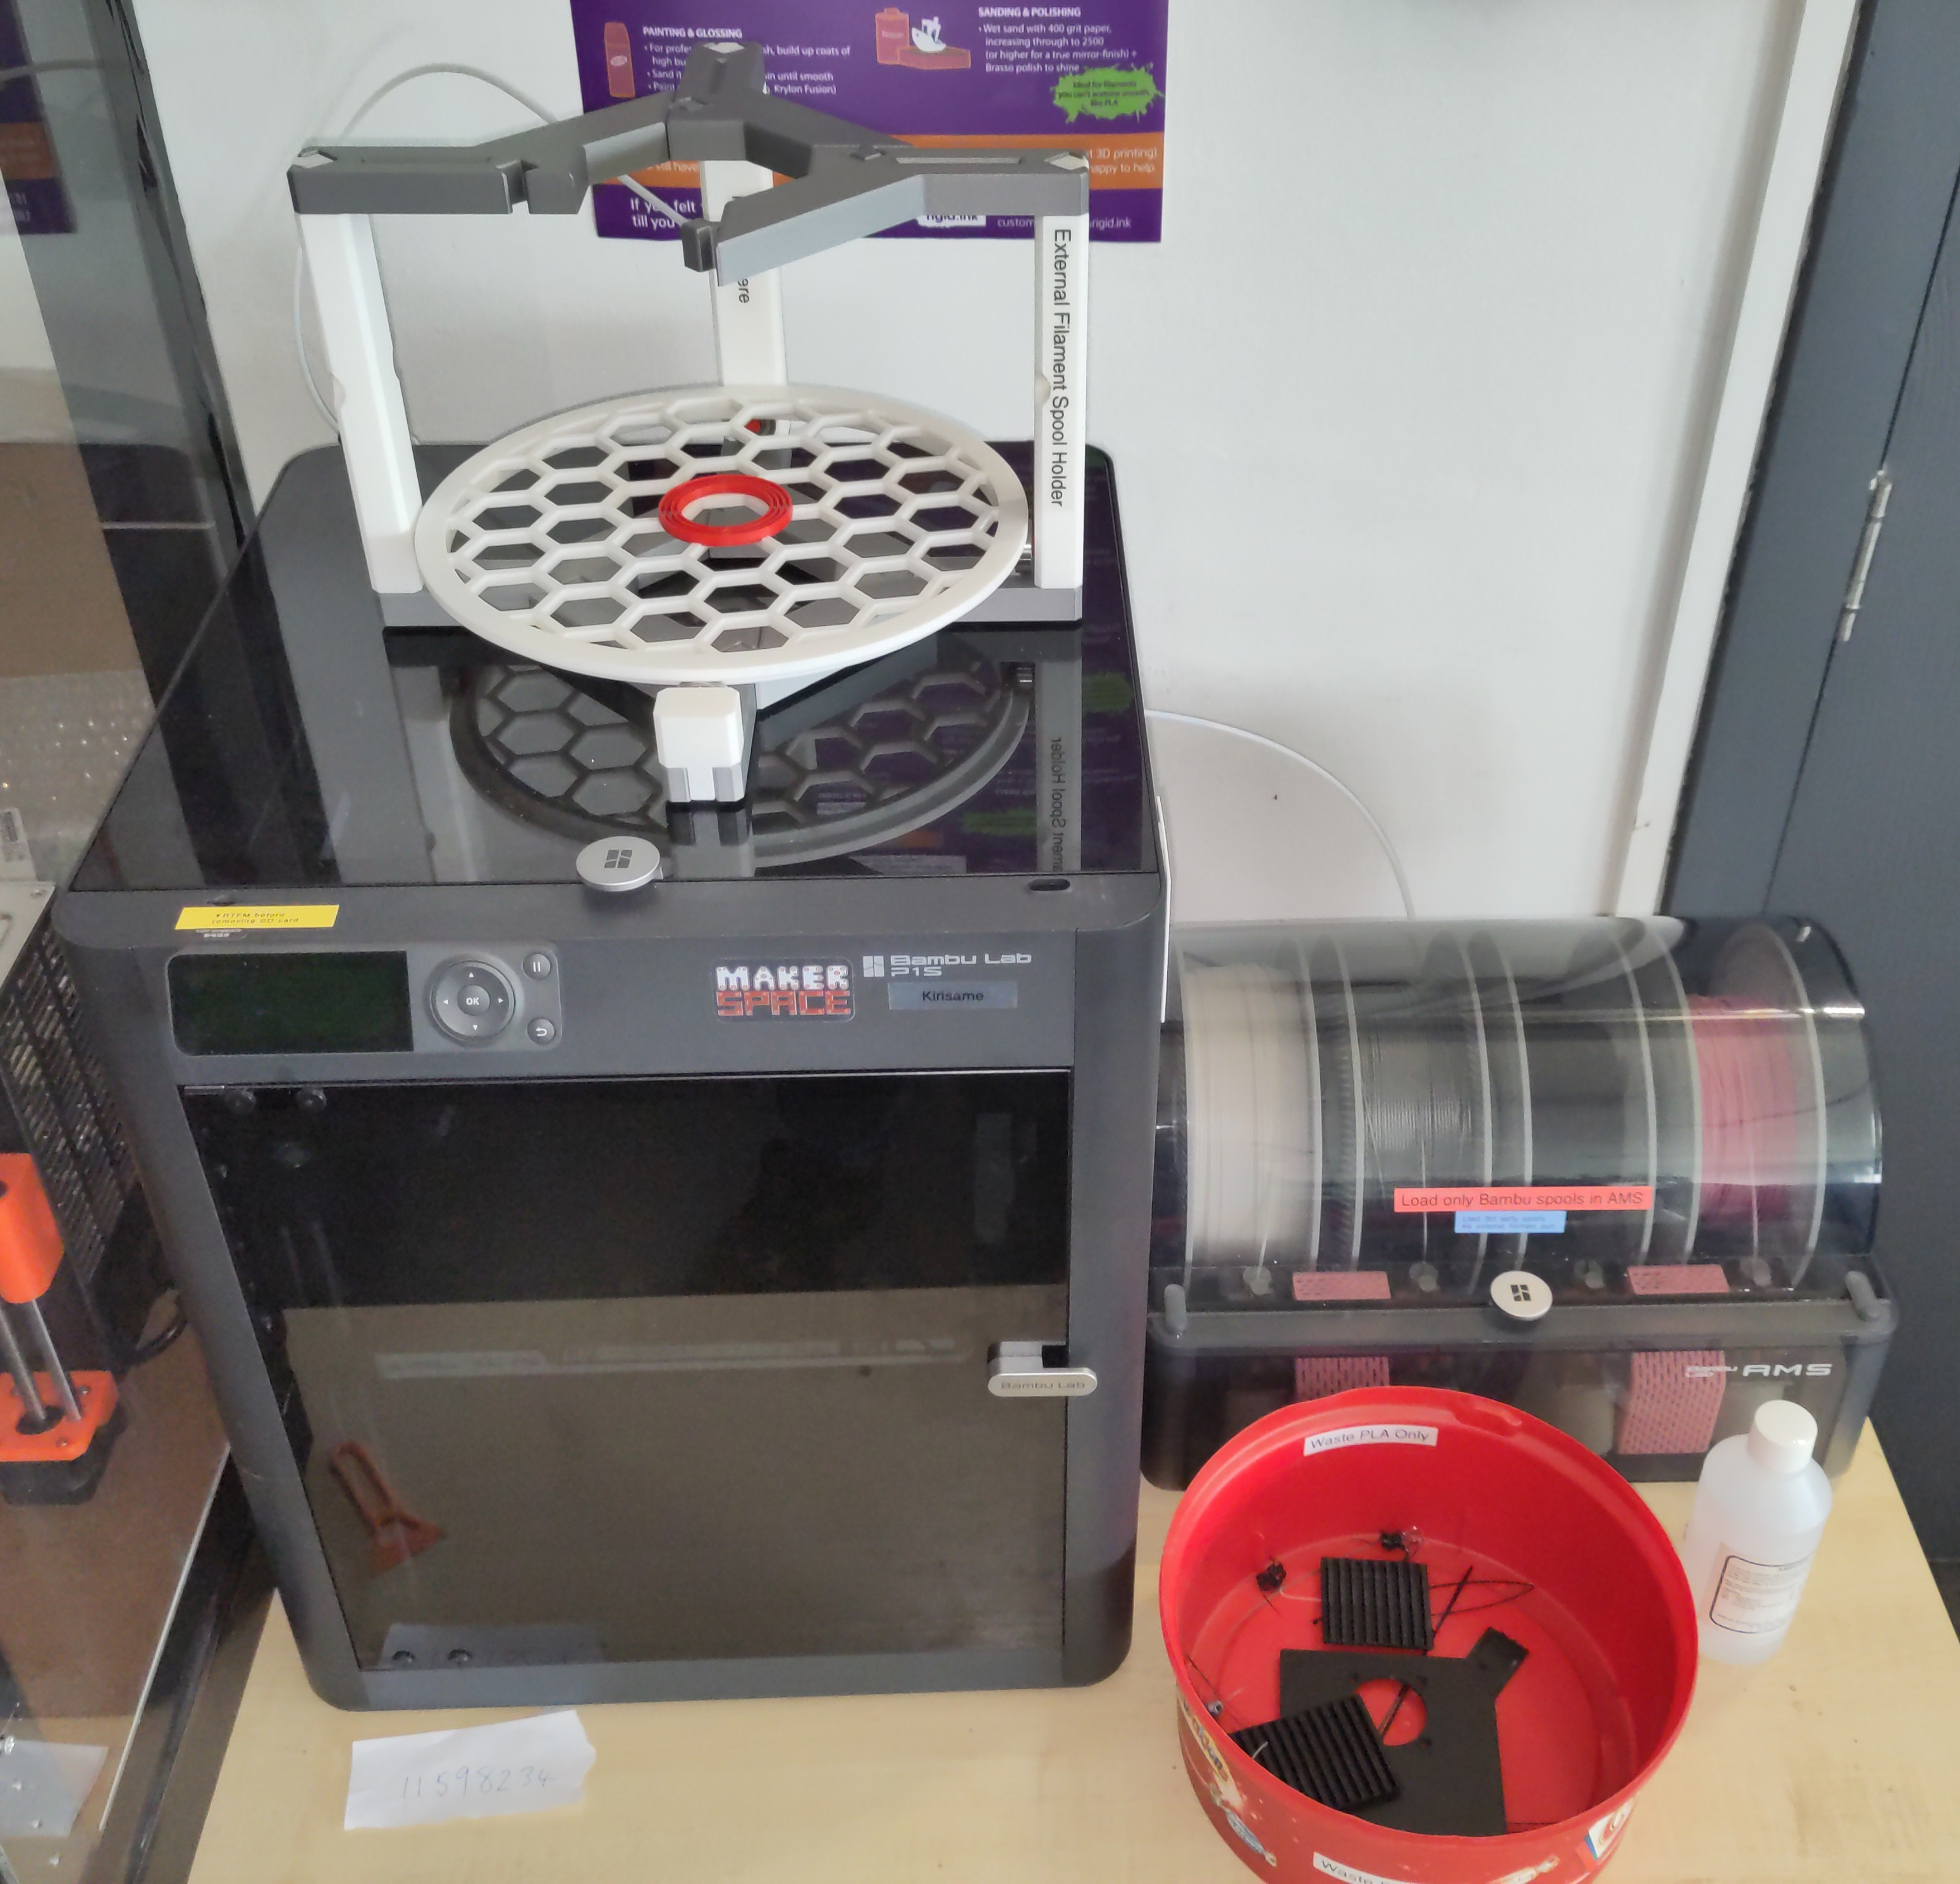
Bambu Lab P1S with AMS and external spool caddy. A very good, quick FDM 3D printer.
Essential Information
- Location: Ground Floor Workshop
- Responsible Person(s): Dan Nixon
- Induction Required: No
Usage notes
It is not permitted to leave this (or any other) 3D printer running whilst Maker Space is unoccupied!
While no induction is required, it is very strongly recommended to read the user guide before using the printer.
Useful links
Bambu Lab P1S user guide
Bambu Studio setup
Install
- Install and launch Bambu Suddio
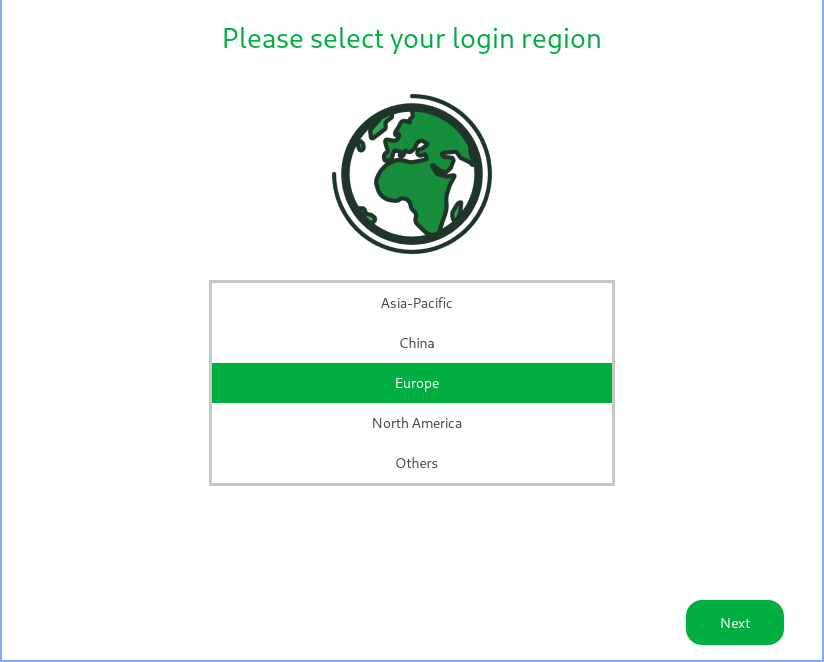
- Click "Get Started"

- Select "Europe"
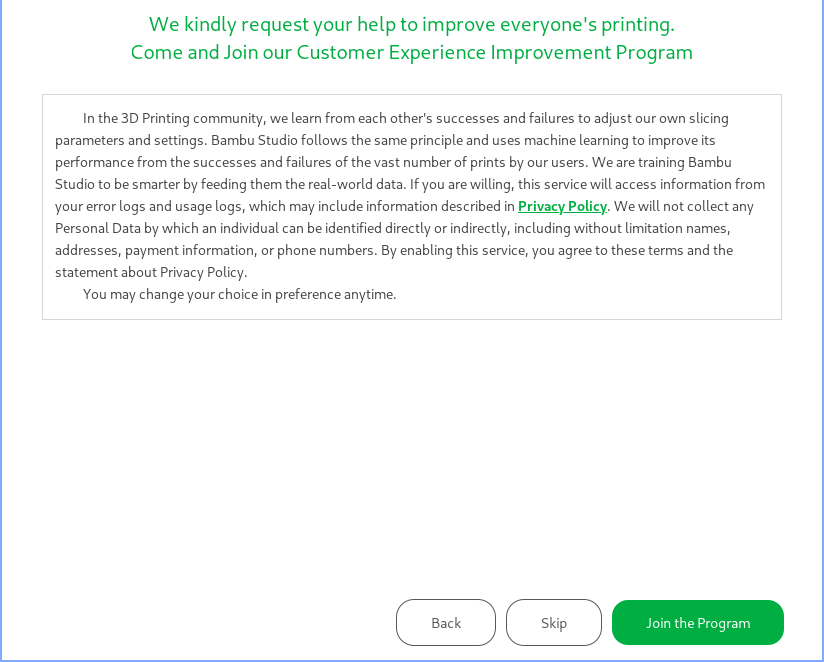
- Select "Skip"
- Select "Clear All"
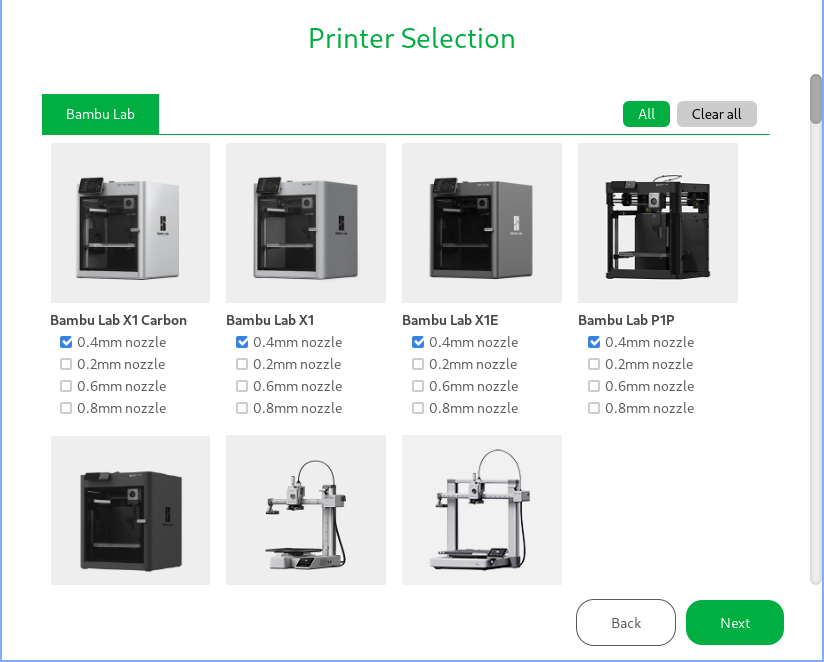
- Check "Bambu Lab P1S 0.4mm nozzle" and click "Next"
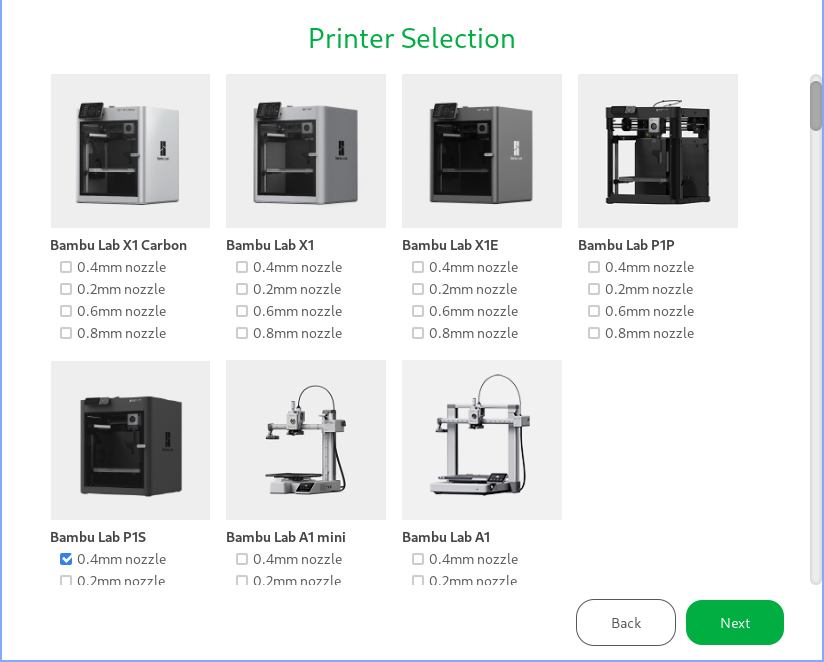
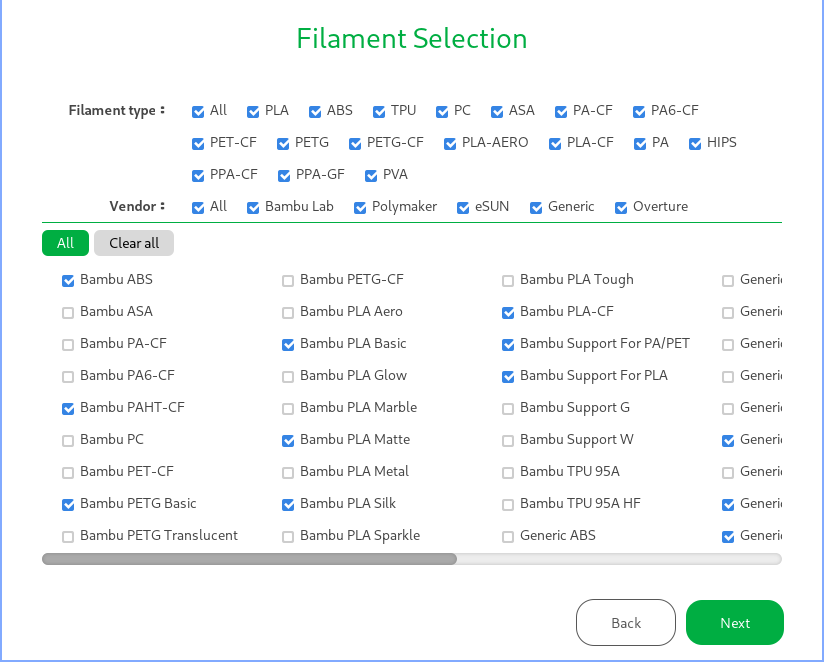
- Customise the filament selection if needed, otherwise just click "Next"
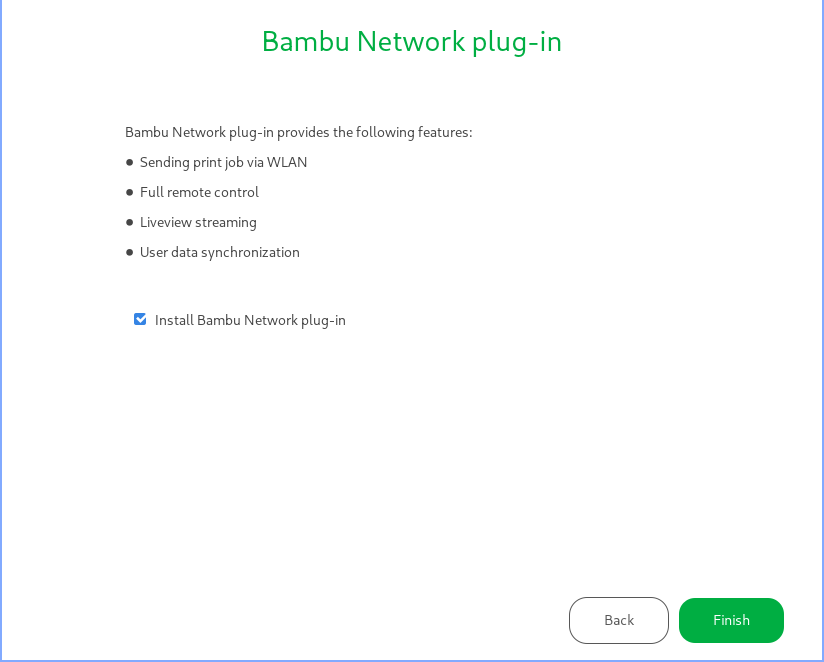
- Ensure "Install Bambu Network plug-in" is checked and click "Finish"
Add printer
- Switch to the "Devices" tab
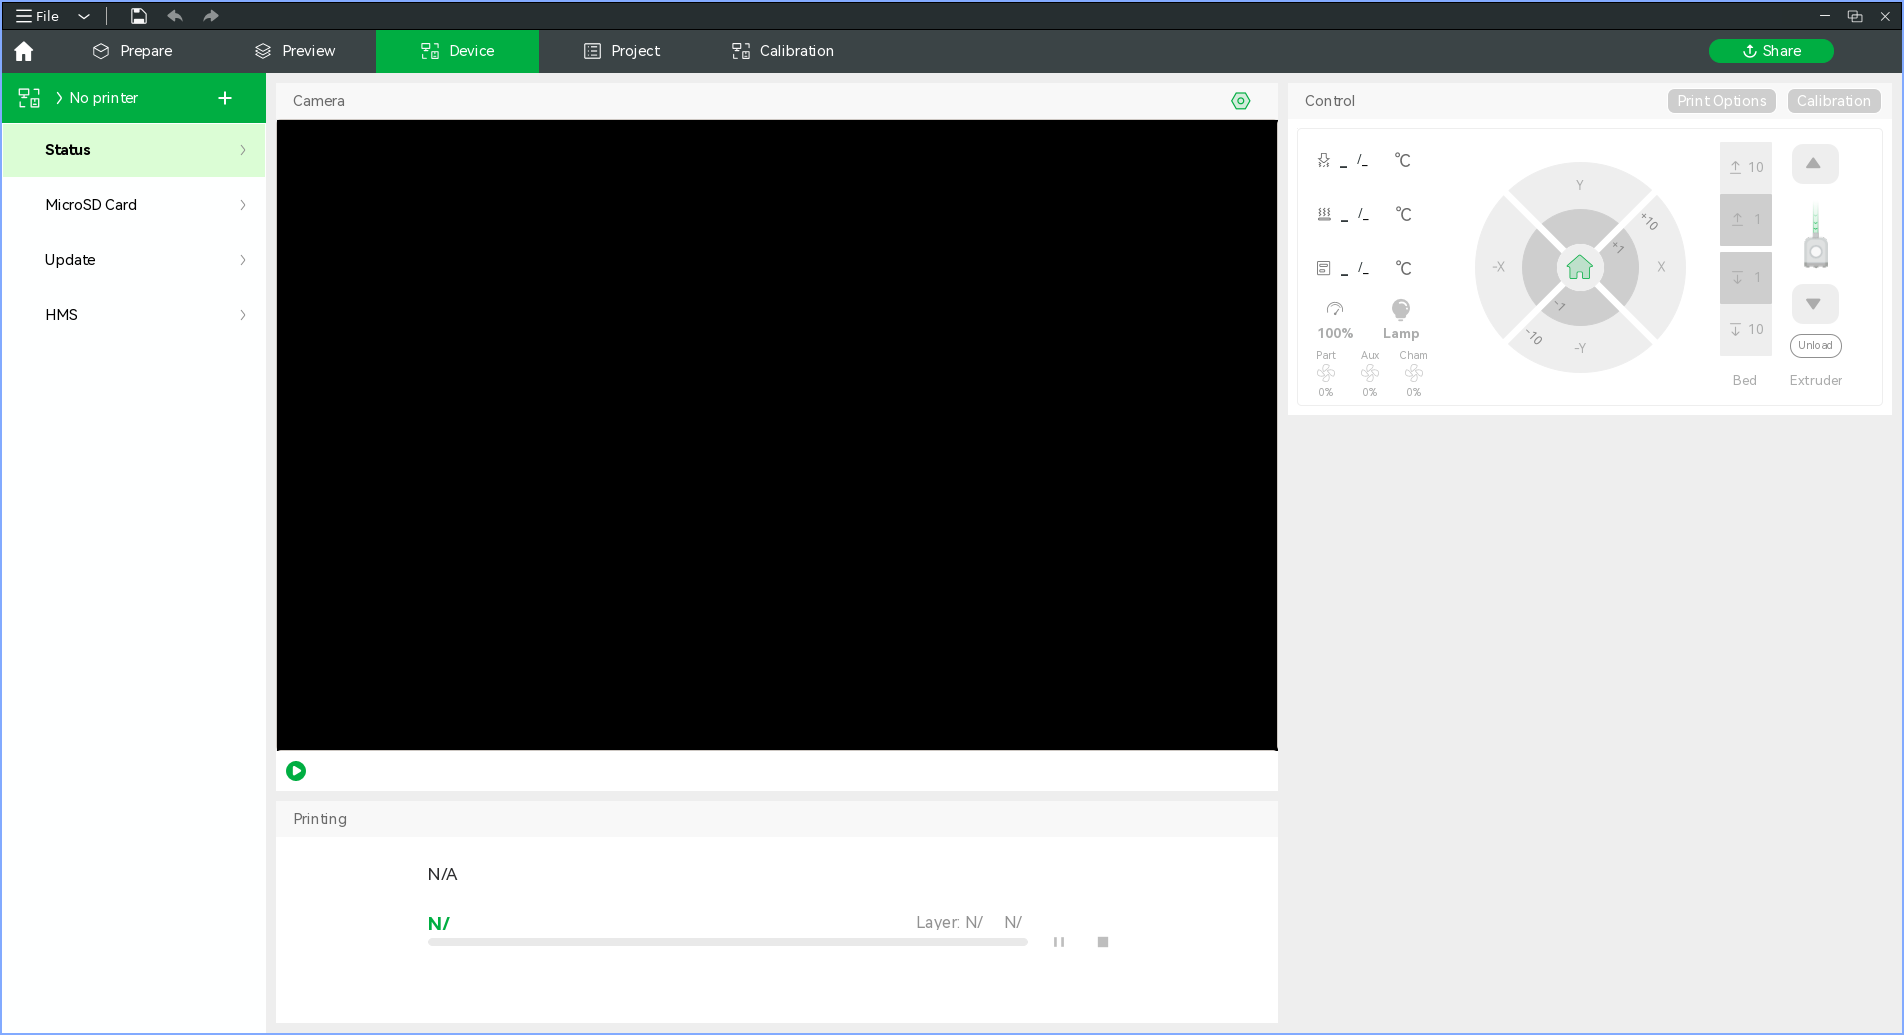
- Click on "No printer" and select "3DP-01P-744" from the list
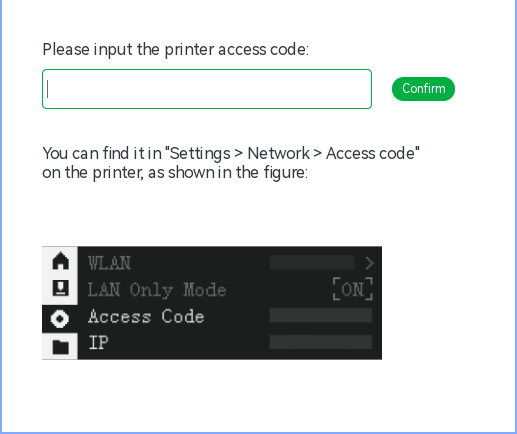
- When prompted enter the code from the printer menu as instructed
- The printer status should now be shown in the "Device" tab
If you do not see the printer in the device list then most likely your machine is not properly configured to act as an SSDP client. See Simple Service Discovery Protocol and Printer Network Ports for more info. TL;DR: open UDP port 2021 on your machines firewall and try again.
When getting the access code from the printer do not select the refresh icon next to the code.
Loading, Unloading and Configuring Filament
Unloading
- Ensure the filament you wish to remove from the AMS is not currently loaded into the printer
- Pull the filament out of the AMS feeder and lift the spool out
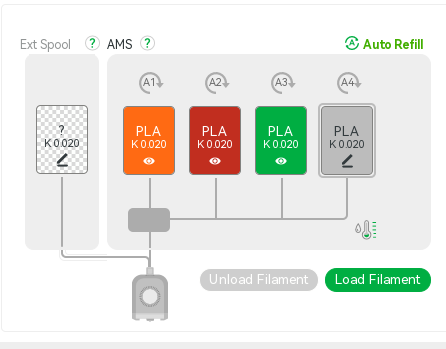
You can tell if a filament is loaded into the printer either by:
- Observing the tube connecting the AMS to the printer, if you cannot see the filament in question inside the tube then it is probably unloaded
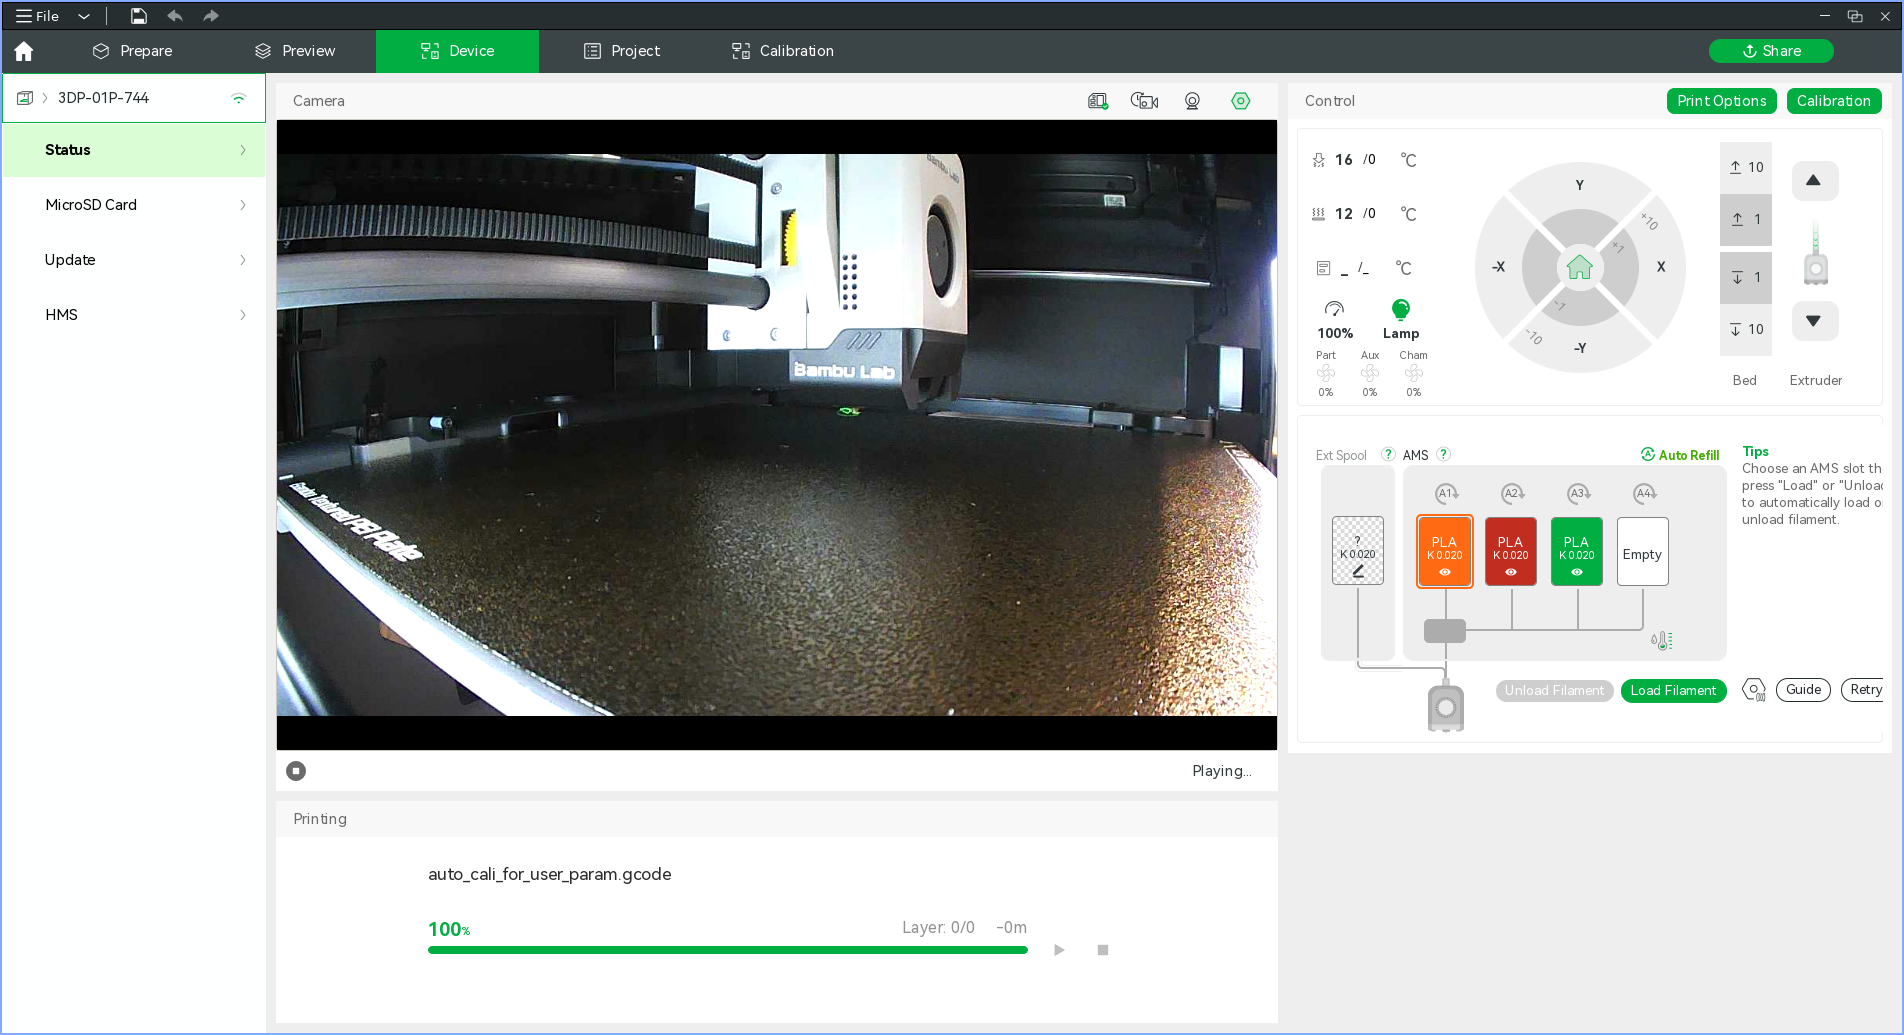
- Checking the diagram on the "Device" tab in Bambu Studio, if the line leading from the spool position is thin and grey then the filament is unloaded
Loading
Bambu Lab filament
- Place the spool in a free AMS slot
- Push the filament into the AMS feeder for the corresponding slot
- Wait 30 seconds or so for the filament to be identified
- Verify that the filament was correctly identified via the "Devices" tab in Bambu Studio
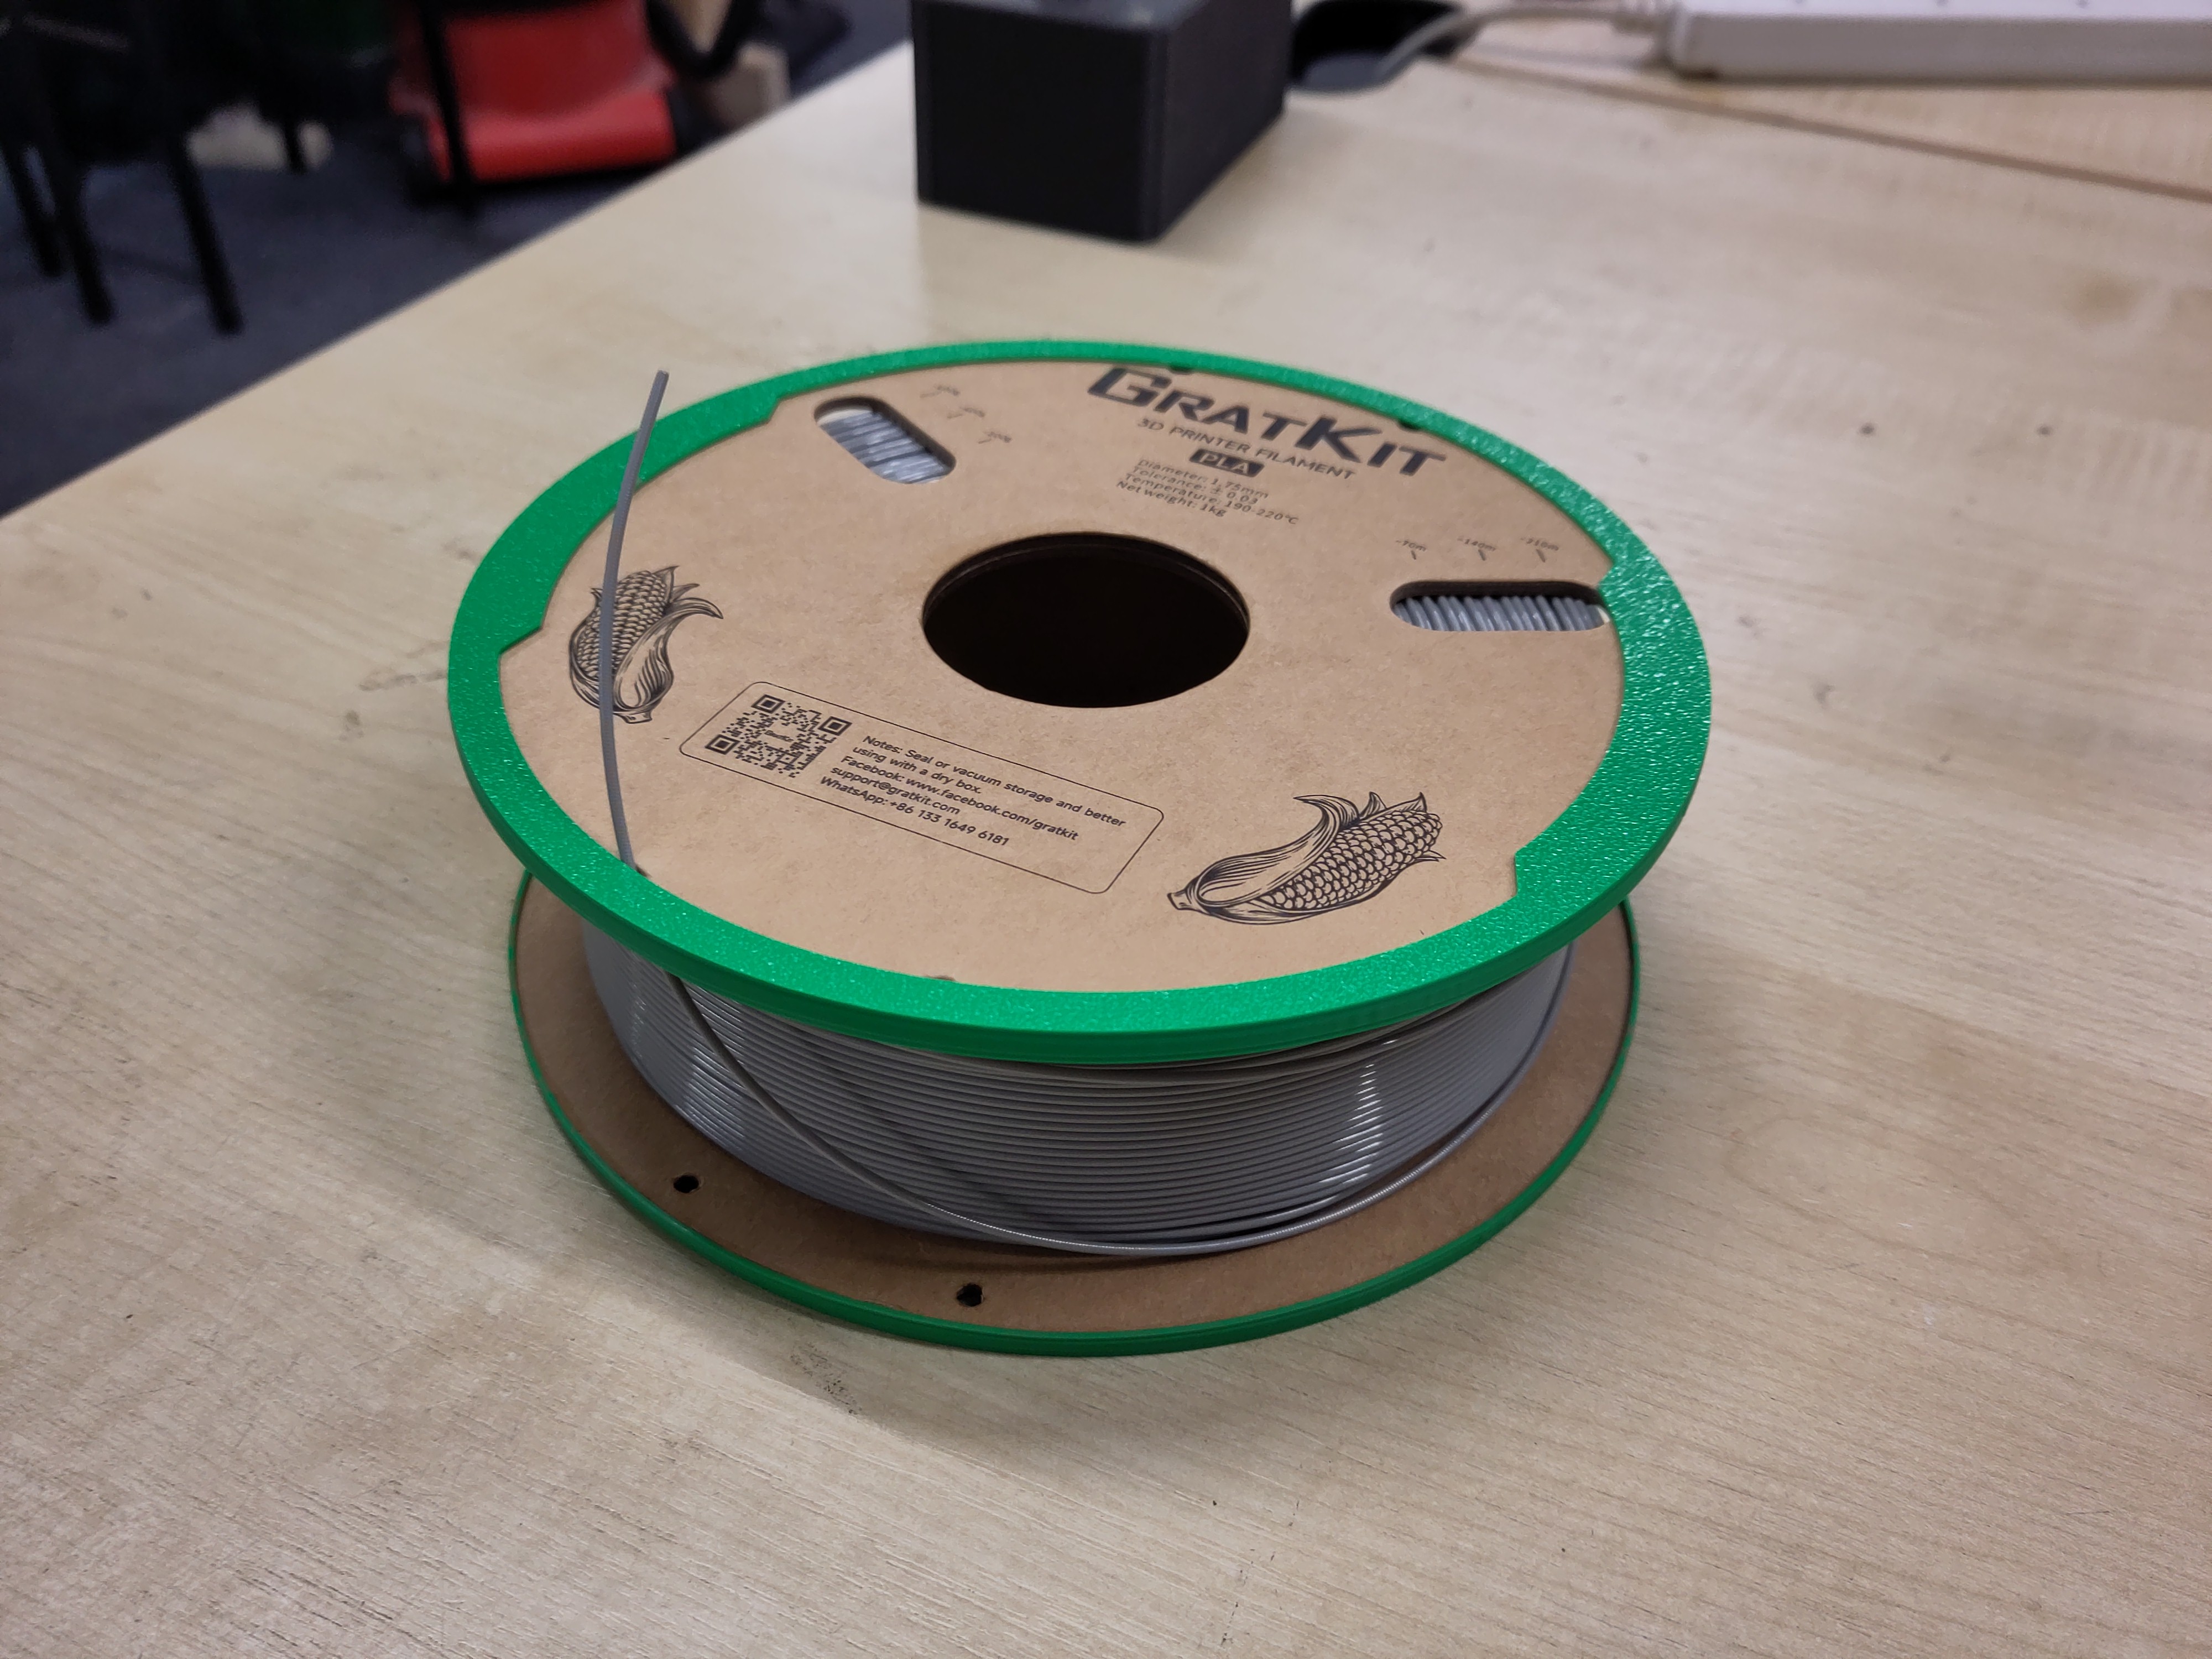
Generic filament on card spools
Filament on card spools should NOT be used directly in the AMS, the spool rollers chew up the card spools and make a mess of the AMS.
A shim can be printed to protect the edges of the card spool.
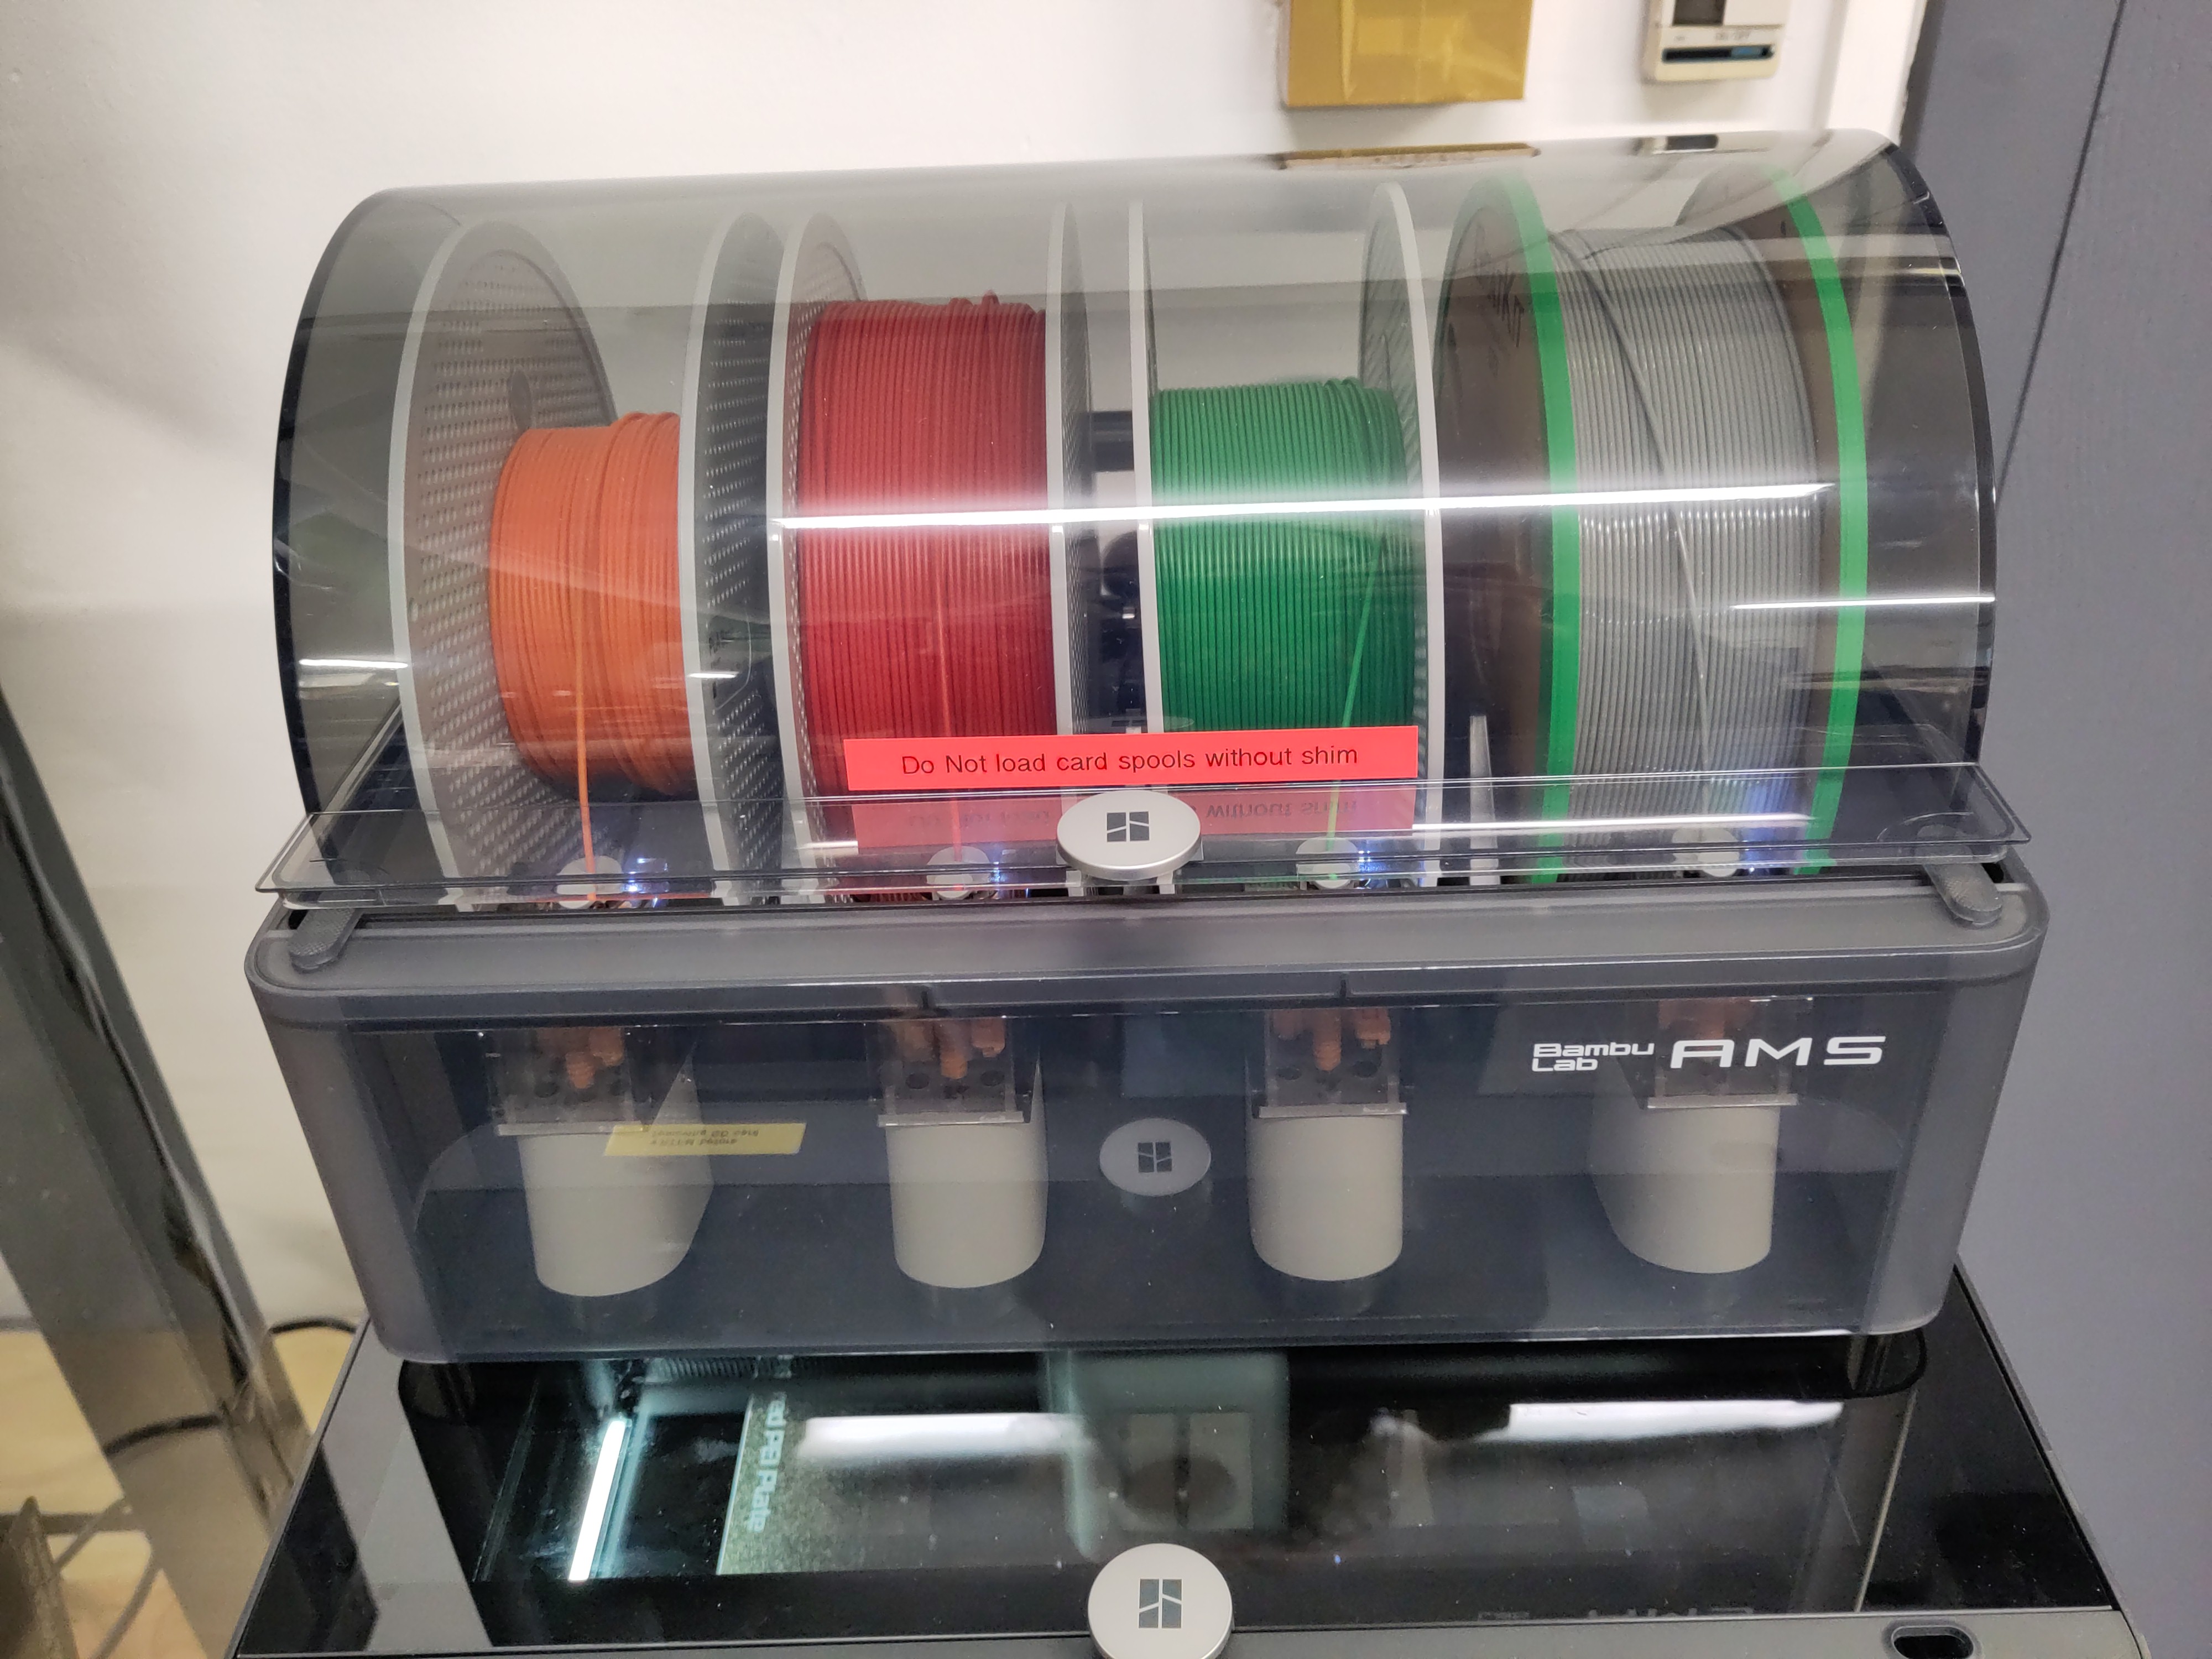
Some cardboard spools, once clad with a printed shim, are too wide for the lid of the AMS to be closed without clamping the spool and preventing it from moving. In this case the clips on the AMS lid may be used to prop the lid slightly open as shown below. This should only be done when a filament is loaded into the AMS that would otherwise foul the AMS lid, prefer closing the lid when possible to take advantage of the humidity control offered by the AMS.
Generic filament
- Place the spool in a free AMS slot
- Push the filament into the AMS feeder for the corresponding slot
- In the "Device" tab of Bambu Studio, click the edit icon on the just loaded AMS slot (may show either an "?" or the settings for the last non RFID filament used in that slow)
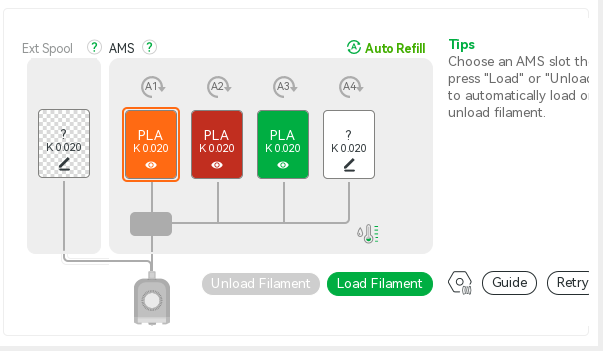
- Edit the parameters and click "Confirm"
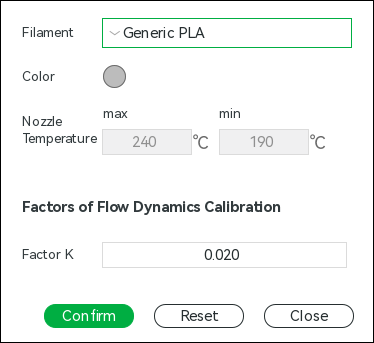
- The "Devices" tab should now show the filament type you specified
Printing
Preparing printer
- Ensure there are no obstacles above or below the bed and that the build plate is correctly seated, located by the white tabs on the rear corners (highlighted in red squares in the photo below)
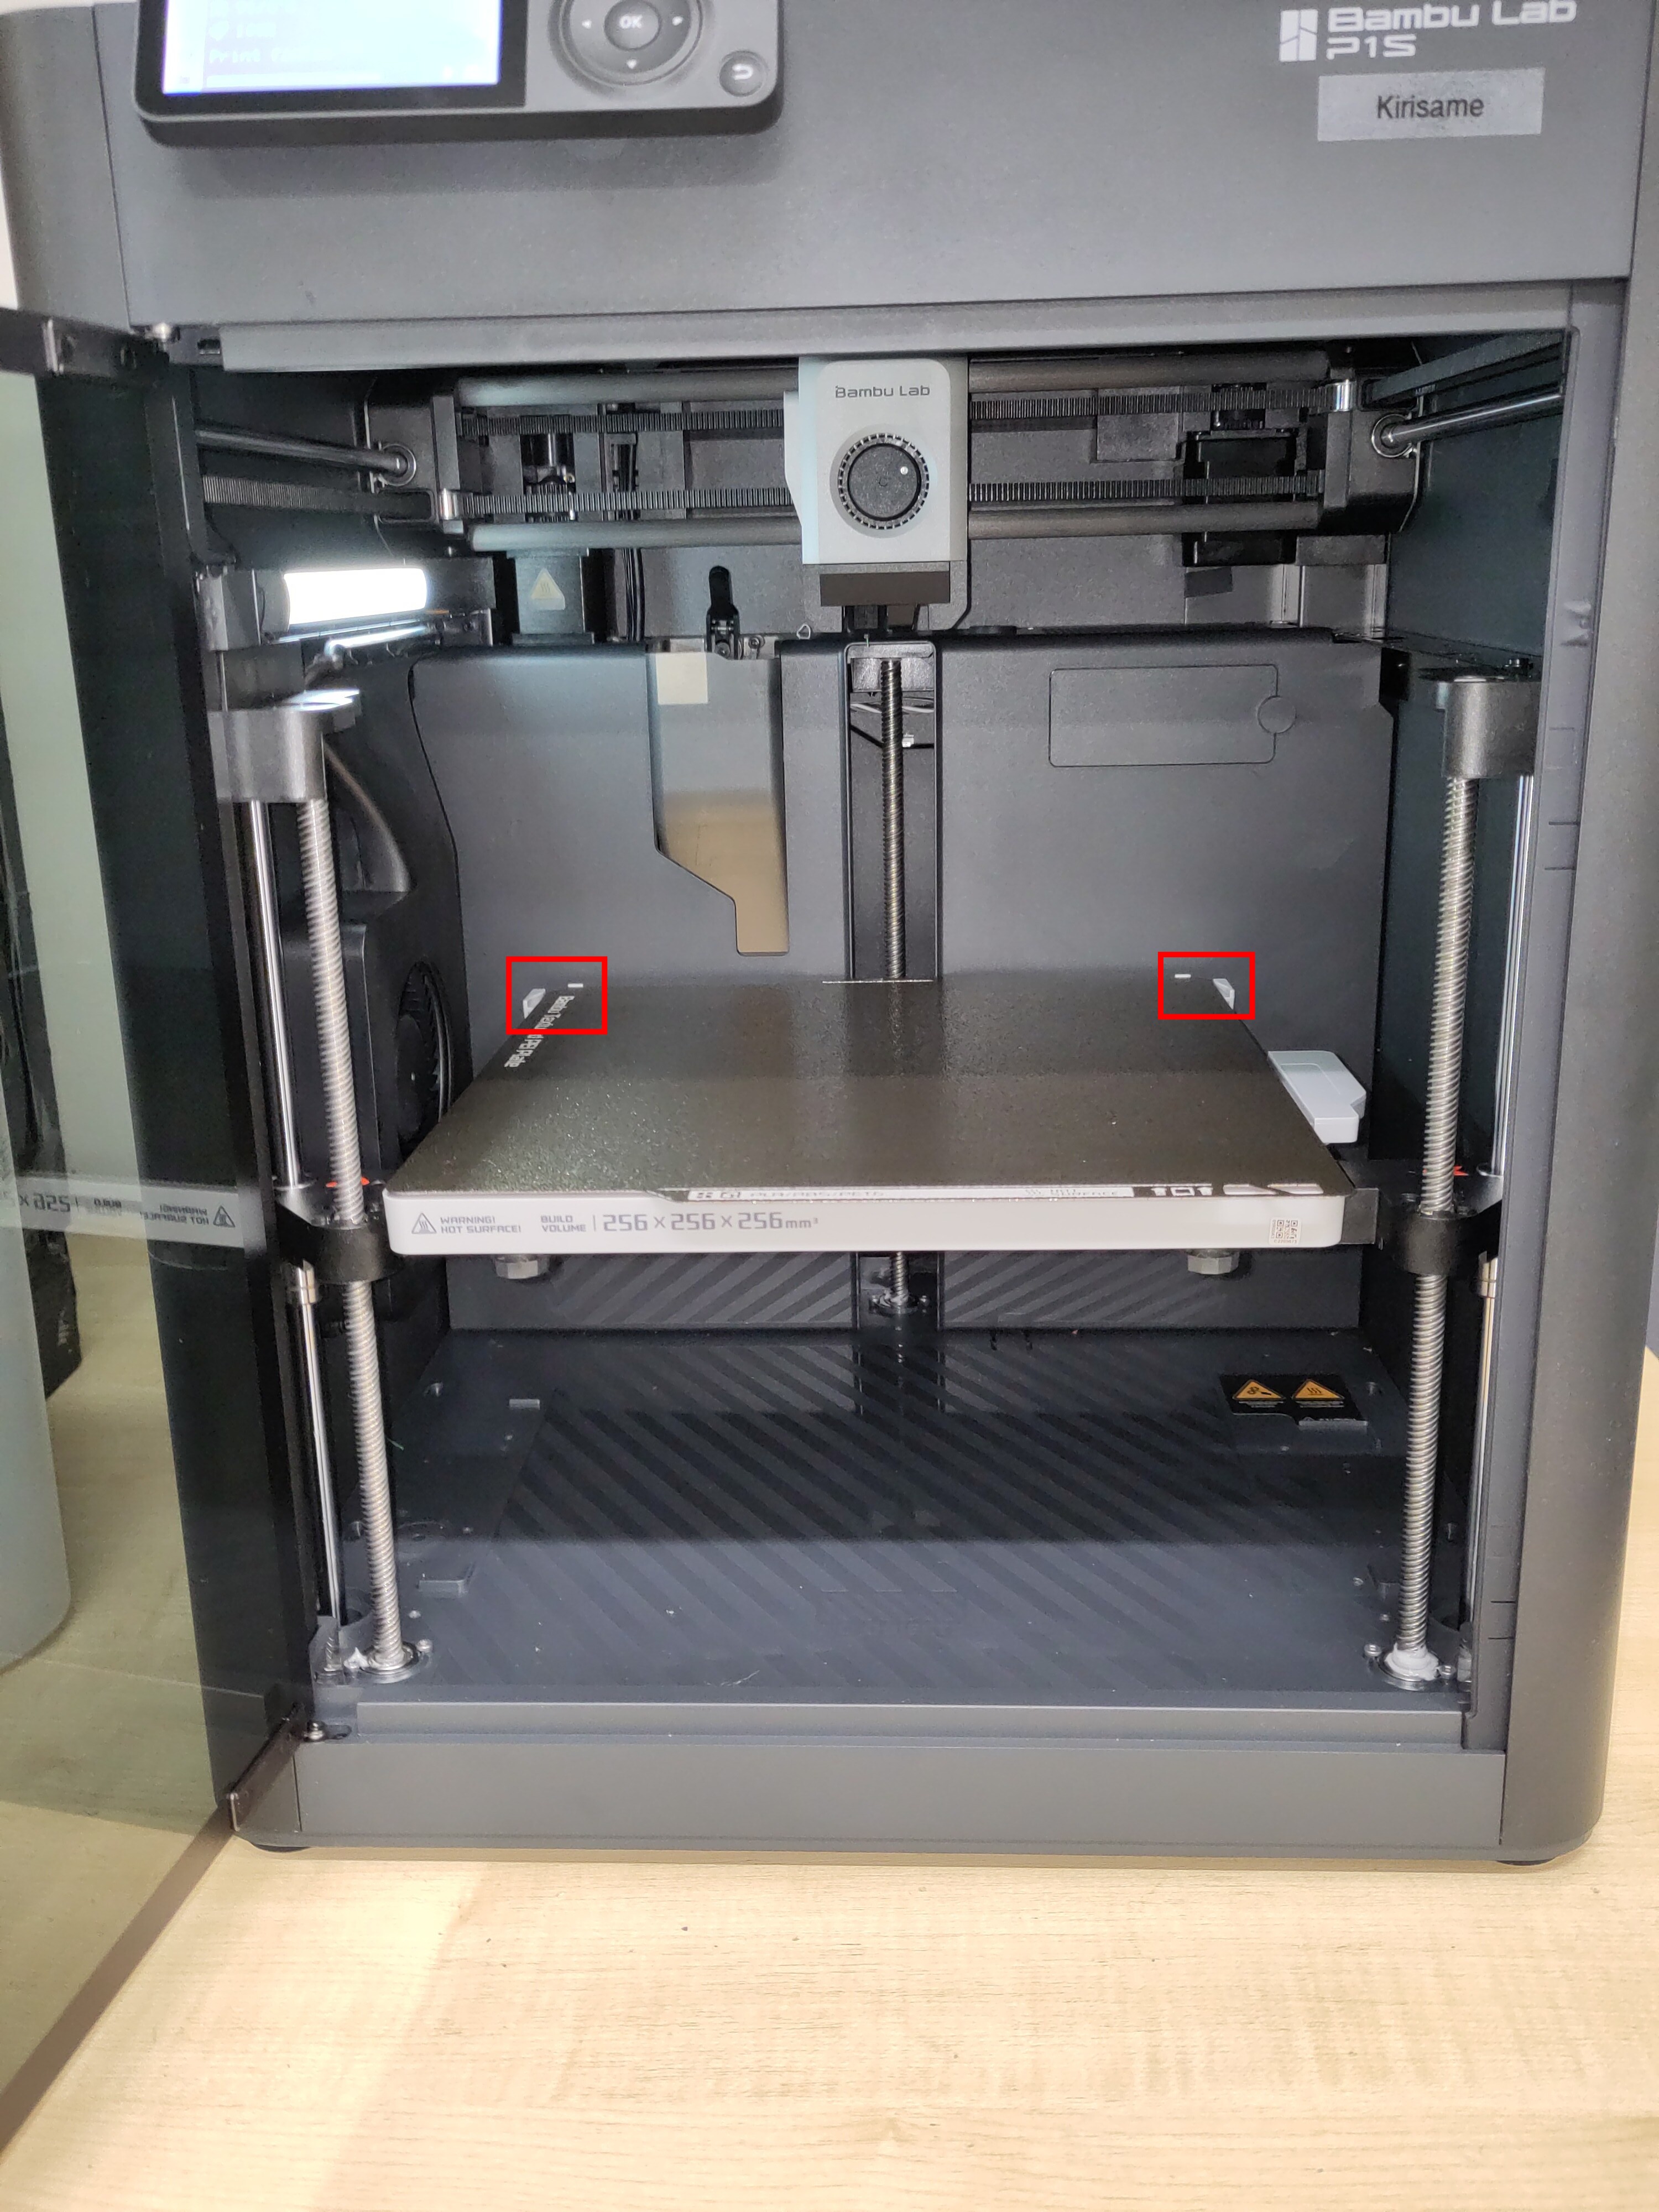
- If you need to change filaments in the AMS, do so now
Preparing and starting job
- Load designs into the "Prepare" tab of Bambu Studio
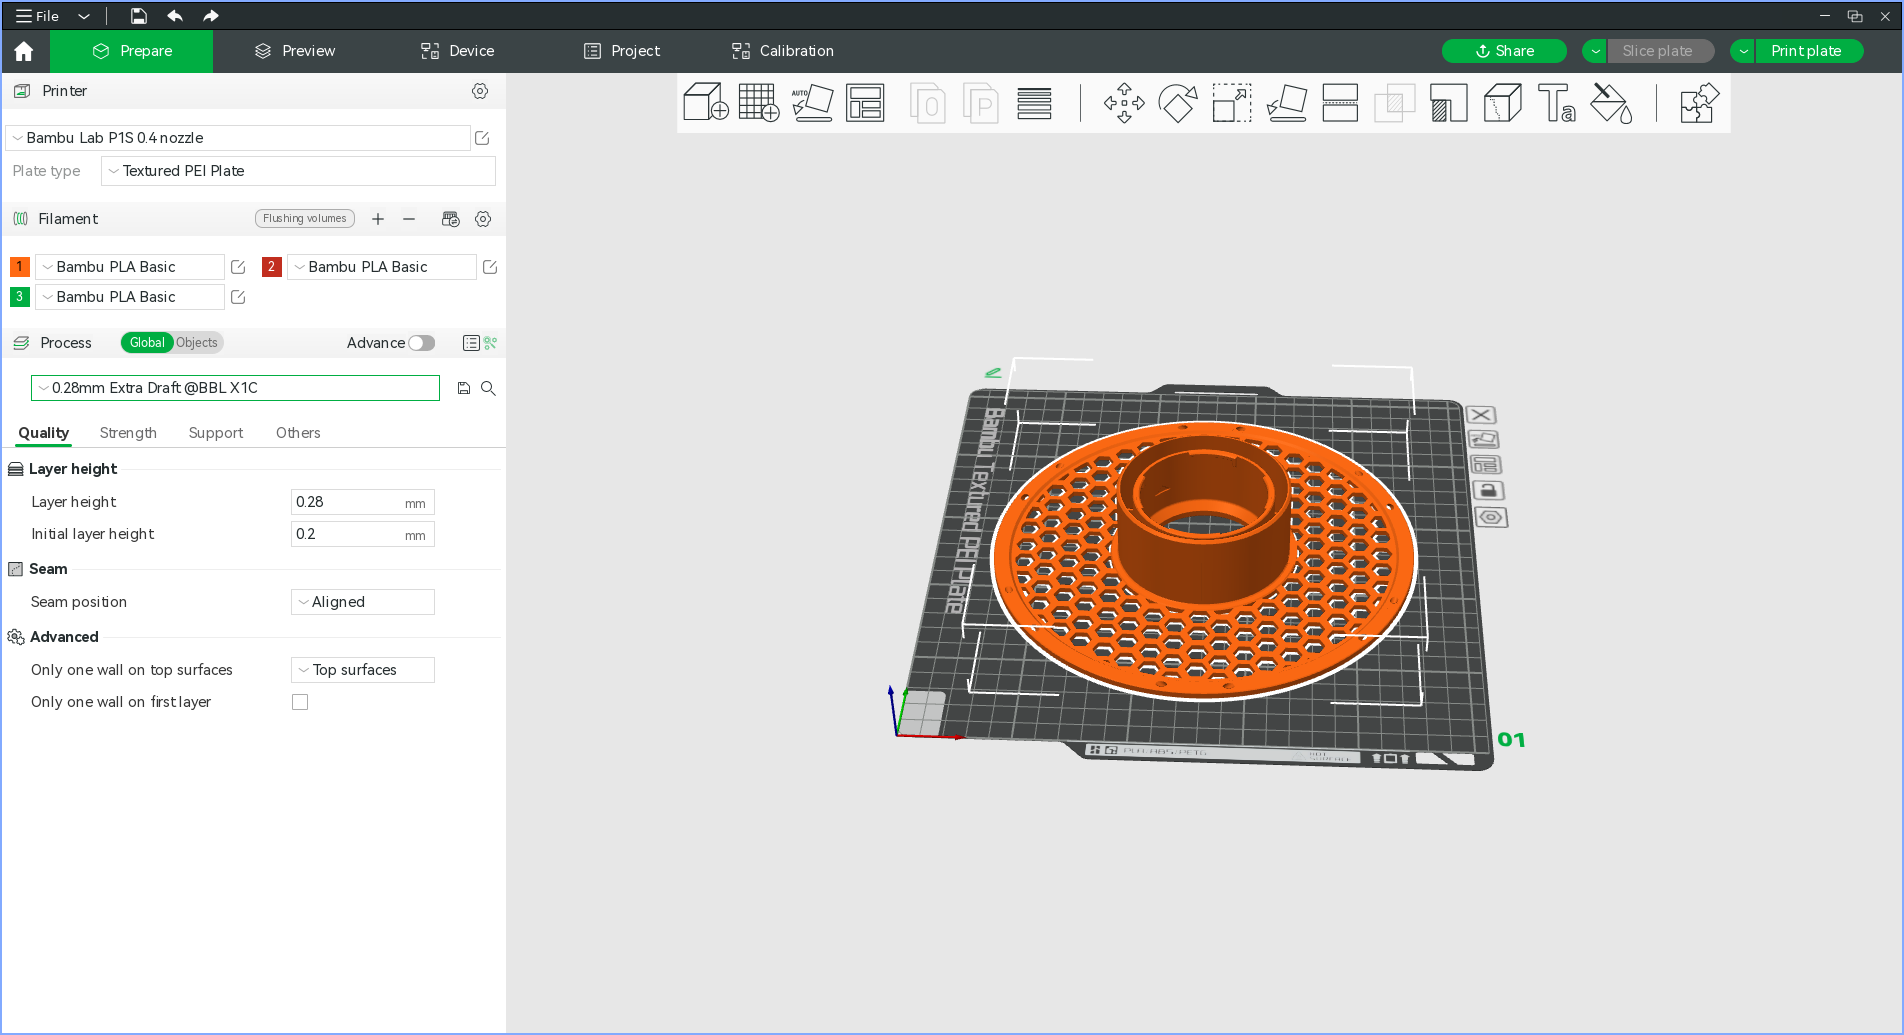
- Synchronise local filament settings with AMS by clicking the
 button on the filament settings panel, this will ensure your local filament settings reflect what is currently available on the printer
 - Set machine, material and slicing settings in the left hand pane (yes the slicing profiles say "X1C", as far as I can tell this is fine)
- Click "Slice plate"
- You will see a preview in the "Preview" tab
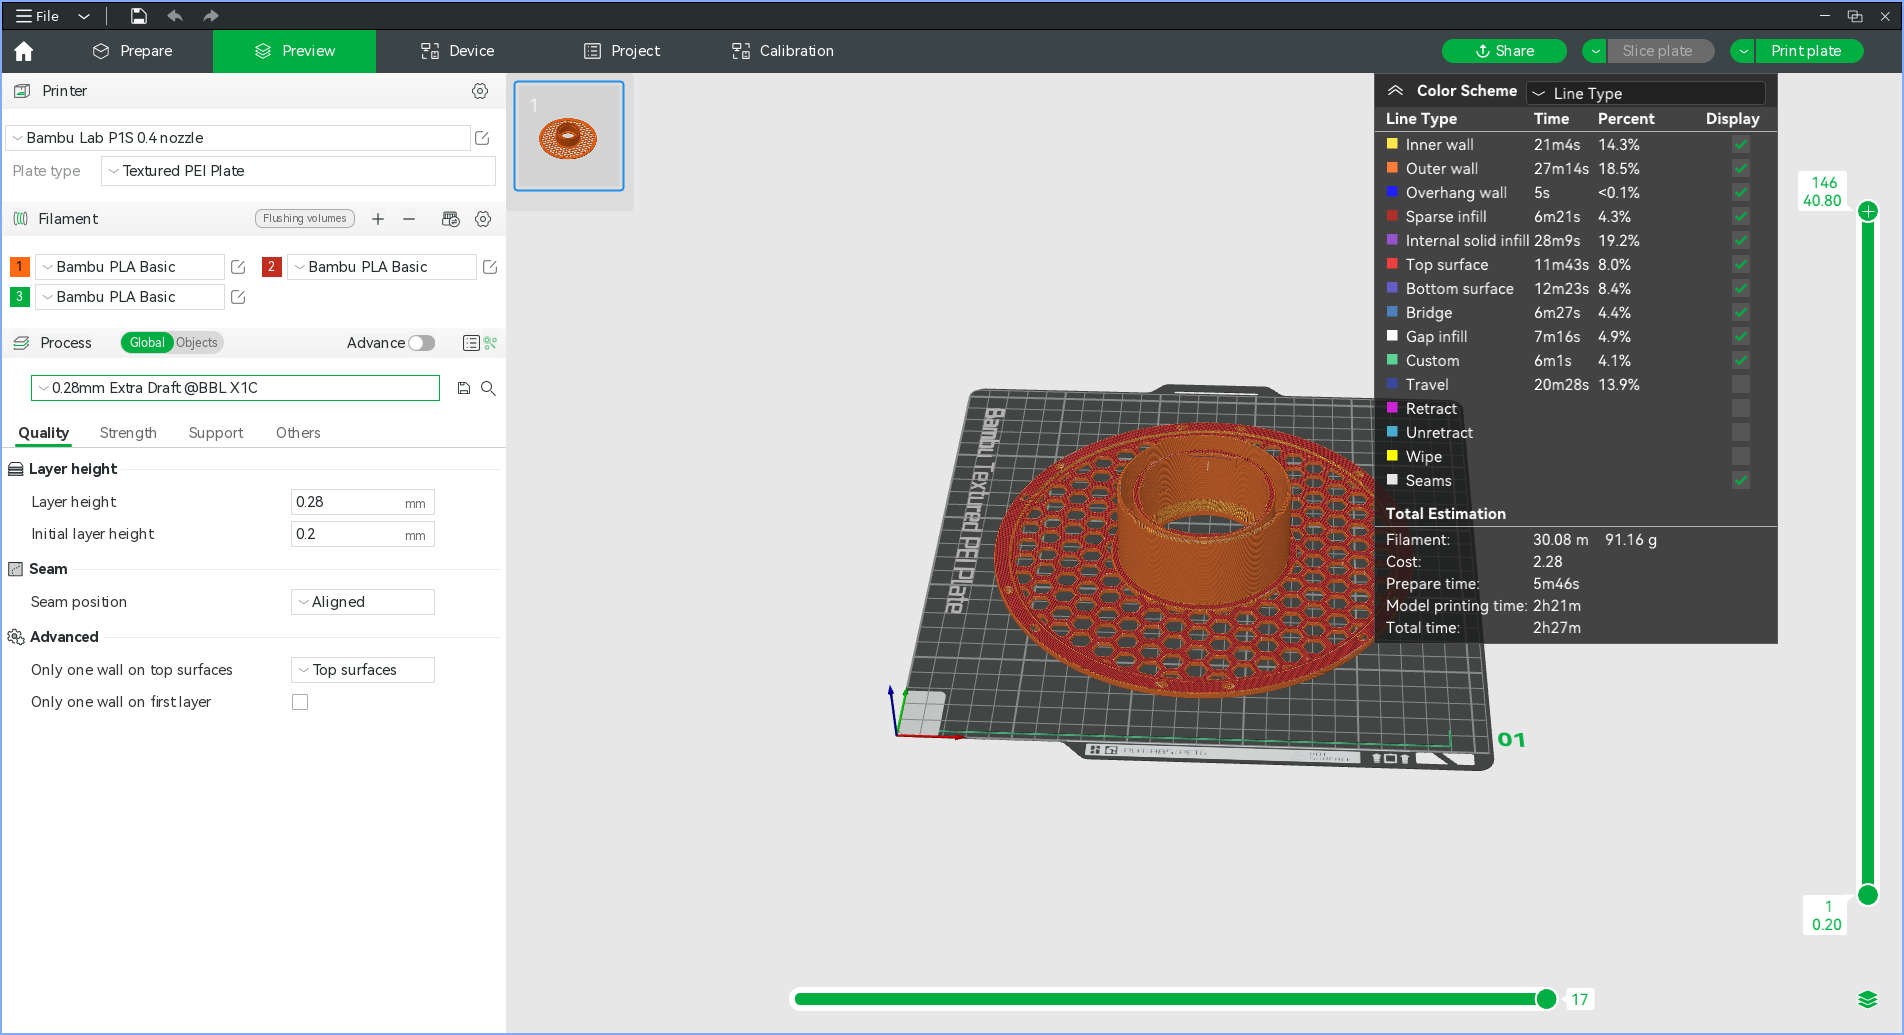
- If all is well, press "Print plate"
- Set options as desired, if you forgot to set the filament for your part you can override this here, disable timelapse if you have no intention of retrieving it, keep bed levelling and AMS enabled
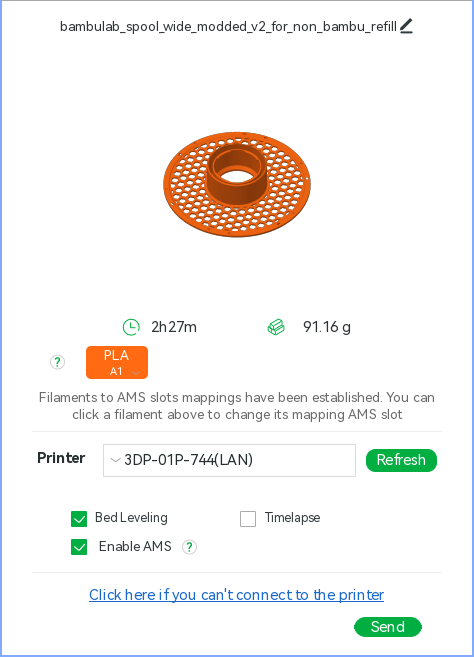
- Click "Send"
- Wait for the job to be uploaded

- The "Device" page is automatically shown where you can monitor the jobs progress, adjust settings and temperatures if needed and pause or cancel the job
- It is worth checking that the purge filament has not ended up on the build plate, this should not happen but it is worth keeping an eye out for
End of job
- Remove build plate from printer
- Remove part from build plate
- Reseat build plate in printer
- Clean up any filament the printer has deposited (check the purge chute at the rear of the machine)
SD card
The micro SD card is used for storing print jobs, timelapse and camera recordings (amongst other things that are of little direct use to humans).
It is not advised to use the SD card as a means of getting print jobs onto the machine.
Removing the SD card is how you would get timelapses and camera recordings off the printer, however if you wish to do this then immediately return the card to the printer as removal of the card renders it inoperative.
Should the card be out of space, it can be safely formatted in the printer using the on screen menu.
Prusa MK3
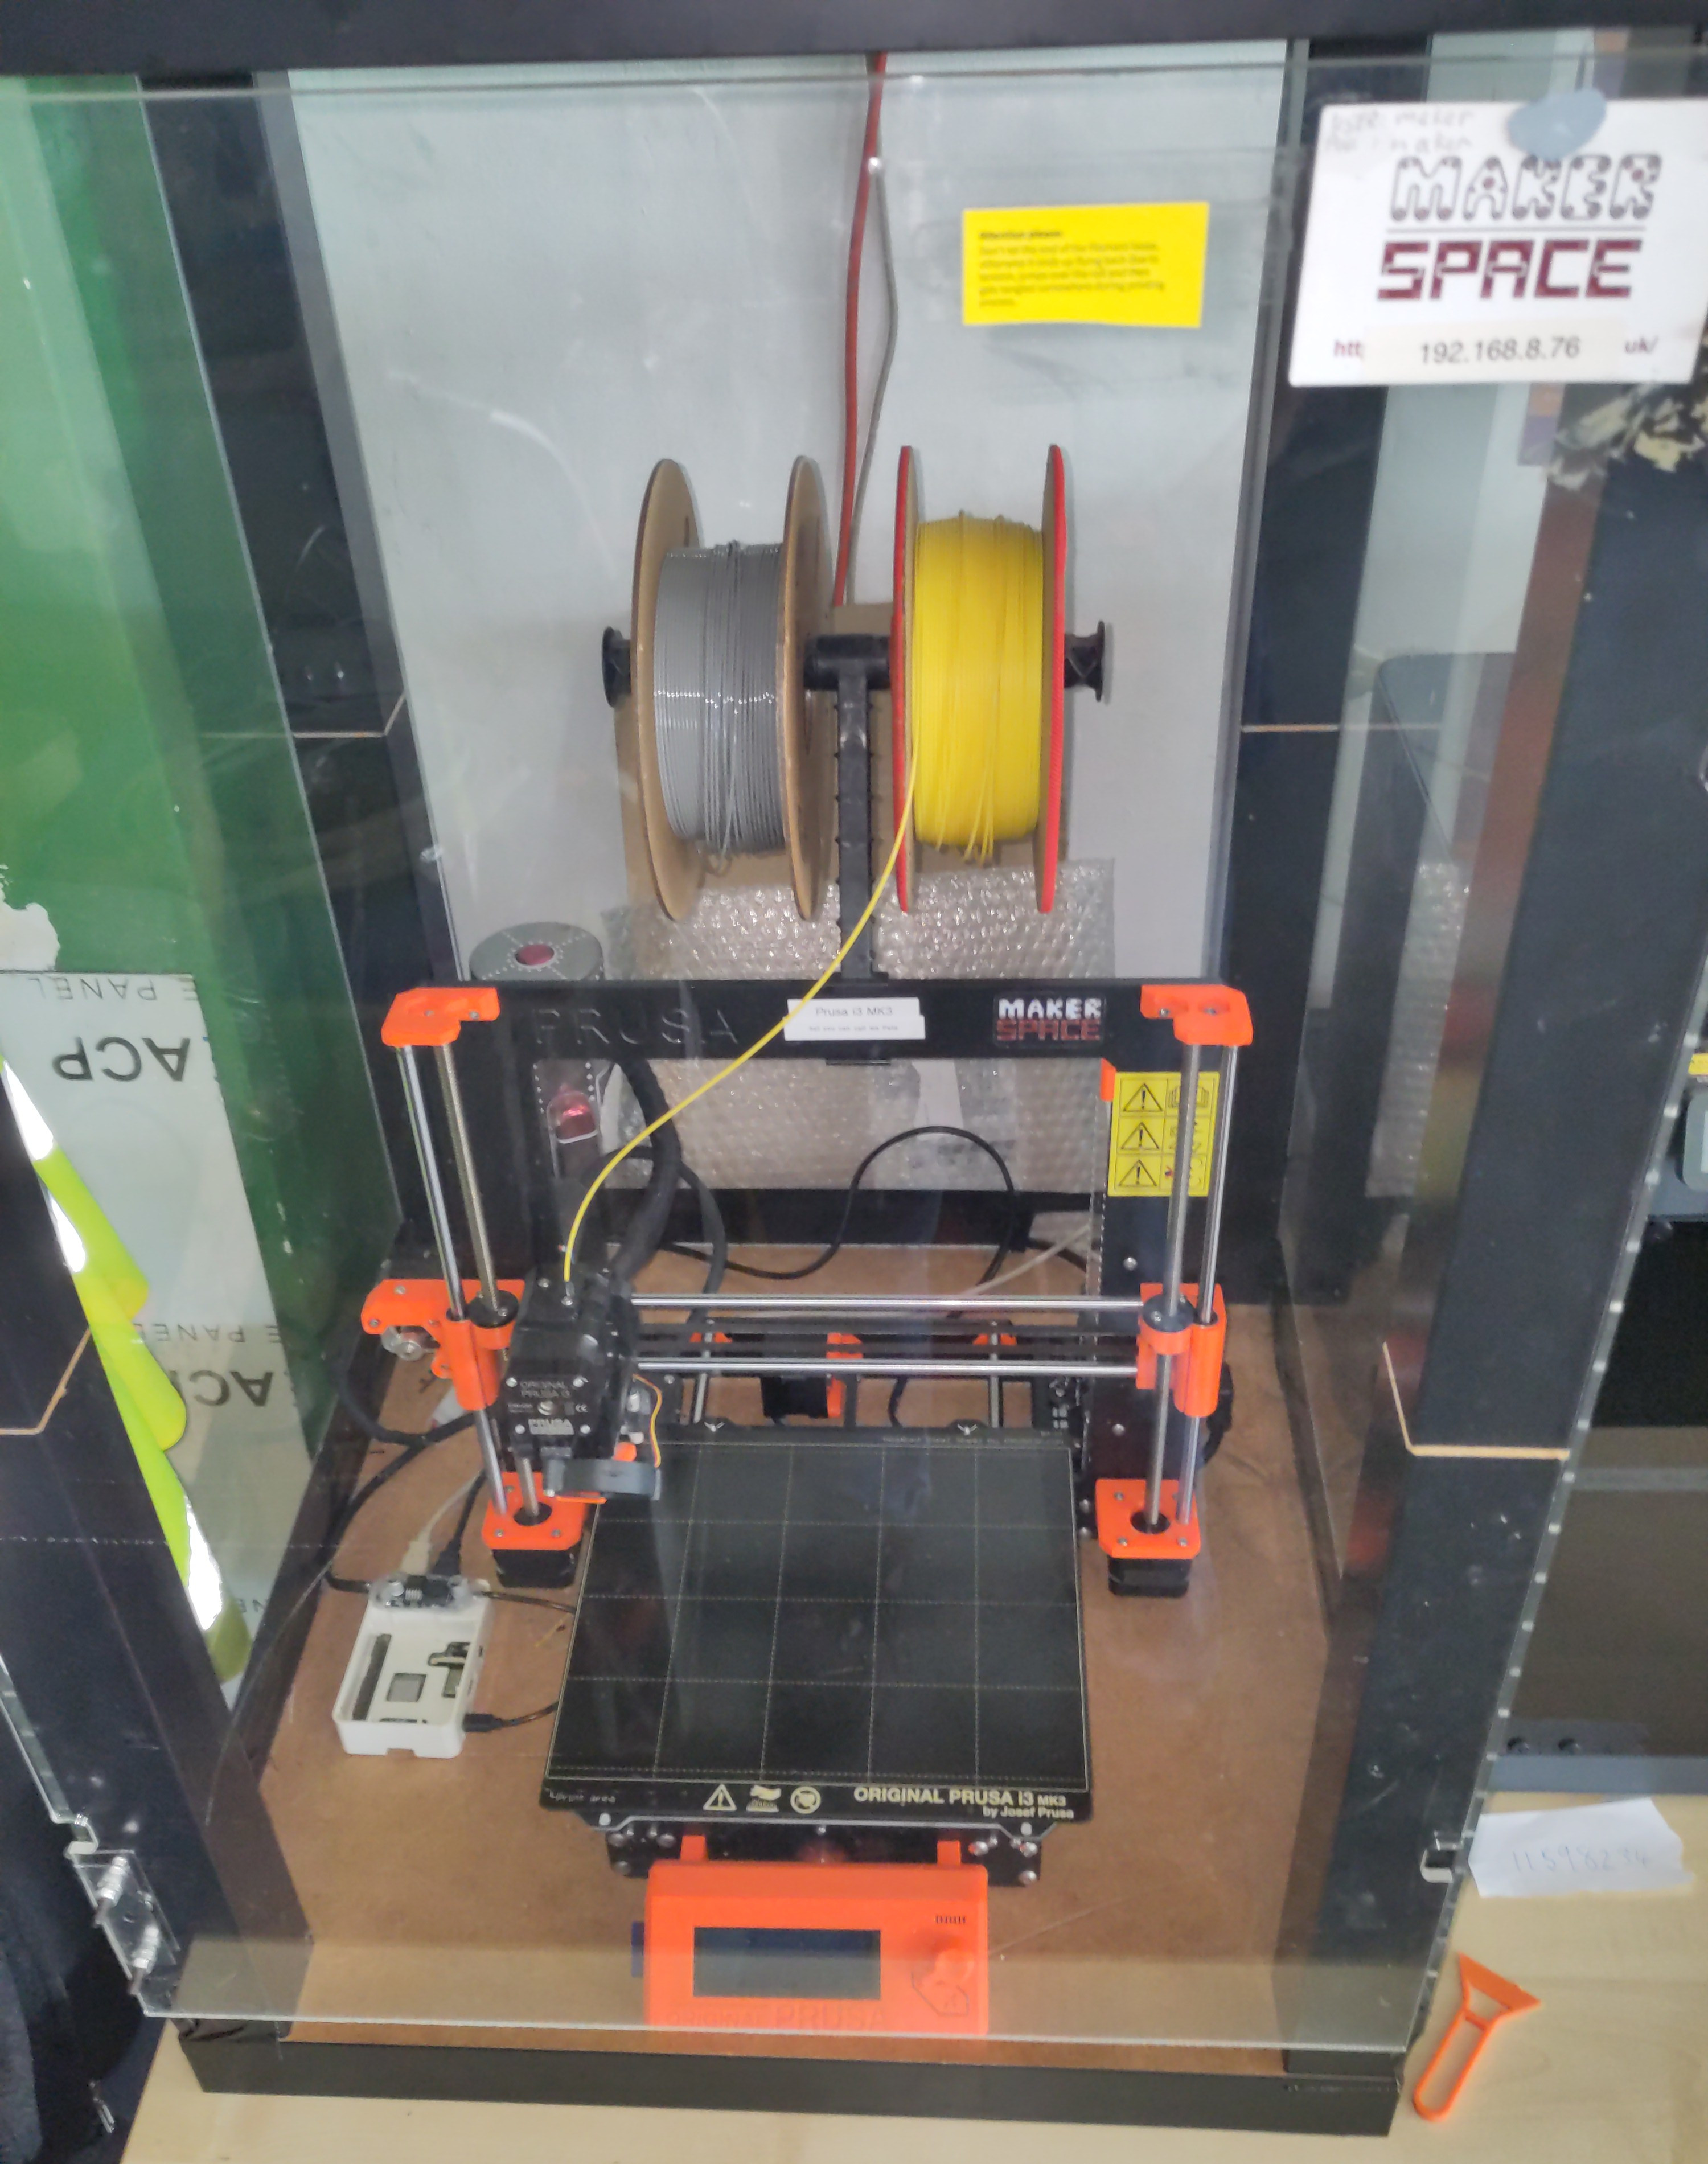
A sort of OK FDM 3D printer.
Essential Information
- Location: Ground Floor Workshop
- Responsible Person(s): ?
- Induction Required: No
Usage notes
It is not permitted to leave this (or any other) 3D printer running whilst Maker Space is unoccupied!
This printer is fitted with a standard 0.4mm nozzle.
Octoprint is installed on a Raspberry Pi, which is capable of controlling and monitoring the printer over the network. The IP address to access the Octoprint interface is on a label on the front of the printer.
If you'd rather print from the SD card, you might find it useful to create a folder with your name for your files. Please remove any big files once you're done with them to save clogging the card up (same goes for Octoprint).
PrusaSlicer is generally the most straightforward way of slicing your files for printing, as it has a pre-made and tuned profile for the MK3.
If you don't know how to use a 3D printer, or if you're unsure of how to use the specific one in the space, please do ask someone before attempting to.
Duratool Desolder Station
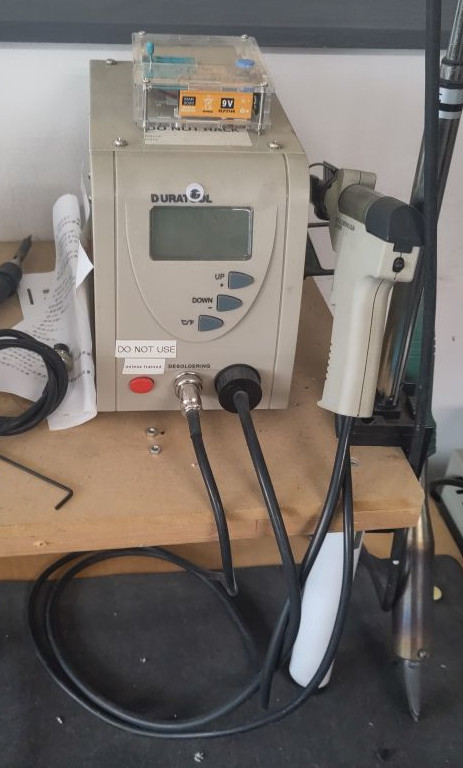
The Desolder Station is mainly for desoldering through hole components. It is particularly great at removing solder from plated through holes where the copper track is on both sides of the board and the hole itself is also metal.
It may have other uses, but no it is not designed to suck anything but solder. It is also not that ideal for surface mount, as the components can end up heat damaged or sucked up and jammed inside the nozzle!
Essential Information
- Location: Ground Floor Workshop
- Responsible Person(s): Jon Davies
- Induction Required: No
How to use the tool
- Press the red power button on the front of the base
- Set the 'C/F' temperature mode to Celsius
- Start with a temperature setting of 350c (The iron will take a few minutes to get up to temperature - be patient) :)
- Place the hole of the iron over the joint to be desoldered
- Hold the iron still for two seconds (until the solder begins to melt)
- Waggle the iron side to side for two seconds (to thoroughly melt the solder)
- Press the trigger and continue to waggle for a further second (The air pump activates and draws away the solder)
- Remove the iron from the solder joint (Solder has now gone)
- Repeat steps 4 to 8 for several solder jionts
- Clean the iron tip in the tip-cleaning brass (Do this regularly to keep a clean healthy tip and a good thermal interface)
- Repeat steps 4 to 10 for your session
- Clean the tip one final time
- Stow the iron in the holder
- Turn off the power
Troubleshooting & Tips
Solder slow to melt (more than five seconds)
- For larger components, it may be necessary to increase the temperature to 375c.
- For ground planes, it may be necessary to increase the temperature to 400c
Loss of Suction
The filter in the iron/base has become clogged.
- Stop using the desoldering tool
- Stick a notice on the base to indicate the tool is in need of TLC
- Notify a maintainer
I am experienced and impatient!
Ok... you can speed up your desoldering session with an increased risk of component damage. Increase the temperature to 400c but work fast on large components and really fast on small components.
Axminster Bandsaw
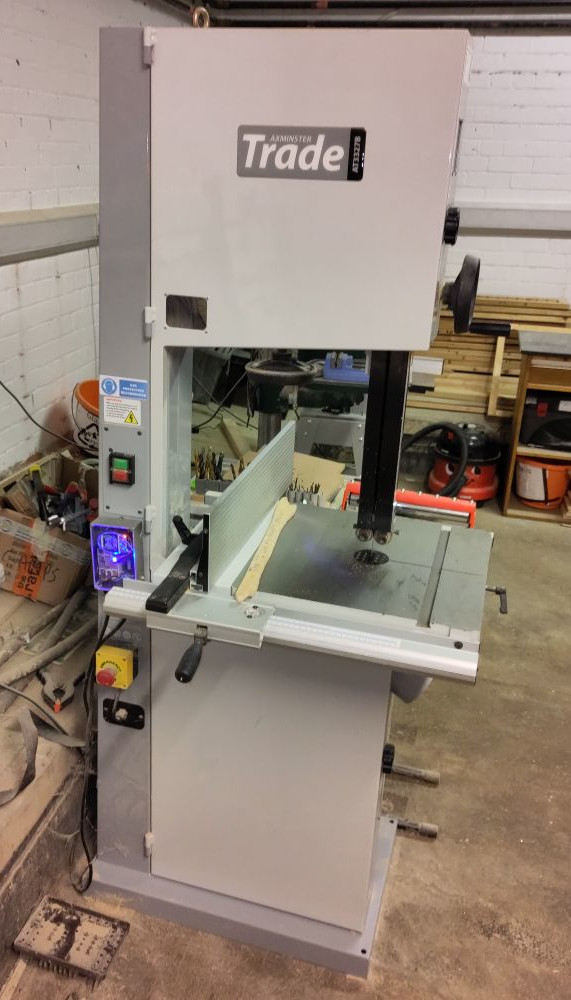
An Axminster SBW4300B bandsaw.
Essential Information
- Location: South Basement Workshop
- Responsible Person(s): Ben Shaw, Dan Nixon
- Induction Required: Yes
Usage notes
The manual for this machine can be found here.
You will be expected to demonstrate the following competencies before gaining RFID access to this machine:
- Understand how the electronic brake operates and the need to let it do its thing after hitting stop.
- Have an appreciation for appropriate (goggles, hearing protection) and inappropriate (gloves) PPE when using the bandsaw.
- Know how to move the fence and change its orientation.
- Understand how to adjust the blade guides and the importance of not having them higher than necessary.
- Know how to stand when using the bandsaw (i.e. not leaning into it).
- Know to never be pushing material with your hand in line with the blade - always to the side, use a push stick etc.
- Understand appropriate materials to cut on the bandsaw - and inappropriate ones. Appreciate how to handle different materials (e.g. wear a mask for MDF and other dusty things).
- Know the appropriate types of cut which can be made on the bandsaw (OK for reasonably thick, reasonably long cuts, bad for tight corners - use the scroll saw).
- Understand the need to keep the blade tensioned, and know how to adjust the tension.
- Understand how and why to use the cross-cut sled (prevents binding on the fence when cross-cutting).
- Know to not start/stop the machine with the workpiece in contact with the blade.
- Understand how to cut thin materials - use a sacrificial board below to prevent tear-out.
- Know how to use dust/chip extraction when necessary.
Record Power Drill Press
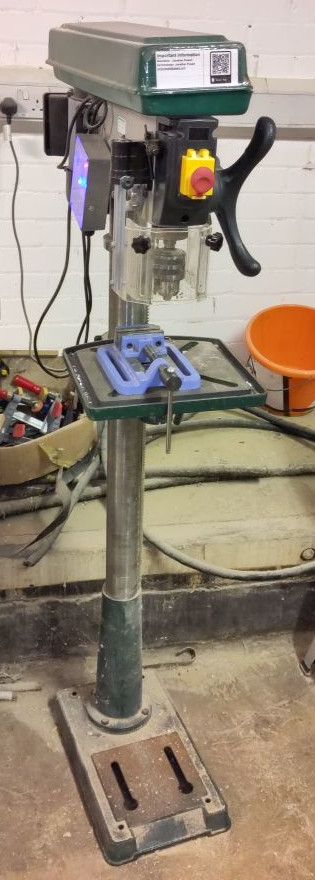
A Record Power DP58P floor standing drill press.
Essential Information
- Location: South Basement Workshop
- Responsible Person(s): Dan Nixon
- Induction Required: Yes
Usage notes
The manual for this machine can be found here.
You will be expected to demonstrate the following competencies before gaining RFID access to this machine:
- Understand the need for protective eyewear for operator and observers.
- Understand the need to protect byestanders.
- Be aware of the risks of wearing gloves while operating the pillar drill.
- Be able to change a drill bit.
- Understand what the guard is and the importance of using it (and that it disables the machine when flipped up).
- Be able to adjust table height and secure it.
- Understand the need for appropriate work holding (and scrap board underneath the work to avoid drilling the table etc.).
- Be able to use the depth stop .
- Be able to change belt speeds.
- Understand the need for different drill speeds.
- Understand the need to leave the drill in a safe and clean state for the next user.
A useful speed chart can be found here.
Record Power Belt & Disc Sander
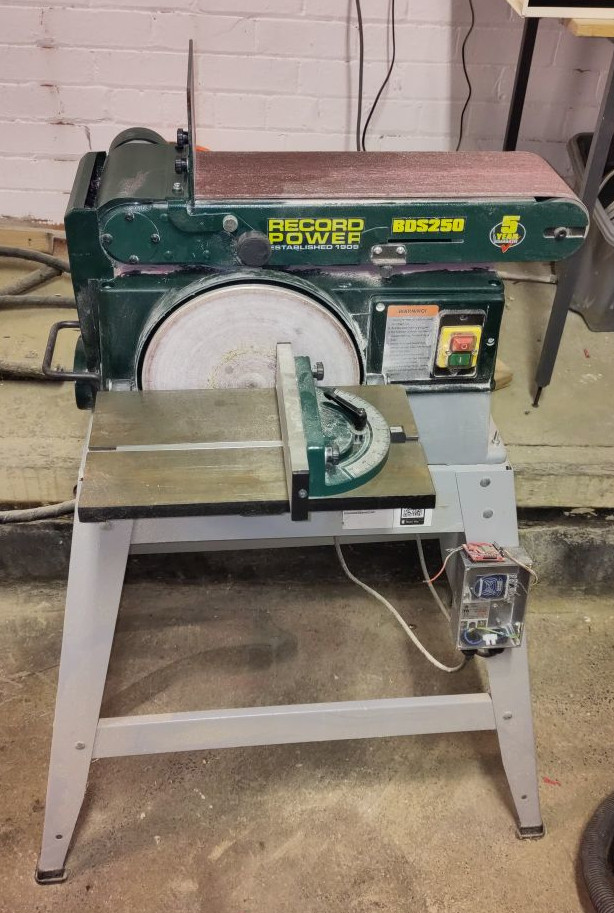
A Record Power BDS250 belt and disc sander.
Essential Information
- Location: South Basement Workshop
- Responsible Person(s): Iain Yarnall, Dan Nixon
- Induction Required: Yes
Usage notes
The manual for this machine can be found here.
You will be expected to demonstrate the following competencies before gaining RFID access to this machine:
- Understand the need for protective eyewear for operator and observers.
- Understand the need to protect byestanders.
- Understand the safety implications of the belt and disc being linked.
- Be able to employ methods to prolong the life of the belt and disc.
- Understand which side of disc sander is safe to use.
- Be able to use the mitre fence on the disc sander.
- Understand how different parts of the belt can be used.
- Change orientation of the belt sander between horizontal and vertical.
- Adjust the tracking of the belt sander.
- Be able to clean the belt and disc.
- Understand the need to leave the sander in a safe and clean state for the next user.
- Understand the need to inform members and the maintainer if you consider the tool to be unusable/damaged or faulty.
Metal Lathe
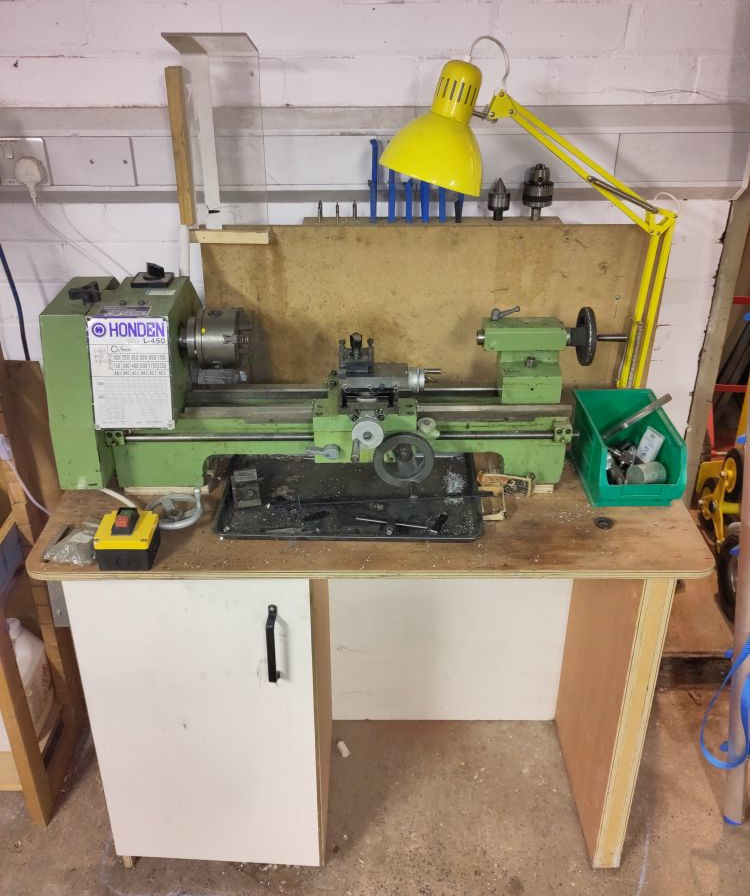
We have a small "Model Engineers" style lathe generically known as a 9x20 (swing x length between centres). It is capable of good work but as with many lathes in this class the lack of rigidity makes it prone to chatter if your cutting speed and/or tool sharpness isn't spot on.
Although classed as "Metal Turning" lathe it can be used to turn plastics and wood (making dowels out of scrap wood or plastic inserts/wheels are a couple of non metallic possibilities).
Essential Information
- Location: North Basement Workshop
- Responsible Person(s): Malcolm G
- Induction Required: Yes
Resources
The manual for this machine can be found here.
A guide to replacing the bearings can be found here.
Ongoing Refurbishment
The lathe was acquired second hand and as such is been subject to semi continuous refurbishment although it is left in a usable condition whenever possible. Maintenance completed to date includes:
- Addition of guard
- Headstock rebuild and bearing lubrication
- Tailstock rebuild
- Saddle/slide rebuild and adjustment of gib strips
- Tool rack
- provision of general use set of tools
- addition of magnetic base to dial indicator to enable centring of work in the 4 jaw chuck
- Refurb/balancing of large grinder to facilitate lathe tool sharpening (see separate article on bench grinders)
- Replacement of idler and intermediate pulley bearings
- Motor aligned so that toothed belt stays in position and low speeds are available
- Replacement of custom electrics with a standard NVR/stop switch
Remaining issues:
- the mounting table lacks rigidity and it is suspected mounting on a solid block (e.g. paving slab) might reduce chatter
- procurement of a fractional horsepower 3 phase motor would allow installation of a variable speed drive with added advantage of faster stopping time
- fabrication of jig to enable sharing of boring tools from the milling machine (one exists but is the wrong diameter)
Possible enhancements (only if there is a critical mass of interest)
- Addition of a headstock shaft encoder and stepper motor drive to the lead screw would allow flexible screw cutting
- Digital Read Out (DRO) on bed and cross slide
Essential Skills
Ideally we need to establish a larger core of members who are both competent and confident in the use of the lathe including essential skills:
- Understanding how to work safely and avoid danger
- Understanding the limits of the lathe and how to look after it
- Understanding the most common machining techniques
Typical techniques most people will need to know would include:
- methods of mounting materials (chuck types / faceplate use)
- drilling (including use of centre holes)
- use of tail stock centre for longer jobs
- appreciation of cutting speeds
- tool selection / sharpening
- typical cuts (e.g. facing / boring etc)
Governance
This section describes how Maker Space operates.
MS4 Induction checklist
This is a checklist of the things that a person who is inducting a new member to Maker Space should cover during their initial induction tour.
Introduction
Maker Space is a community owned and run working space. We've all clubbed together to get a space to work in. There aren't any grownups looking after this place, its just us, and it works because everyone pulls their weight to keep it running and nice for us all.
If in doubt, ask the mailing list.
- It can be found on the website header -> discussion list
- There is also a private list for members which is for the running of the space. You should have been added to this when you became a member - if not, please say something as you'll be missing out on key announcements.
Access to the space
- Access is available if a keyholder has opened the space. i.e. Welcome Wednesday and regular evening sessions.
- If you need access outside of the normal hours, ask on the discussion list as a keyholder may be planning to be in.
RFID Access
- RFID fobs can be used to access:
- The space, when a keyholder is in.
- Machines that require an induction.
- If you have a compatible fob already, you can use that. We also have some fobs available if you don't.
- Register your fob by swiping the main door a few times and letting an admin know when you did it.
General Safety
- Fire exits - keep clear! / Fire Extinguishers / First Aid Kit
- Be mindful of smoke alarms.
- What to do it fire alarm goes off - muster outside - if you find a fire, sound the alarm, yell etc, then leave.
- Fire assembly point is in the car park at the back of the building.
- Don't leave things on the floor where people might trip over them, bags, cables, project boxes etc, tripping over hurts
- Use ladders when required rather than chairs, tables etc. and make sure it's stable.
- Be mindful of others if you're doing something that might impact on them or if they might. e.g. working in doorways, walkways etc.
- Do not work on live mains electricity, it's quite dangerous.
Toilets / Water / Drainage
- Toilets near entrance.
- Drinking water from Kitchen.
- If you're covered in oil or grease, cleaning supplies (Swarfega etc.) are available. - Currently downstairs by the lathe.
Using the Space
People use the space differently, please be considerate.
- Avoid telling people how to do their project. Sometimes the objective is to learn a new technique rather than solve the problem in the best way.
- Try not to touch or pick up projects without permission.
- Some people are here to be social, some people are here to work and may not want to talk. Please respect their space and leave them be!
Infrastructure/security
- While many things are fair game for hacking/modifying, the core infrastructure/access control systems are not.
- Attempts to 'defeat' security/access control for equipment will be viewed very negatively and may end up in restriction/removal of space access privileges.
- If you want to improve a piece of core infrastructure e.g. music player etc, then discuss any proposed changes with its' current owner/maintainer first.
Parts/Materials
- We have lots of scraps, off-cuts, spares and components etc. which can be used.
- If you need something specific or a lot of something, please provide your own.
Maker Space has a clean desk policy
- Try to tidy up as you go if possible. Work spaces should be clean and tidy before you leave.
- If you need to leave something out, ask on the discussion list.
- Bins, dustpans, brushes, mops, blue roll and vacuum cleaners etc. are around the space.
- If you have cut, sawed, drilled, sanded, filed or ground anything then there will be something to clean up.
Bins
- Large bins in the workshops - Dustpans and brushes attached.
- Small bins around the space.
- Please do not leave food waste in the space.
- Bins currently to be taken home. Please help out if you can.
- Battery disposal - Please take to a battery recycling point e.g. Tesco.
- Recycling - Clean/Dry items that could go in a household recycling bin.
- Ensure cans are empty and not likely to leak in someone's car
- soft plastics/films if marked with "Recycle at Store"
- No electronics/e-waste
Entrance Lobby
Hack or Die
- Items on the shelves are for hacking and remaining items are periodically disposed of.
- Please only add items you realistically think will be used by someone.
- Please don't bring things in just for Hack or Die. Do that virtually (by email) instead.
Laser Cutter
- Induction required - Ask on the members list.
- Scrap material available for use.
Toilets
Workshop
Main room
3D Printers
- No training but ask for help if you need it. Follow the QR code for the Bambu.
- Unattended printing is not allowed.
- Filament is paid for by the users. If you use it, bring some filament in occasionally.
- Do not try to maintain the printer. Notify a maintainer or the discussion list.
Members' Store/ General Storage
- Your box goes here - 32L - 18cm (h) x 60cm (w) x 40cm (d)
- Please stack things carefully, especially high up.
- Ask on mailing list about storing big things in space, before you bring it in.
Chemicals
- Any chemicals in the space should be clearly labelled whether hazardous or not.
- Flammables box - Flammable stuff lives here, put it back after using.
- No dangerous chemicals please.
- No spray painting in the space - ventilation isn't adequate.
- No flames/smoking
Wall o' boxes and other material around space
- OK to use stuff, but please add stuff too - It's all provided by members and rather than the space.
- Please also apply 'fair use' principles to Space items - If you use a lot of something, replace it.
- Put it back in the box and on the correct shelf when done (boxes are colour coded to shelves).
- Glue gun - please make sure you let it cool before putting it away.
- There are "Please hack"/"Do not hack" stickers and labels. Please respect them. If labelling something, write "Please/Do Not Hack", your name and the current date.
Tea and coffee facilities.
- Coffee machine - used for hot water instead of a kettle.
- Bin bags - on shelves.
- Tea/biscuits/sweets etc often on the table - help yourself - feel free to add more
Fridge
- Lemonade/Irn Bru - Free but please replenish what you use.
- Club Mate - Prices/Payment details on the fridge.
Soldering station
- Turn irons off after use
- If don't know how to use, please ask
- Hot tools/irons shouldn't be left unattended
- Let stuff cool before putting away
- Scraps tub for collecting bits of wire etc. Please don't leave bits all over the desk.
Stationery
- In grey drawers
Media Centre
- Green Button - Play/Pause (Random tracks if playlist is clear)
- Red "Fire" Button - Short press skips track, Long press (2 Secs) clears playlist.
- For full control use http://mediaserver:9000/
- Apps available to control music from your phone (e.g. Squeezer)
Side room (Goldfish Bowl)
- PCs available for use. Please don't install crap
- Vinyl Cutter
- Electronic component storage - keep it tidy!
- Items Stored on the shelves belong to the space. They can be used but not to be hacked. Don't take them away from the space without permission.
Basement
There are PPE boards - please use them.
- We have provided it, it's your job to use it. It's OK to remind people you see not using it when they should be.
- Dust masks are available from the "Spare PPE" box.
- If you know you're going to need specific PPE for a certain task ahead of time (respirator, coveralls), consider bringing it yourself.
- Hearing protection - if you are making lots of loud noise make sure you and others near you wear it.
- If you are making flying objects, ensure people who may be affected know and are offered eye protection.
Clean up after yourself
- Tools / Bench top / Floor
Tools
- Sander / Pillar Drill / Lathe / Mill / Band Saw / Workbee CNC
- RFID Controlled. Induction Required, ask on the members list or email the maintainer to get inducted.
- Hand tools generally around the space on boards.
- Drills, hand power tools, Dremel and bits/collets near the Workbee CNC machine.
- Return tools when you have finished with them, definitely before leaving space.
Storage
- Wood Store - Help yourself - Add more wood/offcuts when finished own projects. Please check for "Do Not Hack" stickers before using.
- Nuts/Bolts/Screws - please keep tidy - use "M Don't Know" if you can't determine the size.
- Metal Store - to be used for projects etc. Be careful of sharp edges, don't leave any for others.
- Table legs may not be spare. Please check before using.
Keyholder Opening and Closing Procedure (MS4)
N.B. This procedure is liable to change over time. Please ensure you are subscribed to the member's list.
Opening the space
When opening up the space for a member/public session, the following steps should be taken:
- The mortice lock of the front door (A167 side) should be left unlocked.
- The RFID strike lock should be securing the door (i.e. not latched).
- The shutter over the back door (Car park side) should be opened as an emergency exit.
- Ensure the In/Out board is set to IN.
Closing the space
- Ensure no Maker Space members/visitors are in the building.
- Ensure the basement is empty, equipment switched off, lights off and door closed.
- Close the gate at the top of the stairs.
- Ensure the In/Out board is set to OUT.
- Check the building for other users. If the building is unoccupied, the shutter over the back door (Car park side) should be closed.
- Ensure equipment in the main space is off, lights off etc.
- Ensure the doors of the main space are closed and latched.
- The RFID strike lock should be disabled (i.e. latched unlocked).
- The mortice lock of the front door (A167 side) should be left locked.
Safe Space Policy
We expect all members, guests and attendees of events to abide by the following policy at Maker Space and all its online meeting places.
Maker Space intends to provide everyone a harassment-free environment, regardless of gender, sexual orientation, disability, physical appearance, body size, race, or religion. We want the space to be a safe space for everyone, and will not tolerate harassment in any form.
Harassment includes (but isn’t limited to) offensive verbal comments related to gender, sexual orientation, disability, age, physical appearance, body size, mental health, race, religion; deliberate intimidation; stalking; following; inappropriate physical contact; unwelcome sexual attention; and inappropriate or unrequested photography or recording; sustained disruption of events; or any action that makes another member uncomfortable.
Anyone asked to stop any harassing behaviour, by anyone, is expected to do so immediately.
If you act or speak in a way that someone thinks is inappropriate, it’s inappropriate. If somebody tells you that you are making them uncomfortable, you must stop making them uncomfortable. Do not put your opinions or desires before the comfort of others; “It’s just a bit of fun”, “It’s just a joke”, “Where’s the harm in it?” (and so forth) are not excuses for behaviour that makes anyone else feel unwelcome or as if they are a target. If you feel compelled to tell someone who is uncomfortable that they are wrong to feel that way, you are most definitely putting yourself in the wrong.
If you are being harassed, notice that someone else is being harassed, or have any other concerns, please don’t ignore it. If you feel that you can, challenge the behaviour directly. If you can’t do that, please contact the Board Members. If the offender is a Board Member, you can contact another Board Member directly.
If anyone engages in harassing behaviour, the Board Members may take any action they deem appropriate, including warning the offender or starting the Grievance Procedure.
Grievance Procedure
Intention
The Board Members of Maker Space have the authority to ban anyone from entering the space and the authority to strip anyone of their membership, or remove keyholder status. This must only be done in circumstances where this authority is best for the Maker Space and its members as a whole.
This policy will only be applied to members who demonstrate unwillingness to address behaviour which has caused offence, harm or distress to another member or members; or has threatened the safety of the space. This may be behaviour directly targeting or witnessed by any individual. The Maker Space Safe Spaces policy elaborates on this somewhat. Throughout the process, all efforts will be made to keep clear and constructive communication between the Board Members, the offending party, and any other affected parties.
In very serious cases, Board Members may invoke temporary access bans until the issue is resolved.
Introduction
This policy applies to members, guests and attendees of events that use Maker Space or its online meeting places. Any person may be banned from the space if they violate existing policies or if they have the potential to harm other users of the space. Before the formal banning procedure is started, the Board Members must make every attempt to resolve the issue informally.
Process
Should a Board Member become the focus of a complaint, they will not be included in their normal capacity during the grievance process. The offending party must be given at least two written warnings before being banned. At every stage, it must be made clear to the party where they are in this process. At every stage, all involved Board Members but one must be in agreement that allowing the user to continue to use the space would not be in the best interest of the organisation. At every stage, the Board Members must make their reasoning available to the offending party. They must also make as much detail as is appropriate available to all members. By default, a ban will be for a year. At their discretion, the Board Members can issue a reduced ban period. Bans of more than one year may only be issued in extreme circumstances. The Board Members must review these bans yearly. If the offending party is a member, the ban will trigger the process to ternimate the offending person's membership as per the articles. When a person is banned, their right to access Maker Space is revoked. Any entry to the space without the prior, express permission of Board Members will be considered trespass. The Board Members must seek feedback from the community to ensure this process remains fair and balanced.
Wiki Guide
This section describes a little about the wiki, how to use it and how to write content for it.
The wiki uses mdBook, the content is hosted on GitHub and the site is hosted on Cloudflare Pages.
Contributing content
If you would like to make some changes to the wiki, have a read of the style and contributing guides.
Wiki style guide
The key words "MUST", "MUST NOT", "REQUIRED", "SHALL", "SHALL NOT", "SHOULD", "SHOULD NOT", "RECOMMENDED", "MAY", and "OPTIONAL" in this document are to be interpreted as described in RFC 2119.
- File and directory names must be
snake_case - Text should be formatted as one sentence per line (i.e. a newline should always follow a
.) - Each document must make correct use of headings, i.e.
#as the document title, incrementing by one (##,###, ...) for each subsequent level of nesting desired - Unless referenced elsewhere, photos should be either in the same directory as the document that references them or in a directory named
imagesin the same directory as the document that references them - Photos should be cropped to only show what is relevant to the document
- Photos should be of an appropriate resolution (i.e. high enough to resolve sufficient detail, but low enough to not be excessive in size or page load time)
Contributing to the wiki
This outlines the means of editing the wiki.
If you are familiar with Git, then you can likely skip most of these docs, install mdBook locally and contribute as you would to any other project. The one caveat is that if you wish to use the CI generated previews then you must not work from a fork of the MakerSpaceNewcastle/wiki repository (you do not need to as being a member of the MakerSpaceNewcastle organisation gives you write permission to this repository).
Relevant parts of the mdBook documentation to reference are:
Prerequisites
- A GitHub account
- Be a member of the MakerSpaceNewcastle GitHub organisation
- Git installed and configured (if following Locally via Git clone)
- mdBook installed (if following Locally via Git clone)
Single page via the GitHub web UI
This will walk through making a change to a single page of the wiki.
In this example, let's assume you wish to add a couple more tools to the equipment page, only adding them to this list, not creating their description pages.
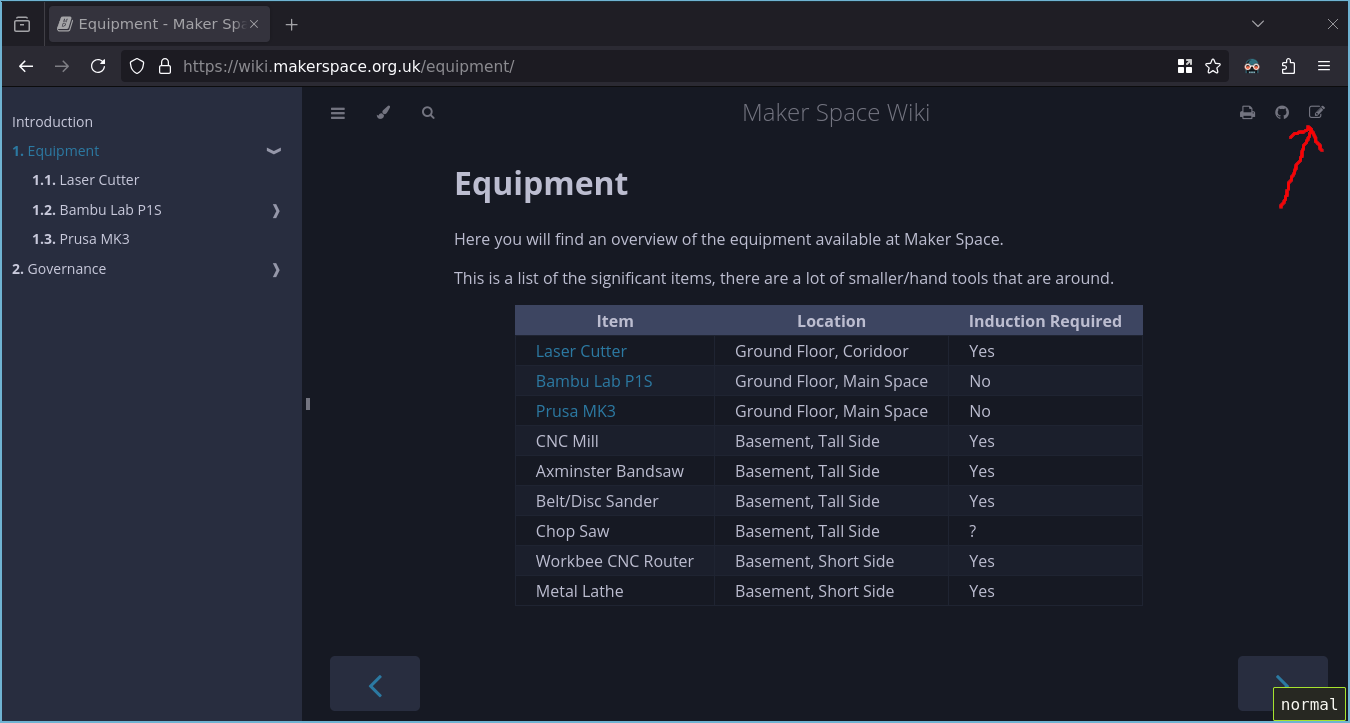
-
On the page, click the edit icon in the top right hand corner:
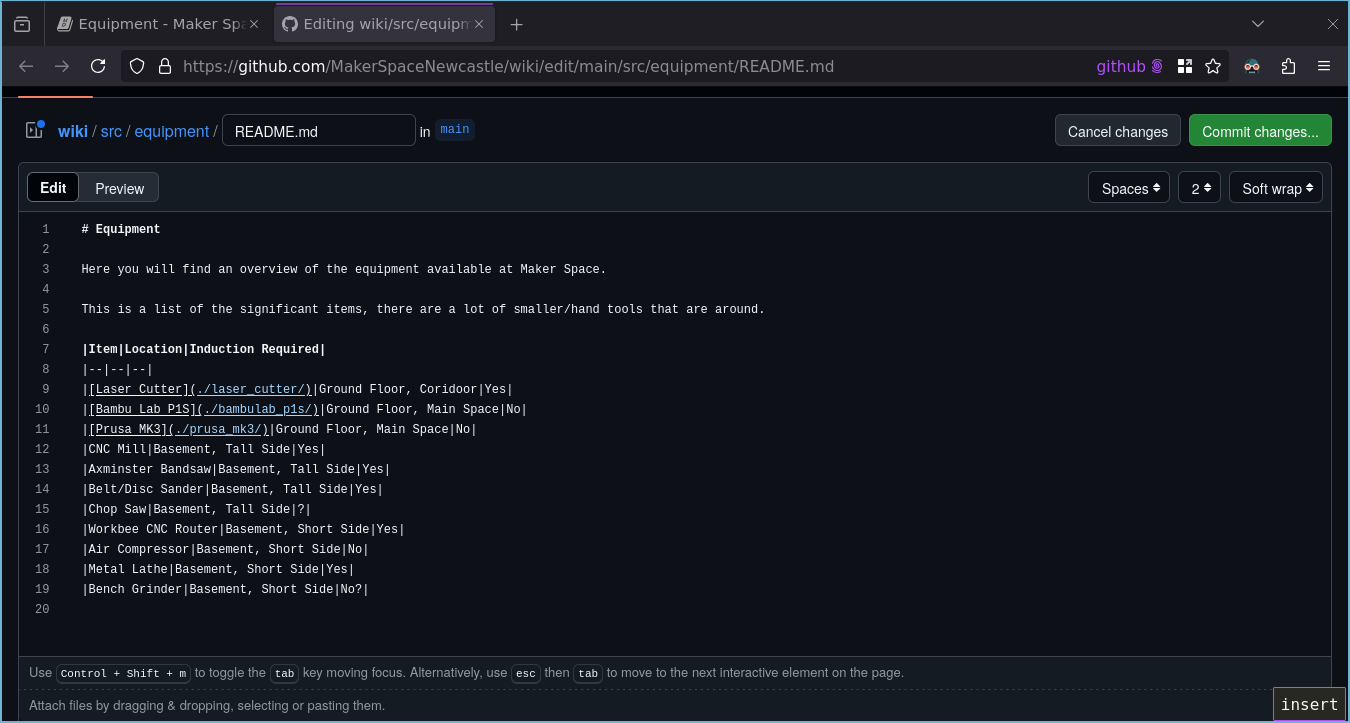
-
This will take you to the online text editor on GitHub (if you are not already signed in then you will be asked to). Make the desired changes (in this case the addition of the air compressor and bench grinder to the list) and click the green "Commit changes..." button.
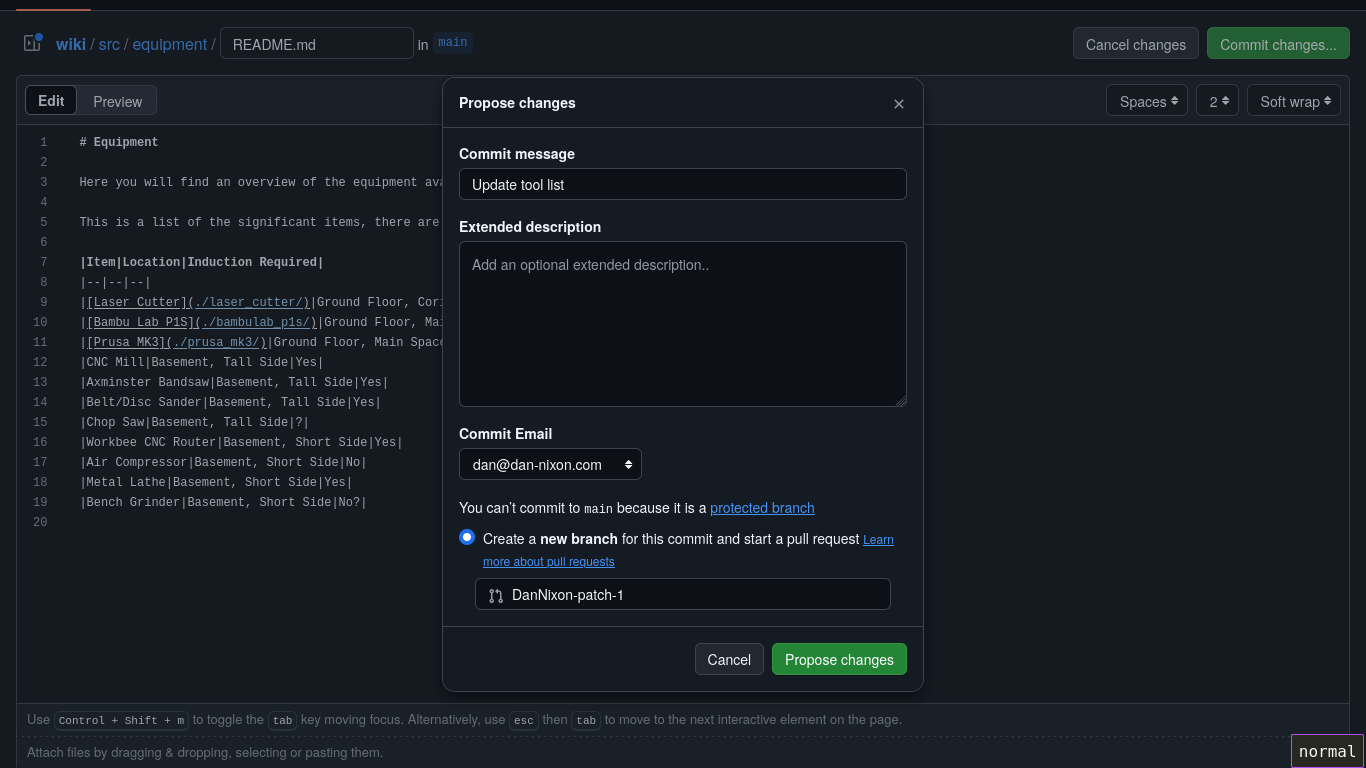
-
You will be asked to provide a commit message, type something descriptive here and click the green "Propose changes" button.
The remaining options may be left as their defaults. If the options provided to you look different to the above then verify you have satisfied the prerequisites.
-
You will be taken to the create pull request screen, proceed to Proposing changes via a Pull Request.
Locally via Git clone
Note that these instructions are quite brief for the time being.
- Clone the wiki repository.
- Inside the repository, run
mdbook serve. This will start a local web server that will update the site live as you make changes. - Make your changes via your text editor/IDE of choice.
- Commit the changes to a new branch.
- Push the branch.
- Open a pull request, proceed to Proposing changes via a Pull Request.
Proposing changes via a Pull Request
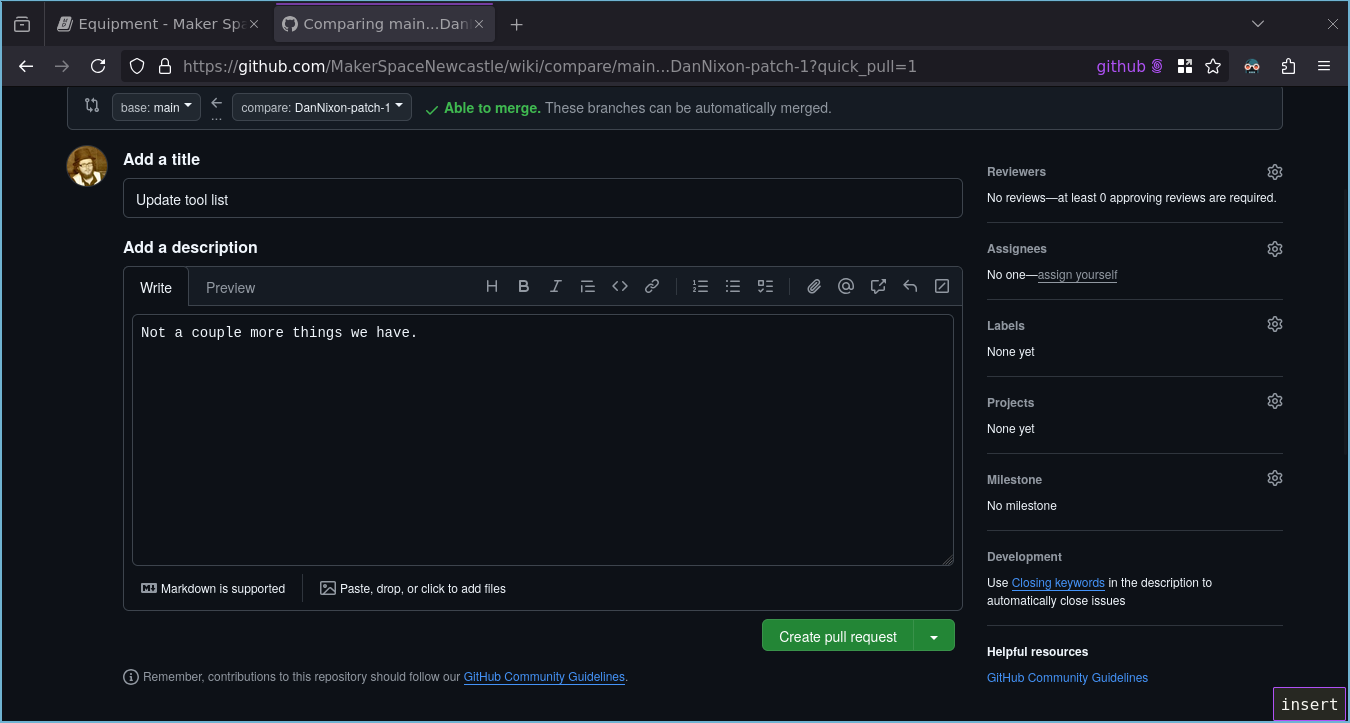
-
Provide a suitably descriptive title and description of your changes and click the green "Create pull request" button.
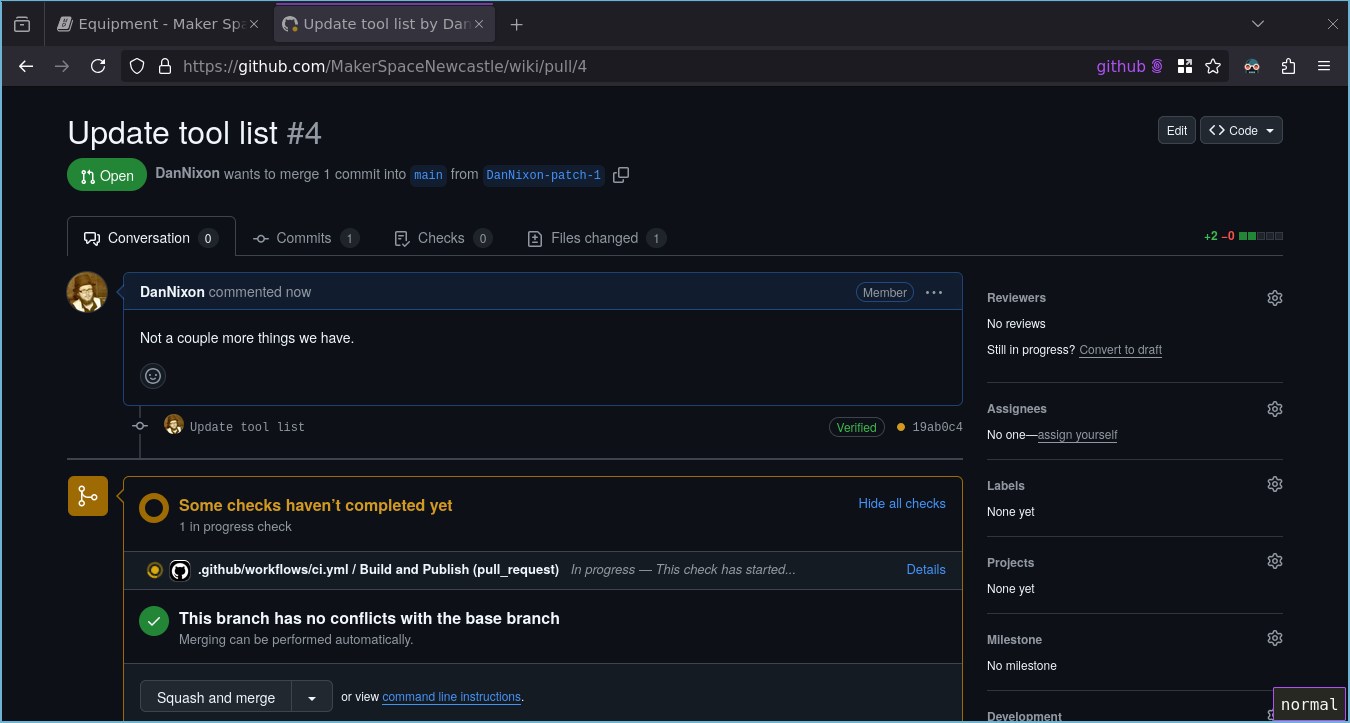
-
One the pull request has been opened, you will see the actions start to run. This will build the site and deploy a preview of it.
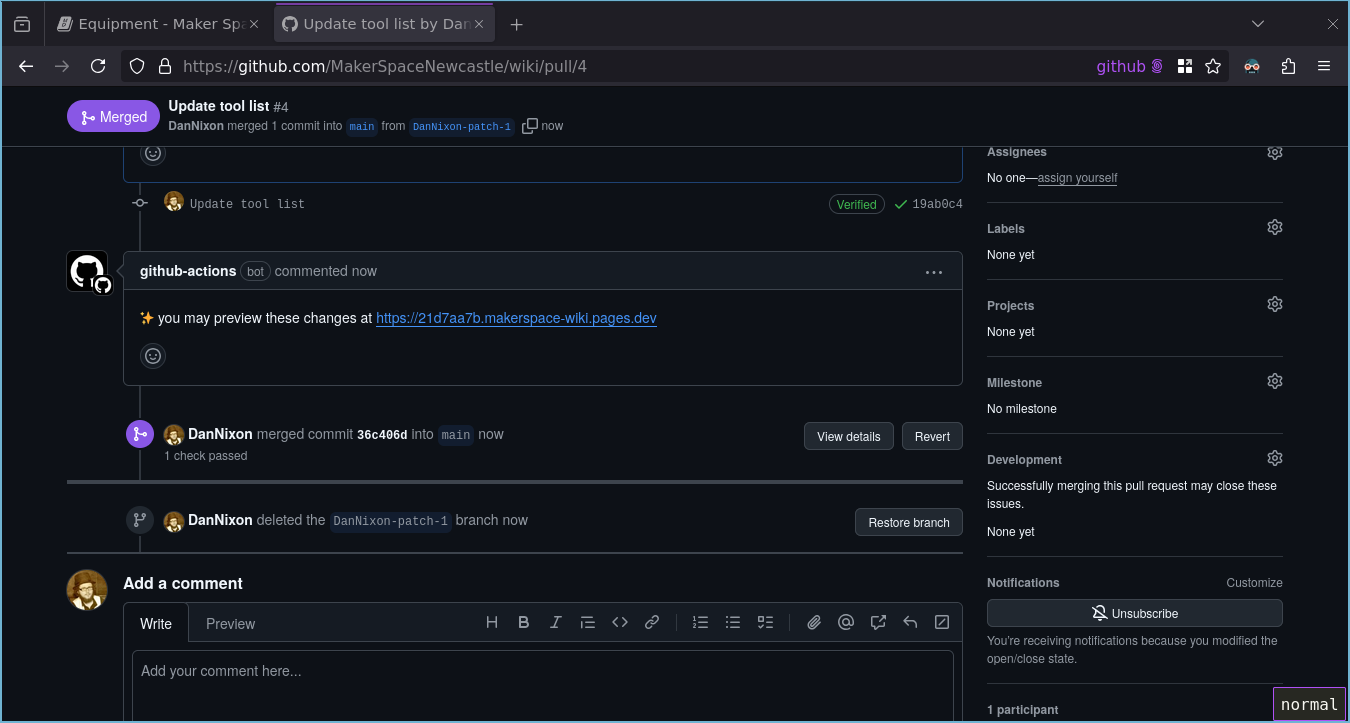
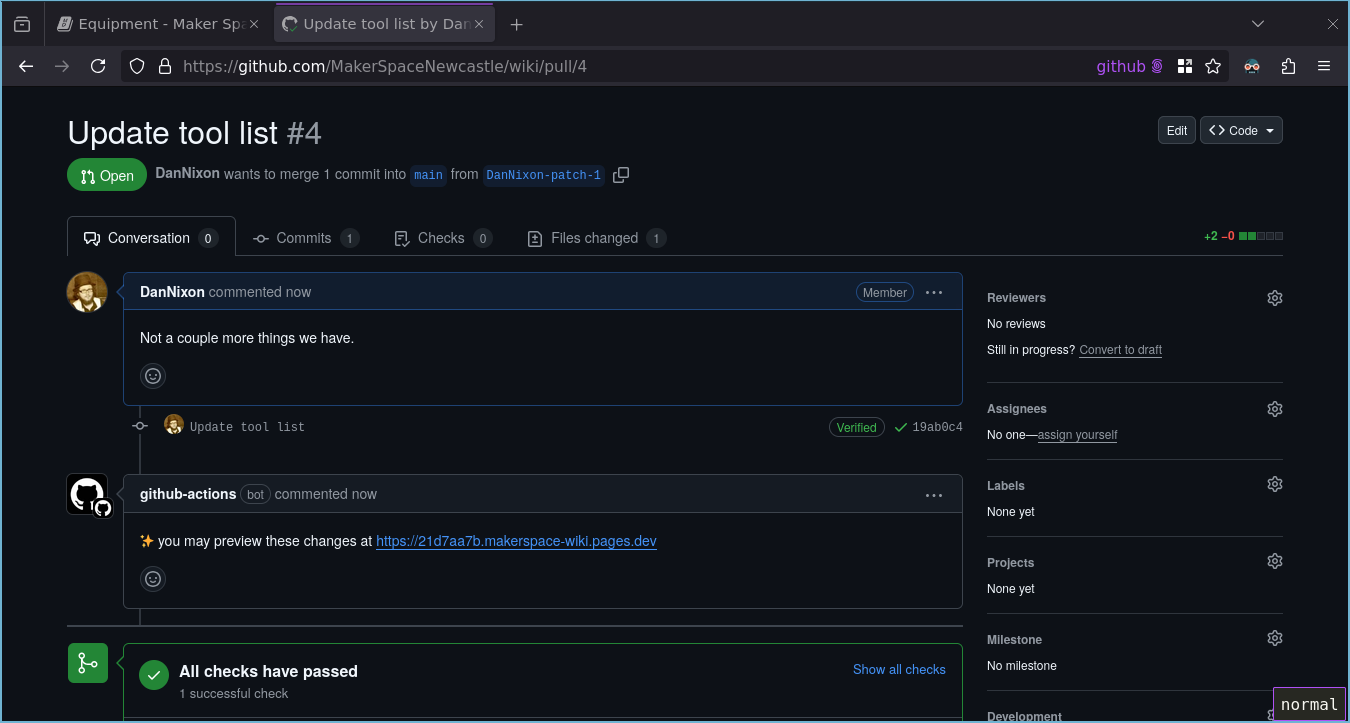
-
Once the actions have completed, you will see a comment appear with a link to preview the changes.
-
Opening the link in the comments and browsing to the equipment page shows the changes made.

-
Depending on exactly what has been changed in the pull request, certain people may have automatically been requested to review your changes, if so they must provide their reviews first. You may also opt to ask people to review your changes if desired.
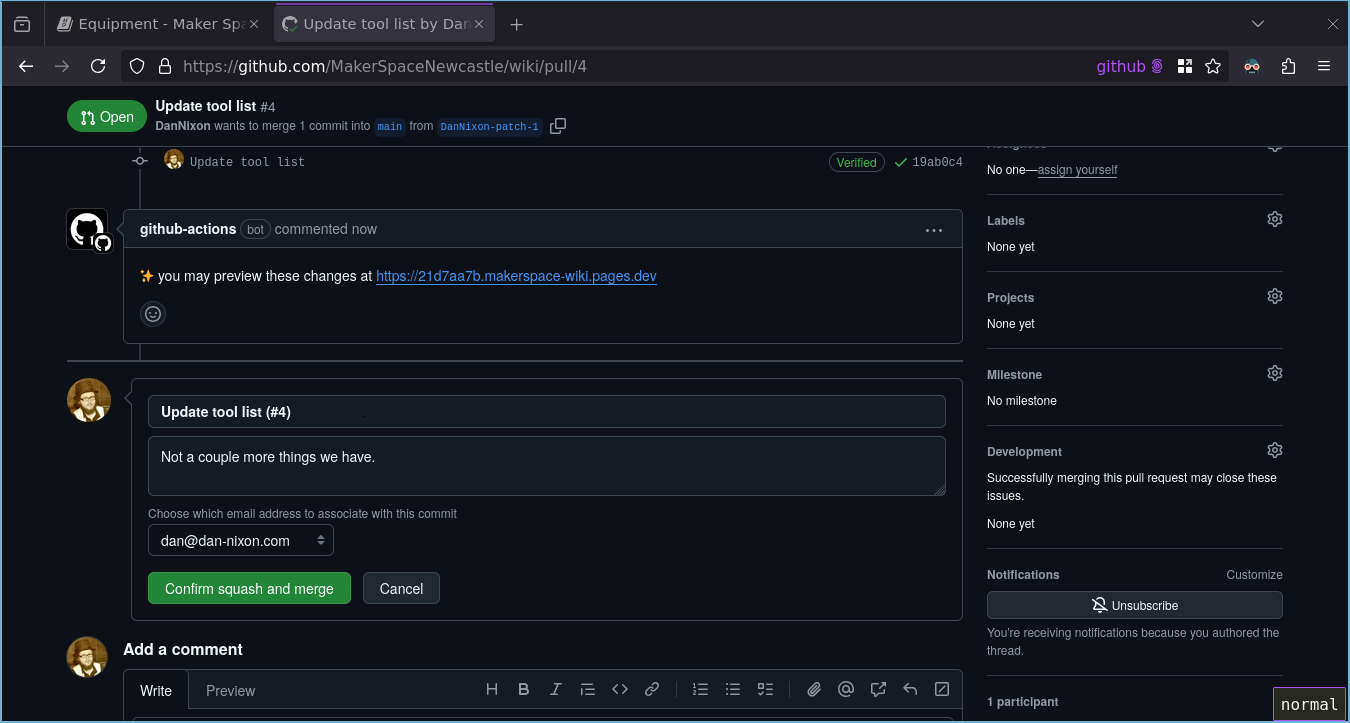
Otherwise you can now click the green "Squash and merge" button, followed by "Confirm squash and merge" to accept the proposed changes.
-
The pull request is closed, the live wiki will now update.